Note
Hello, welcome to the SunFounder Raspberry Pi & Arduino & ESP32 Enthusiasts Community on Facebook! Dive deeper into Raspberry Pi, Arduino, and ESP32 with fellow enthusiasts.
Why Join?
Expert Support: Solve post-sale issues and technical challenges with help from our community and team.
Learn & Share: Exchange tips and tutorials to enhance your skills.
Exclusive Previews: Get early access to new product announcements and sneak peeks.
Special Discounts: Enjoy exclusive discounts on our newest products.
Festive Promotions and Giveaways: Take part in giveaways and holiday promotions.
👉 Ready to explore and create with us? Click [here] and join today!
WeatherTime Screen
This sketch connects to a WiFi network, fetches weather data from OpenWeatherMap every minute, retrieves the current time from an NTP server, and displays the day, time, and weather information on an OLED screen.
Required Components
In this project, we need the following components.
It’s definitely convenient to buy a whole kit, here’s the link:
Name |
ITEMS IN THIS KIT |
LINK |
|---|---|---|
Elite Explorer Kit |
300+ |
You can also buy them separately from the links below.
COMPONENT INTRODUCTION |
PURCHASE LINK |
|---|---|
- |
|
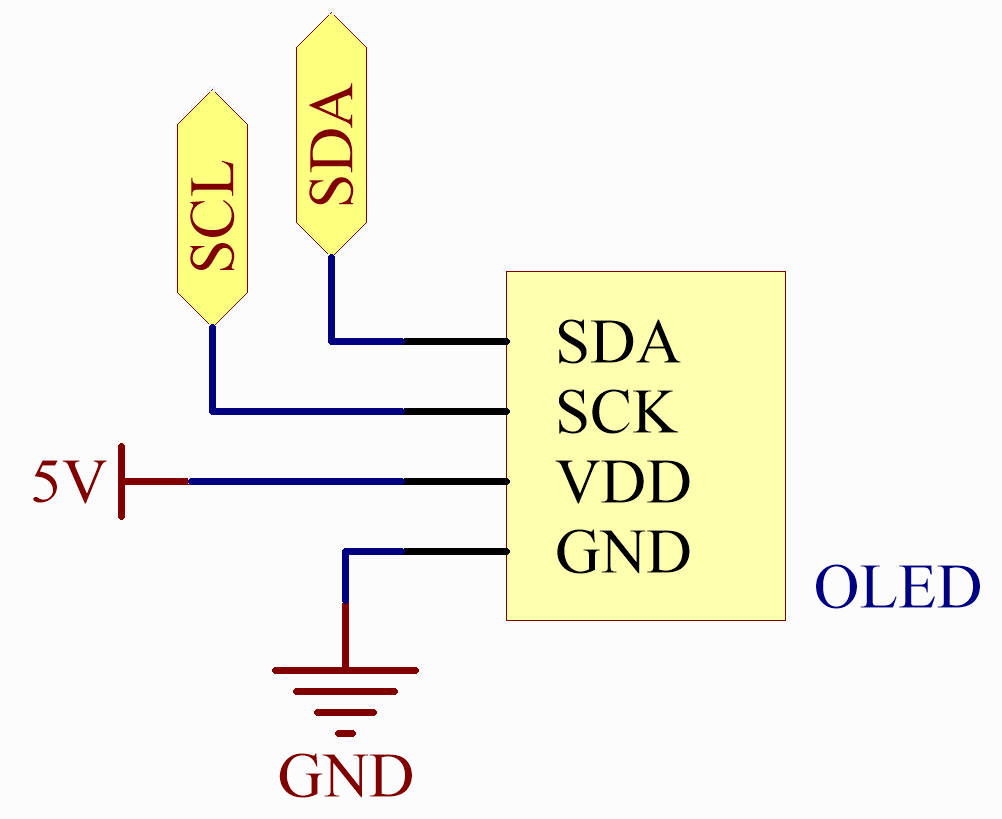
Wiring
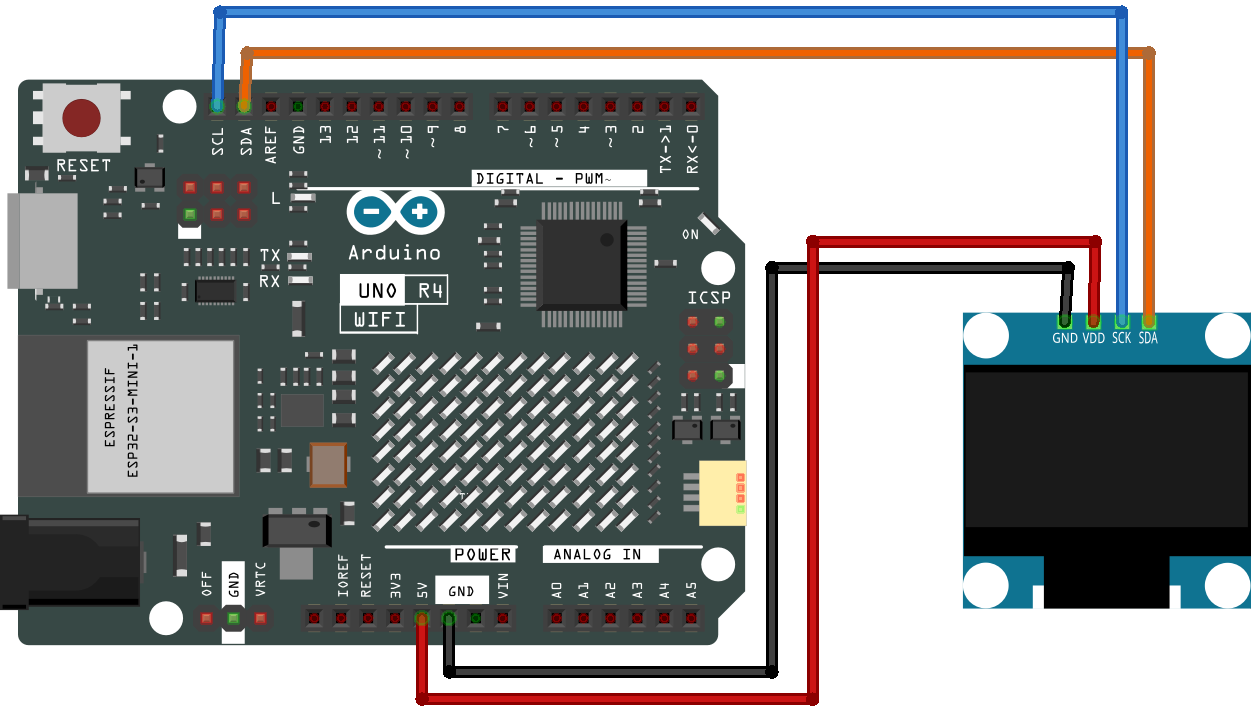
Schematic
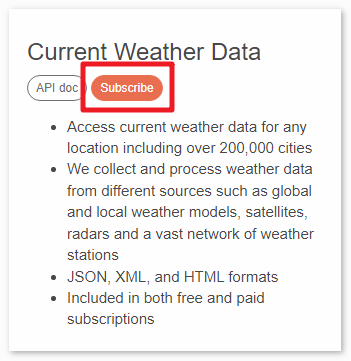
OpenWeather
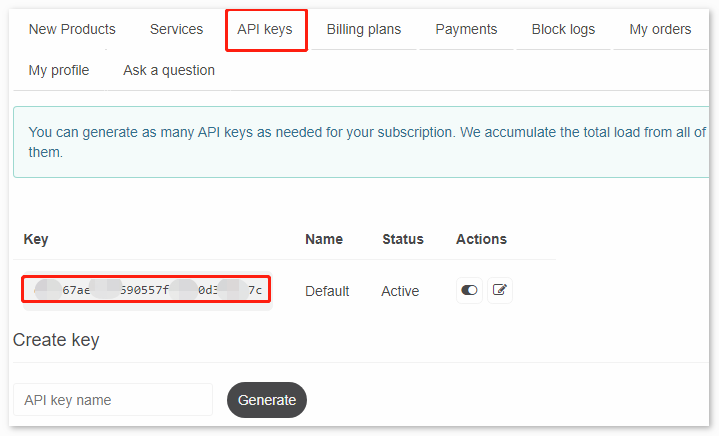
Get OpenWeather API keys
OpenWeather is an online service, owned by OpenWeather Ltd, that provides global weather data via API, including current weather data, forecasts, nowcasts and historical weather data for any geographical location.
Visit OpenWeather to log in/create an account.

Click into the API page from the navigation bar.

Find Current Weather Data and click Subscribe.
Under Current weather and forecasts collection, subscribe to the appropriate service. In our project, Free is good enough.
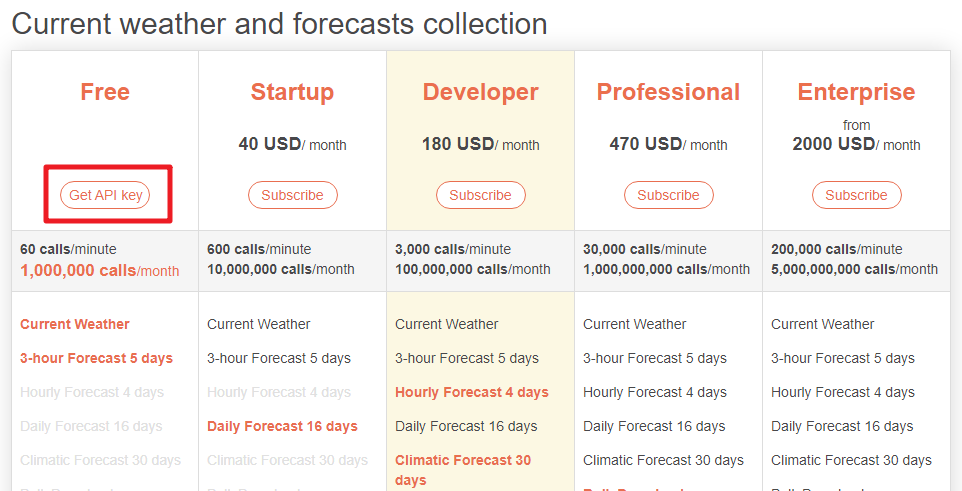
Copy the Key from the API keys page.
Copy it to the
arduino_secrets.h.#define SECRET_SSID "<SSID>" // your network SSID (name) #define SECRET_PASS "<PASSWORD>" // your network password #define API_KEY "<OpenWeather_API_KEY>" #define LOCATION "<YOUR CITY>"
Set the time zone of your location.
Take the capital of Sweden, Stockholm, as an example. Search “stockholm timezone” on Google.
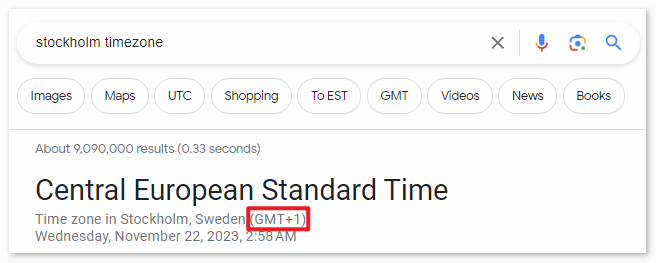
In the search results, you will see “GMT+1”, so you set the parameter of the function below to
3600 * 1seconds.timeClient.setTimeOffset(3600 * 1); // Adjust for your time zone (this is +1 hour)
Install the Library
To install the library, use the Arduino Library Manager and search for “ArduinoMqttClient”, “FastLED”, “Adafruit GFX” and “Adafruit SSD1306” and install them.
ArduinoJson.h: Used for handling JSON data (data obtained from openweathermap).
NTPClient.h: Used for obtaining real-time time.
Adafruit_GFX.h, Adafruit_SSD1306.h: Used for OLED module.
Run the Code
Note
You can open the file
06_weather_oled.inounder the path ofelite-explorer-kit-main\iot_project\06_weather_oleddirectly.Or copy this code into Arduino IDE.
Note
In the code, SSID and password are stored in arduino_secrets.h. Before uploading this example, you need to modify them with your own WiFi credentials.
#define SECRET_SSID "your_ssid"        // your network SSID (name)
#define SECRET_PASS "your_password"        // your network password (use for WPA, or use as key for WEP)
#define API_KEY "your_key"
#define LOCATION "your_location"
  1/*
  2  The code fetches and shows weather information such as temperature, humidity, pressure,
  3  and wind details. This information is obtained from the OpenWeatherMap API through a WiFi
  4  connection. The program initially connects to the WiFi network and retrieves the current
  5  time from an NTP server. It then regularly sends HTTP requests to retrieve weather data
  6  from the OpenWeatherMap API. Upon receiving a JSON response, it parses the data and displays
  7  both the weather information and current time on the OLED screen.
  8
  9  Board: Arduino Uno R4 WiFi
 10  Component: OLED
 11  Library: https://github.com/bblanchon/ArduinoJson (ArduinoJson by Benoit Blanchon)
 12           https://github.com/adafruit/Adafruit_SSD1306 (Adafruit SSD1306 by Adafruit)
 13           https://github.com/adafruit/Adafruit-GFX-Library (Adafruit GFX Library by Adafruit)
 14           https://github.com/arduino-libraries/NTPClient (NTPClient by Fabrice Weinberg)
 15
 16*/
 17
 18#include "WiFiS3.h"
 19#include <ArduinoJson.h>  // JSON decoding library
 20#include "arduino_secrets.h"
 21
 22// NTP client setup to get real-time data
 23#include <NTPClient.h>
 24#include <WiFiUdp.h>
 25WiFiUDP ntpUDP;
 26NTPClient timeClient(ntpUDP, "pool.ntp.org");  // NTP server
 27
 28// Declaration for an SSD1306 display connected to I2C (SDA, SCL pins)
 29#include <SPI.h>
 30#include <Wire.h>
 31#include <Adafruit_GFX.h>
 32#include <Adafruit_SSD1306.h>
 33#define SCREEN_WIDTH 128  // OLED display width, in pixels
 34#define SCREEN_HEIGHT 64  // OLED display height, in pixels
 35#define OLED_RESET 4      // Reset pin # (or -1 if sharing Arduino reset pin)
 36Adafruit_SSD1306 display(SCREEN_WIDTH, SCREEN_HEIGHT, &Wire, OLED_RESET);
 37
 38// WiFi credentials and server information
 39char ssid[] = SECRET_SSID;  // your network SSID (name)
 40char pass[] = SECRET_PASS;  // your network password
 41int status = WL_IDLE_STATUS;
 42char server[] = "api.openweathermap.org";  // name address for OWM (using DNS)
 43
 44// Timing variables to manage update intervals
 45unsigned long lastConnectionTime = 0;               // last time you connected to the server, in milliseconds
 46const unsigned long postingInterval = 60L * 1000L;  // delay between updates, in milliseconds
 47
 48// WiFi client for connecting to the API server
 49WiFiClient client;
 50
 51void setup() {
 52  //Initialize serial and wait for port to open:
 53  Serial.begin(9600);
 54  while (!Serial) {
 55    ;  // wait for serial port to connect. Needed for native USB port only
 56  }
 57
 58  // check for the WiFi module:
 59  if (WiFi.status() == WL_NO_MODULE) {
 60    Serial.println("Communication with WiFi module failed!");
 61    // don't continue
 62    while (true)
 63      ;
 64  }
 65
 66  String fv = WiFi.firmwareVersion();
 67  if (fv < WIFI_FIRMWARE_LATEST_VERSION) {
 68    Serial.println("Please upgrade the firmware");
 69  }
 70
 71  // attempt to connect to WiFi network:
 72  while (status != WL_CONNECTED) {
 73    Serial.print("Attempting to connect to SSID: ");
 74    Serial.println(ssid);
 75    status = WiFi.begin(ssid, pass);
 76    delay(5000);  // Wait 5 seconds before retrying
 77  }
 78
 79  printWifiStatus();
 80
 81  // Initialize and clear OLED display
 82  display.begin(SSD1306_SWITCHCAPVCC, 0x3C);
 83  display.display();
 84  display.clearDisplay();
 85
 86  // Initialize and clear OLED display
 87  timeClient.begin();
 88  timeClient.setTimeOffset(3600 * 8);  // Adjust for your time zone (this is +8 hour)
 89}
 90
 91void loop() {
 92
 93  read_response();
 94  timeClient.update();
 95
 96  // Check if it's time to send a new request
 97  if (!lastConnectionTime || millis() - lastConnectionTime > postingInterval) {
 98    httpRequest();
 99  }
100}
101
102
103void read_response() {
104  uint32_t received_data_num = 0;
105  String payload = "";
106  bool jsonDetected = false;
107
108  // Read data from the client connection
109  while (client.available()) {
110    /* actual data reception */
111    char c = client.read();
112
113    // for debug
114    Serial.print(c);
115
116    if ('{' == c) {
117      jsonDetected = true;
118    }
119    if (jsonDetected) {
120      payload += c;
121    }
122    received_data_num++;
123  }
124  if (jsonDetected) {
125    /* print data to serial port */
126    // Serial.print("data num : ");
127    // Serial.println(received_data_num);
128    // Serial.print("data : ");
129    // Serial.println(payload);
130    DynamicJsonDocument root(1024);
131    DeserializationError error = deserializeJson(root, payload);
132    if (error) {
133      Serial.print("Deserialization failed with code: ");
134      Serial.println(error.c_str());
135      return;
136    }
137
138    String weather = (root["weather"][0]["main"]);
139    float temp = (float)(root["main"]["temp"]) - 273.15;        // get temperature in °C
140    int humidity = root["main"]["humidity"];                    // get humidity in %
141    float pressure = (float)(root["main"]["pressure"]) / 1000;  // get pressure in bar
142    float wind_speed = root["wind"]["speed"];                   // get wind speed in m/s
143    int wind_degree = root["wind"]["deg"];                      // get wind degree in °
144
145    // // print data
146    // Serial.println("Temperature= " + String(temp) + " °C");
147    // Serial.println("Humidity = " + String(humidity) + " %");
148    // Serial.println("Pressure = " + String(pressure) + " bar");
149    // Serial.println("Wind speed = " + String(wind_speed) + " m/s");
150    // Serial.println("Wind degree = " + String(wind_degree) + " °");
151    displayWeatherData(weather, temp, humidity, pressure, wind_speed);
152  }
153}
154
155
156void httpRequest() {
157  // close any connection before send a new request.
158  client.stop();
159
160  // Construct HTTP GET request for OpenWeatherMap API
161  String httpRequest = "";
162  httpRequest += "GET /data/2.5/weather?q=" LOCATION "&APPID=" API_KEY " HTTP/1.1";
163
164  // if you get a connection, report back via serial:
165  if (client.connect(server, 80)) {
166    Serial.println("connected");
167    // Make a HTTP request:
168    client.println(httpRequest);
169    client.println("Host: api.openweathermap.org");
170    client.println("Connection: close");
171    client.println();
172    // note the time that the connection was made:
173    lastConnectionTime = millis();
174  } else {
175    // if you couldn't make a connection:
176    Serial.println("connection failed");
177  }
178}
179
180void printWifiStatus() {
181  // print the SSID of the network you're attached to:
182  Serial.print("SSID: ");
183  Serial.println(WiFi.SSID());
184
185  // print your board's IP address:
186  IPAddress ip = WiFi.localIP();
187  Serial.print("IP Address: ");
188  Serial.println(ip);
189
190  // print the received signal strength:
191  long rssi = WiFi.RSSI();
192  Serial.print("signal strength (RSSI):");
193  Serial.print(rssi);
194  Serial.println(" dBm");
195}
196
197void displayWeatherData(String weather, float temp, int humidity, float pressure, float wind_speed) {
198  display.clearDisplay();
199  display.setTextSize(1);               // Normal 1:1 pixel scale
200  display.setTextColor(SSD1306_WHITE);  // Draw white text
201  display.setCursor(0, 0);              // Start at top-left corner
202
203  // Display Day of the Week
204  String daysOfTheWeek[7] = { "Sunday", "Monday", "Tuesday", "Wednesday", "Thursday", "Friday", "Saturday" };
205  display.print(daysOfTheWeek[timeClient.getDay()]);
206
207  display.print(" ");
208  if (timeClient.getHours() < 10) display.print("0");  // Add leading zero for hours < 10
209  display.print(timeClient.getHours());
210  display.print(":");
211  if (timeClient.getMinutes() < 10) display.print("0");  // Add leading zero for minutes < 10
212  display.println(timeClient.getMinutes());
213
214  display.println();
215  display.print(LOCATION);
216  display.println(" " + weather);
217
218  // Display Weather
219  display.print("Temperature: ");
220  display.print(temp);
221  display.println(" C");
222
223  display.print("Humidity: ");
224  display.print(humidity);
225  display.println(" %");
226
227  display.print("Pressure: ");
228  display.print(pressure);
229  display.println(" bar");
230
231  display.print("Wind: ");
232  display.print(wind_speed);
233  display.println(" m/s");
234
235  display.display();
236}
How it works?
Libraries and Definitions:
WiFiS3.h: This is likely a library specific to a certain WiFi module or board to manage WiFi connections.ArduinoJson.h: This library is used for decoding (and encoding) JSON data.arduino_secrets.h: A separate file where sensitive data (like WiFi credentials) are stored. This is a good practice to keep credentials out of the main code.NTPClient & WiFiUdp: These are used for fetching the current time from an NTP (Network Time Protocol) server.
Adafruit libraries: Used for managing the OLED display.
Various global variables: These include WiFi credentials, server details, and more, which will be used throughout the script.
setup():It initializes the serial communication.
Checks and prints the WiFi module’s firmware version.
Tries to connect to the WiFi network using the provided SSID and password.
Prints the connected WiFi’s status (SSID, IP, Signal strength).
Initializes the OLED display.
Starts the NTP client to fetch the current time and sets a time offset (in this case, 8 hours which might correspond to a specific timezone).
read_response():Reads the response from the server, specifically looking for JSON data (denoted by
{and}).If JSON data is found, it decodes the data to extract weather details like temperature, humidity, pressure, wind speed, and wind direction.
Calls the
displayWeatherDatafunction to display the weather information on the OLED screen.
httpRequest():Closes any existing connections to ensure the WiFi module’s socket is free.
Tries to connect to the OpenWeatherMap server.
If connected, sends an HTTP GET request to fetch the weather data for a specific location defined by
LOCATION(likely defined inarduino_secrets.hor elsewhere).Records the time the request was made.
loop():Calls the
read_responsefunction to process any incoming data from the server.Updates the time from the NTP server.
Checks if it’s time to make another request to the weather server (based on the
postingInterval). If so, it calls thehttpRequestfunction.
printWifiStatus():The SSID of the connected network.
The local IP address of the board.
The signal strength (RSSI).
displayWeatherData():Clears the OLED screen.
Displays the current day of the week.
Displays the current time in HH:MM format.
Displays the provided weather data (temperature, humidity, pressure, and wind speed).