Note
Hello, welcome to the SunFounder Raspberry Pi & Arduino & ESP32 Enthusiasts Community on Facebook! Dive deeper into Raspberry Pi, Arduino, and ESP32 with fellow enthusiasts.
Why Join?
Expert Support: Solve post-sale issues and technical challenges with help from our community and team.
Learn & Share: Exchange tips and tutorials to enhance your skills.
Exclusive Previews: Get early access to new product announcements and sneak peeks.
Special Discounts: Enjoy exclusive discounts on our newest products.
Festive Promotions and Giveaways: Take part in giveaways and holiday promotions.
👉 Ready to explore and create with us? Click [here] and join today!
Cloud Calling System with MQTT
Message Queuing Telemetry Transport (MQTT) is a straightforward messaging protocol. It is also the most widely used messaging protocol in the realm of the Internet of Things (IoT).
MQTT protocols define how IoT devices exchange data. They operate in an event-driven manner and are interconnected using the Publish/Subscribe model. The sender (Publisher) and the receiver (Subscriber) communicate through Topics. A device publishes a message on a specific topic, and all devices subscribed to that topic receive the message.
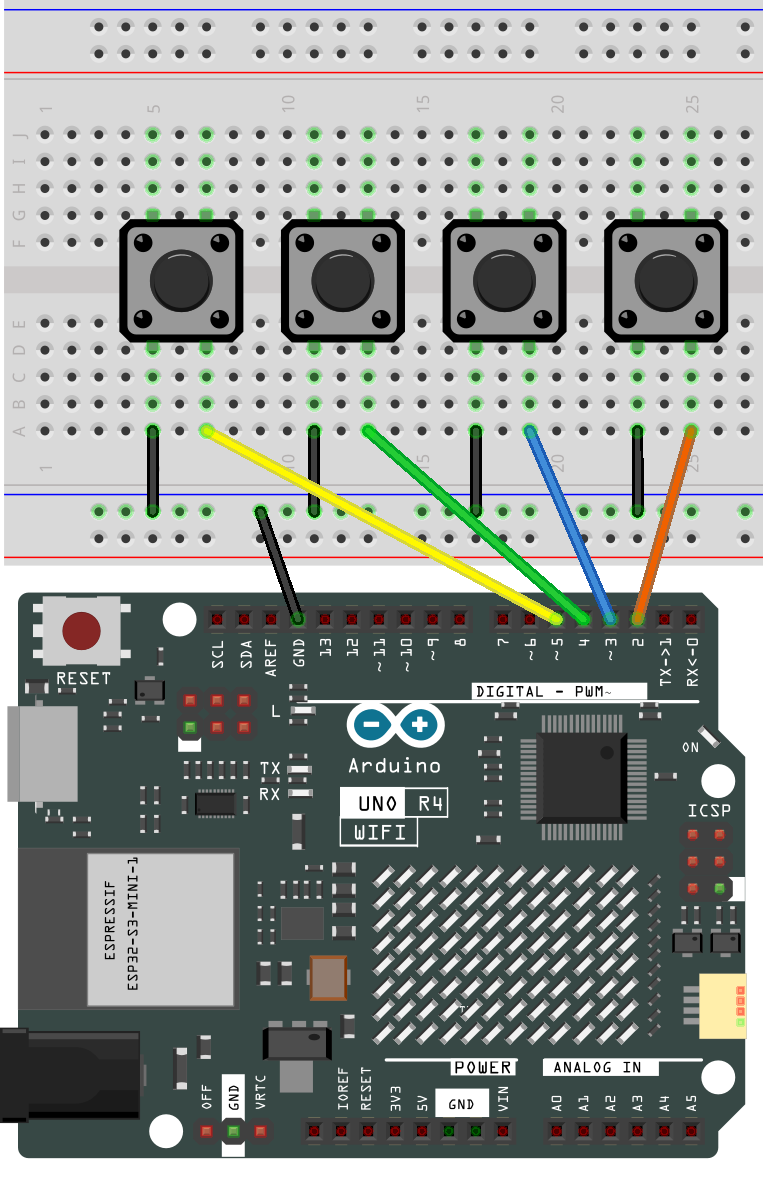
In this section, we’ll create a service bell system using UNO R4, HiveMQ (a free public MQTT broker service), and four buttons. Each of the four buttons corresponds to a restaurant table, and when a customer presses a button, you’ll be able to see which table needs service on HiveMQ.
Required Components
In this project, we need the following components.
It’s definitely convenient to buy a whole kit, here’s the link:
Name |
ITEMS IN THIS KIT |
LINK |
|---|---|---|
Elite Explorer Kit |
300+ |
You can also buy them separately from the links below.
COMPONENT INTRODUCTION |
PURCHASE LINK |
|---|---|
- |
|
Wiring
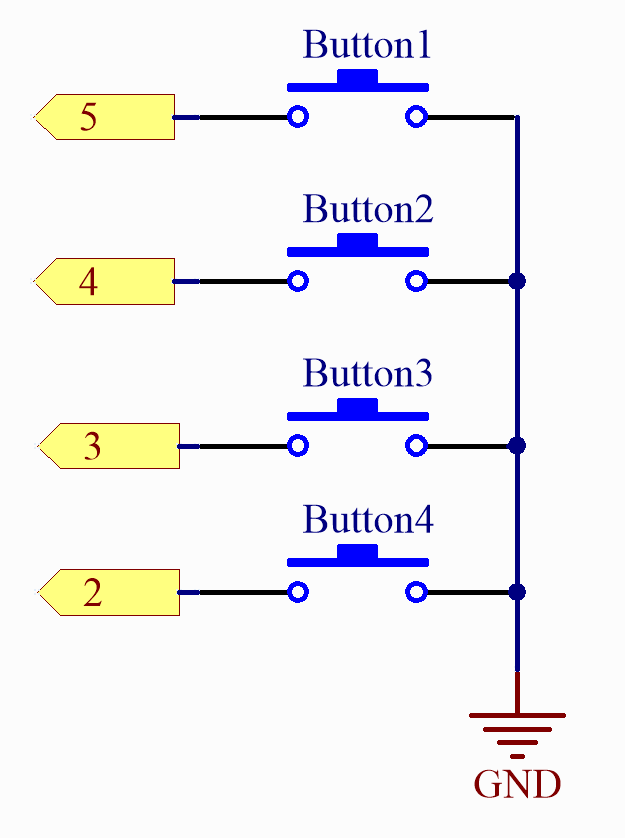
Schematic
How to play?
HiveMQ is an MQTT broker and client-based messaging platform that facilitates fast, efficient, and reliable data transfer to IoT devices.
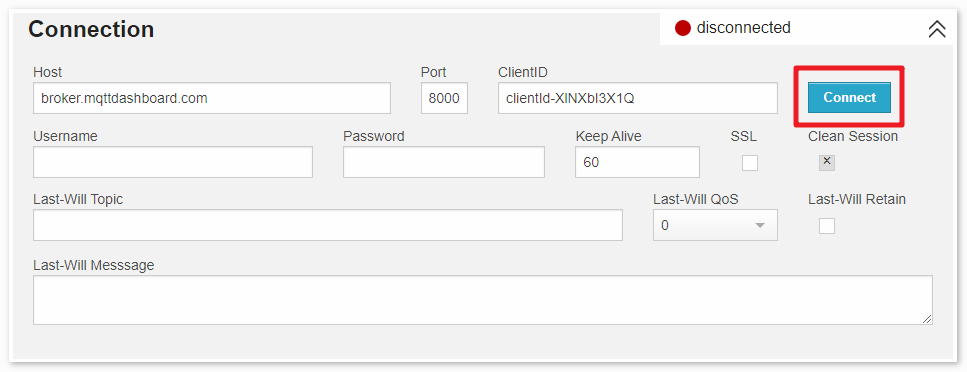
Open HiveMQ Web Client in your web browser.
Connect the client to the default public proxy.
Click on Add New Topic Subscription.
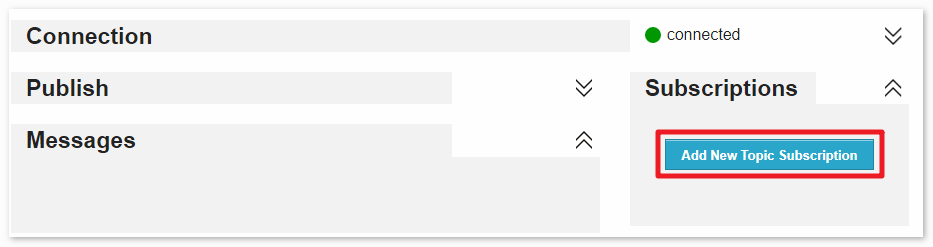
Enter the topics you wish to follow and click Subscribe. Make sure the topics you set here are unique to avoid receiving messages from other users, and pay attention to case sensitivity.
In this example code, we set the topic as
SunFounder MQTT Test. If you have made any changes, ensure that the topic in the code matches the subscribed topic on the webpage.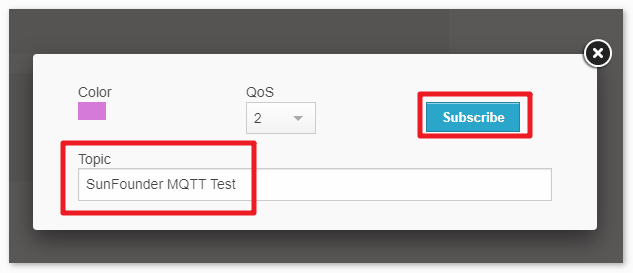
Install the Library
To install the library, use the Arduino Library Manager and search for “ArduinoMqttClient” and install it.
ArduinoMqttClient.h: Used for MQTT communication.
Run the Code
Note
You can open the file
04_mqtt_button.inounder the path ofelite-explorer-kit-main\iot_project\04_mqtt_buttondirectly.Or copy this code into Arduino IDE.
Note
In the code, SSID and password are stored in arduino_secrets.h. Before uploading this example, you need to modify them with your own WiFi credentials.
#define SECRET_SSID "your_ssid"        // your network SSID (name)
#define SECRET_PASS "your_password"        // your network password (use for WPA, or use as key for WEP)
  1/*
  2  The code is designed for an Arduino Uno R4 WiFi to establish a connection with
  3  both a Wi-Fi network and an MQTT broker. It constantly monitors the status of
  4  four buttons that are connected to digital inputs. Whenever a button is pressed,
  5  it sends a message to a specific MQTT topic. Additionally, the code incorporates
  6  functions for displaying Wi-Fi network information and managing received MQTT
  7  messages.
  8
  9  Board: Arduino Uno R4 WiFi
 10  Component: Button
 11  Library: https://github.com/arduino-libraries/ArduinoMqttClient (ArduinoMqttClient by Arduino)
 12*/
 13
 14#include <WiFiS3.h>
 15#include <ArduinoMqttClient.h>
 16
 17#include "arduino_secrets.h"
 18///////please enter your sensitive data in the Secret tab/arduino_secrets.h
 19char ssid[] = SECRET_SSID;    // your network SSID (name)
 20char pass[] = SECRET_PASS;    // your network password (use for WPA, or use as key for WEP)
 21int status = WL_IDLE_STATUS;  // the WiFi radio's status
 22
 23WiFiClient wifiClient;
 24MqttClient mqttClient(wifiClient);
 25
 26const char broker[] = "broker.hivemq.com";
 27int port = 1883;
 28const char topic[] = "SunFounder MQTT Test";
 29
 30//init buttons & states
 31const int buttonPins[4] = { 2, 3, 4, 5 };
 32bool previousButtonStates[4] = { false, false, false, false };
 33
 34void setup() {
 35  //Initialize serial and wait for port to open:
 36  Serial.begin(9600);
 37
 38  while (!Serial) {
 39    ;  // wait for serial port to connect. Needed for native USB port only
 40  }
 41
 42  // check for the WiFi module:
 43  if (WiFi.status() == WL_NO_MODULE) {
 44    Serial.println("Communication with WiFi module failed!");
 45    // don't continue
 46    while (true)
 47      ;
 48  }
 49
 50  String fv = WiFi.firmwareVersion();
 51  if (fv < WIFI_FIRMWARE_LATEST_VERSION) {
 52    Serial.println("Please upgrade the firmware");
 53  }
 54
 55  // attempt to connect to WiFi network:
 56  while (status != WL_CONNECTED) {
 57    Serial.print("Attempting to connect to WPA SSID: ");
 58    Serial.println(ssid);
 59    // Connect to WPA/WPA2 network. Change this line if using open or WEP network:
 60    status = WiFi.begin(ssid, pass);
 61
 62    // wait 5 seconds for connection:
 63    delay(5000);
 64  }
 65
 66  // you're connected now, so print out the data:
 67  Serial.print("You're connected to the network");
 68  printCurrentNet();
 69  printWifiData();
 70
 71  // You can provide a unique client ID, if not set the library uses Arduino-millis()
 72  // Each client must have a unique client ID
 73  // mqttClient.setId("clientId");
 74
 75  // You can provide a username and password for authentication
 76  // mqttClient.setUsernamePassword("username", "password");
 77
 78  Serial.print("Attempting to connect to the MQTT broker: ");
 79  Serial.println(broker);
 80
 81  if (!mqttClient.connect(broker, port)) {
 82    Serial.print("MQTT connection failed! Error code = ");
 83    Serial.println(mqttClient.connectError());
 84
 85    while (1)
 86      ;
 87  }
 88
 89  Serial.println("You're connected to the MQTT broker!");
 90  Serial.println();
 91
 92  // set the message receive callback
 93  mqttClient.onMessage(onMqttMessage);
 94
 95  Serial.print("Subscribing to topic: ");
 96  Serial.println(topic);
 97  Serial.println();
 98
 99  // subscribe to a topic
100  mqttClient.subscribe(topic);
101
102  // topics can be unsubscribed using:
103  // mqttClient.unsubscribe(topic);
104
105  Serial.print("Waiting for messages on topic: ");
106  Serial.println(topic);
107  Serial.println();
108
109  // set button pins as INPUT_PULLUP
110  for (int i = 0; i < 4; i++) {
111    pinMode(buttonPins[i], INPUT_PULLUP);
112    previousButtonStates[i] = digitalRead(buttonPins[i]);
113  }
114}
115
116void loop() {
117
118  // call poll() regularly to allow the library to receive MQTT messages and
119  // send MQTT keep alives which avoids being disconnected by the broker
120  mqttClient.poll();
121
122  // Check button status
123  for (int i = 0; i < 4; i++) {
124    bool currentButtonState = digitalRead(buttonPins[i]);
125
126    // If the button is pressed and its previous state was not pressed.
127    if (!currentButtonState && previousButtonStates[i]) {
128      sendButtonMessage(i + 1);  // The message that the send button has been pressed.
129    }
130
131    previousButtonStates[i] = currentButtonState;  // Update button status
132  }
133
134  // Add a delay to avoid constant pinging
135  delay(50);
136}
137
138void printWifiData() {
139  // print your board's IP address:
140  IPAddress ip = WiFi.localIP();
141  Serial.print("IP Address: ");
142
143  Serial.println(ip);
144
145  // print your MAC address:
146  byte mac[6];
147  WiFi.macAddress(mac);
148  Serial.print("MAC address: ");
149  printMacAddress(mac);
150}
151
152void printCurrentNet() {
153  // print the SSID of the network you're attached to:
154  Serial.print("SSID: ");
155  Serial.println(WiFi.SSID());
156
157  // print the MAC address of the router you're attached to:
158  byte bssid[6];
159  WiFi.BSSID(bssid);
160  Serial.print("BSSID: ");
161  printMacAddress(bssid);
162
163  // print the received signal strength:
164  long rssi = WiFi.RSSI();
165  Serial.print("signal strength (RSSI):");
166  Serial.println(rssi);
167
168  // print the encryption type:
169  byte encryption = WiFi.encryptionType();
170  Serial.print("Encryption Type:");
171  Serial.println(encryption, HEX);
172  Serial.println();
173}
174
175void printMacAddress(byte mac[]) {
176  for (int i = 5; i >= 0; i--) {
177    if (mac[i] < 16) {
178      Serial.print("0");
179    }
180    Serial.print(mac[i], HEX);
181    if (i > 0) {
182      Serial.print(":");
183    }
184  }
185  Serial.println();
186}
187
188
189void onMqttMessage(int messageSize) {
190  // we received a message, print out the topic and contents
191  Serial.print("Received a message with topic '");
192  Serial.print(mqttClient.messageTopic());
193  Serial.println("'");
194  Serial.print("Message length: ");
195  Serial.print(messageSize);
196  Serial.println(" bytes:");
197
198  // Read the message contents into a String
199  String message = mqttClient.readString();
200
201  // Convert the received message and comparison strings to lowercase
202  message.toLowerCase();
203
204  Serial.print("Message to me: ");
205  Serial.println(message);
206
207  Serial.println();
208}
209
210void sendButtonMessage(int buttonNumber) {
211  String message = "Button " + String(buttonNumber) + " was pressed.";
212
213  Serial.println(message);
214
215  mqttClient.beginMessage(topic);
216  mqttClient.print(message);
217  mqttClient.endMessage();
218}
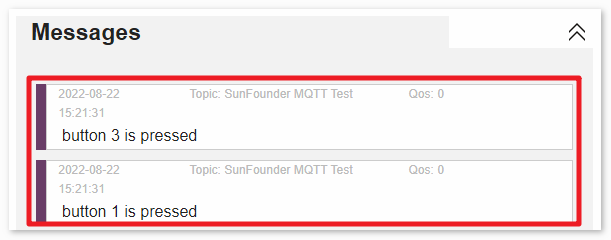
After running the code, go back to HiveMQ Web Client, and when you press one of the buttons on the breadboard, you will see the Messages prompt on HiveMQ.
How it works?
This code is for an Arduino-based project that connects to Wi-Fi and communicates with an MQTT broker using the MQTT protocol. Additionally, it can detect whether four buttons are pressed and send the corresponding messages to the MQTT broker.
Here is a detailed explanation of the code:
Include Relevant Libraries:
#include <WiFiS3.h>
#include <ArduinoMqttClient.h>
Include Sensitive Information:
The
arduino_secrets.hfile contains the SSID and password for the Wi-Fi network.
#include "arduino_secrets.h"
char ssid[] = SECRET_SSID;
char pass[] = SECRET_PASS;
Initialize Variables:
Variables for managing Wi-Fi and MQTT connections.
Initialize button pins and button states.
setup():Initialize serial communication.
Check for the presence of the Wi-Fi module and attempt to connect to Wi-Fi.
Print network data.
Attempt to connect to the MQTT broker.
Subscribe to MQTT topics.
Set buttons to input mode.
loop():Keep the MQTT connection active.
Check if each button is pressed, and if so, send MQTT messages.
Other Utility Functions:
printWifiData(): Prints information about the currently connected Wi-Fi network.printCurrentNet(): Prints relevant data about the current network.printMacAddress(byte mac[]): Prints the MAC address.onMqttMessage(int messageSize): Callback function triggered when a message is received from the MQTT broker. It prints the received message topic and content.sendButtonMessage(int buttonNumber): Use this function to send MQTT messages when a button is pressed.