Nota
¡Hola! Bienvenido a la Comunidad de Entusiastas de SunFounder Raspberry Pi, Arduino y ESP32 en Facebook. Sumérgete más en Raspberry Pi, Arduino y ESP32 con otros entusiastas.
¿Por qué unirse?
Soporte experto: Resuelve problemas postventa y desafíos técnicos con la ayuda de nuestra comunidad y equipo.
Aprende y comparte: Intercambia consejos y tutoriales para mejorar tus habilidades.
Avances exclusivos: Obtén acceso anticipado a nuevos anuncios de productos y adelantos.
Descuentos especiales: Disfruta de descuentos exclusivos en nuestros productos más nuevos.
Promociones festivas y sorteos: Participa en sorteos y promociones festivas.
👉 ¿Listo para explorar y crear con nosotros? Haz clic en [Aquí] y únete hoy mismo!
1.2.2 Zumbador Pasivo
Introducción
En este proyecto, aprenderemos cómo hacer que un zumbador pasivo reproduzca música.
Componentes Necesarios
En este proyecto, necesitamos los siguientes componentes.
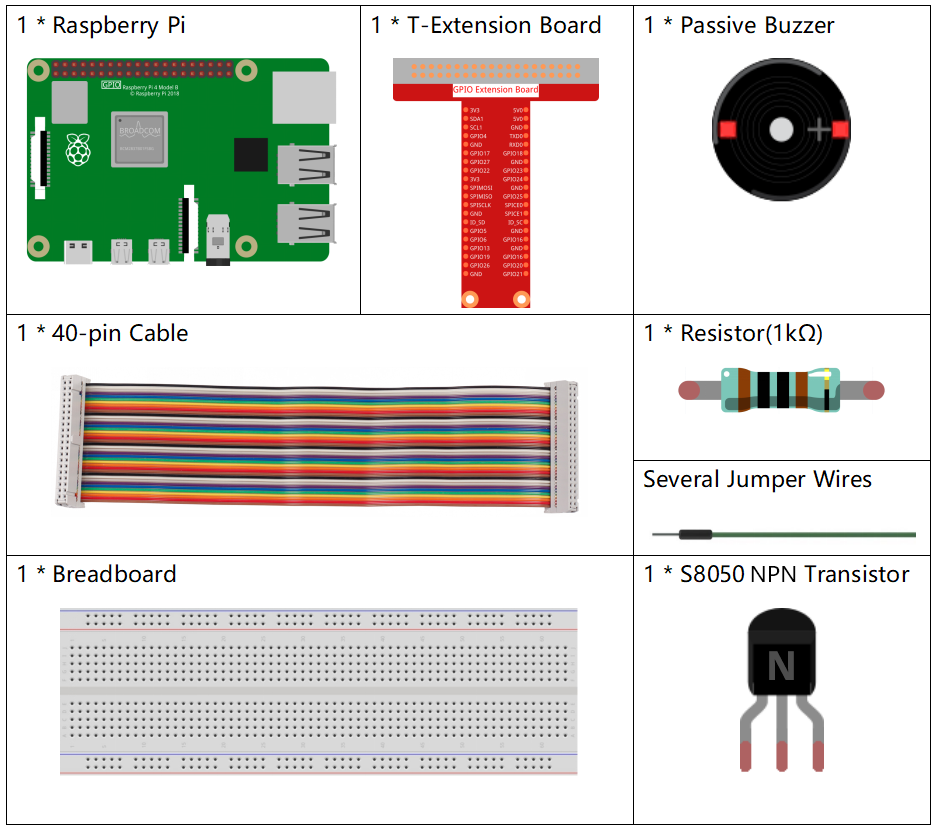
Es definitivamente conveniente comprar un kit completo, aquí está el enlace:
Nombre |
ARTÍCULOS EN ESTE KIT |
ENLACE |
|---|---|---|
Kit Raphael |
337 |
También puedes comprarlos por separado en los siguientes enlaces.
INTRODUCCIÓN DEL COMPONENTE |
ENLACE DE COMPRA |
|---|---|
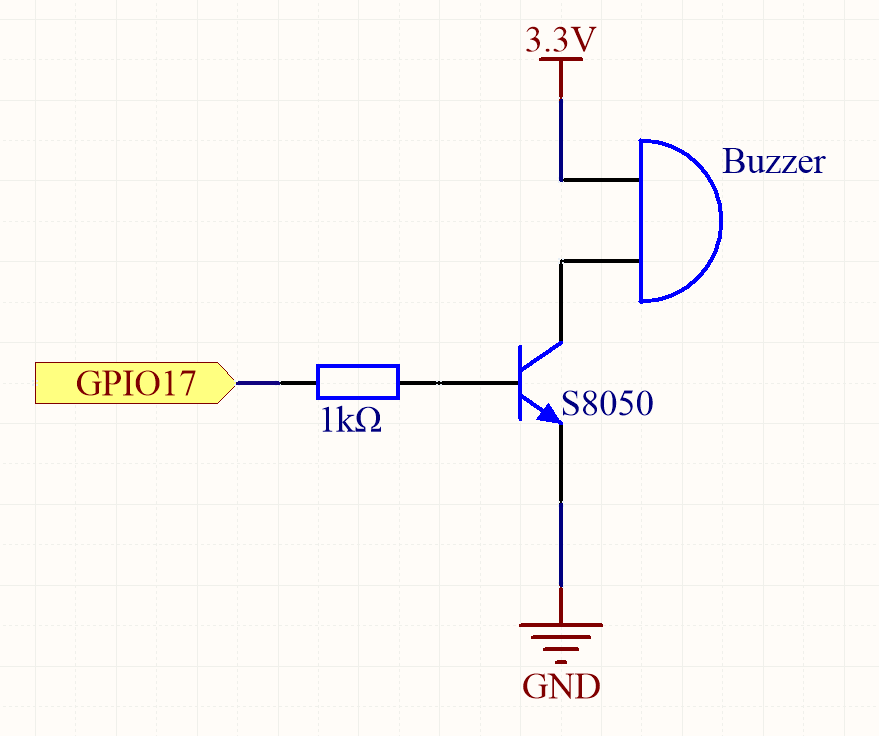
Diagrama Esquemático
En este experimento, se utiliza un zumbador pasivo, un transistor NPN y una resistencia de 1k entre la base del transistor y el GPIO para proteger el transistor.
Cuando GPIO17 recibe diferentes frecuencias, el zumbador pasivo emitirá diferentes sonidos; de esta manera, el zumbador reproduce música.
Nombre del T-Board |
físico |
wiringPi |
BCM |
GPIO17 Pin 11 |
0 |
17 |
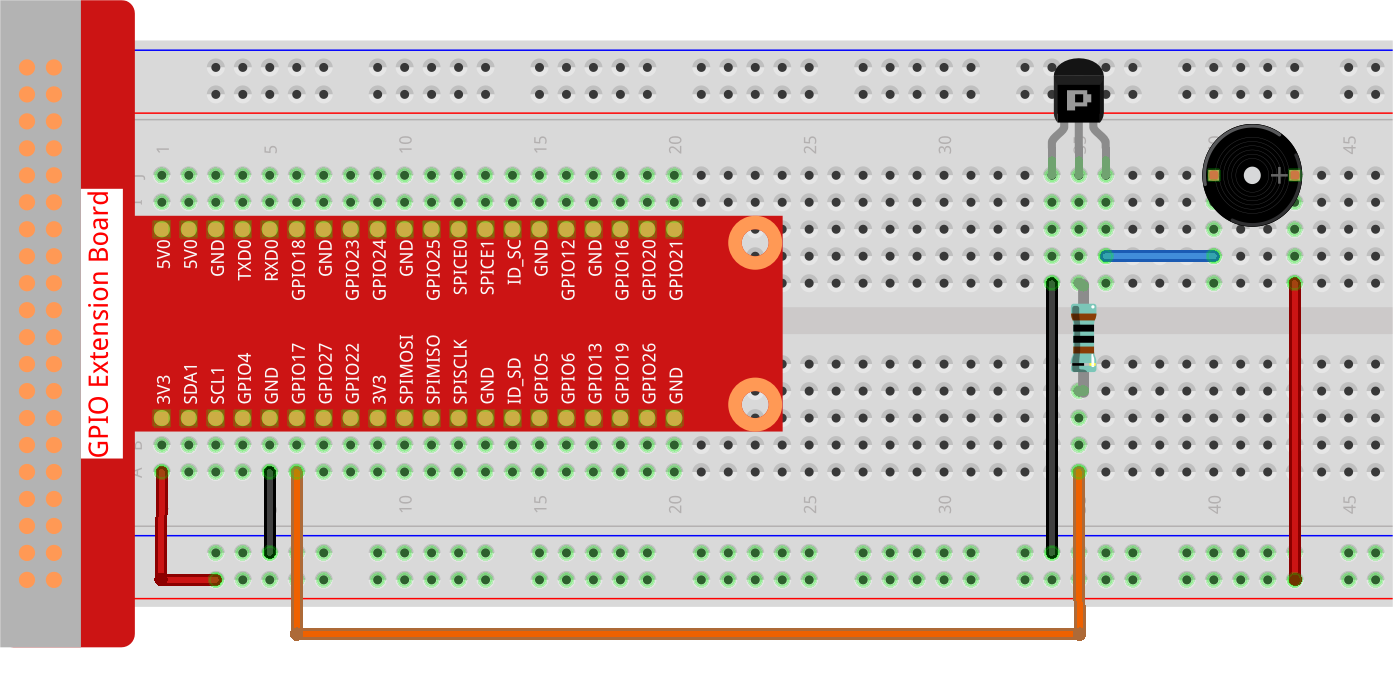
Procedimientos Experimentales
Paso 1: Construir el circuito. (El zumbador pasivo con placa de circuito verde en la parte posterior.)
Paso 2: Cambiar directorio.
cd ~/raphael-kit/python-pi5
Paso 3: Ejecutar.
sudo python3 1.2.2_PassiveBuzzer_zero.py
Al ejecutar el código, el zumbador reproducirá una pieza de música.
Advertencia
Si recibe el mensaje de error RuntimeError: Cannot determine SOC peripheral base address, consulte Si «gpiozero» no funciona.
Código
Nota
Puedes Modificar/Restablecer/Copiar/Ejecutar/Detener el código a continuación. Pero antes de eso, debes ir a la ruta del código fuente como raphael-kit/python-pi5. Después de modificar el código, puedes ejecutarlo directamente para ver el efecto.
#!/usr/bin/env python3
from gpiozero import TonalBuzzer
from time import sleep

# Initialize a TonalBuzzer connected to GPIO pin 17
tb = TonalBuzzer(17)  # Update this pin number based on your setup

def play(tune):
    """
    Play a musical tune using the buzzer.
    :param tune: List of tuples (note, duration), where each tuple represents a note and its duration.
    """
    for note, duration in tune:
        print(note)  # Output the current note being played
        tb.play(note)  # Play the note on the buzzer
        sleep(float(duration))  # Delay for the duration of the note
    tb.stop()  # Stop playing after the tune is complete

# Define a musical tune as a sequence of notes and durations
tune = [('C#4', 0.2), ('D4', 0.2), (None, 0.2),
    ('Eb4', 0.2), ('E4', 0.2), (None, 0.6),
    ('F#4', 0.2), ('G4', 0.2), (None, 0.6),
    ('Eb4', 0.2), ('E4', 0.2), (None, 0.2),
    ('F#4', 0.2), ('G4', 0.2), (None, 0.2),
    ('C4', 0.2), ('B4', 0.2), (None, 0.2),
    ('F#4', 0.2), ('G4', 0.2), (None, 0.2),
    ('B4', 0.2), ('Bb4', 0.5), (None, 0.6),
    ('A4', 0.2), ('G4', 0.2), ('E4', 0.2),
    ('D4', 0.2), ('E4', 0.2)]

try:
    play(tune)  # Execute the play function to start playing the tune

except KeyboardInterrupt:
    # Handle KeyboardInterrupt for graceful termination
    pass
Explicación del Código
Estas líneas importan la clase
TonalBuzzerde la bibliotecagpiozeropara controlar el zumbador y la funciónsleepdel módulotimepara crear retardos.#!/usr/bin/env python3 from gpiozero import TonalBuzzer from time import sleep
Esta línea inicializa un objeto
TonalBuzzeren el pin GPIO 17.# Initialize a TonalBuzzer connected to GPIO pin 17 tb = TonalBuzzer(17) # Update this pin number based on your setup
La función
playitera sobre una lista de tuplas que representan notas musicales y sus duraciones. Cada nota se reproduce durante su duración especificada, y el zumbador se detiene después de completar la melodía.def play(tune): """ Play a musical tune using the buzzer. :param tune: List of tuples (note, duration), where each tuple represents a note and its duration. """ for note, duration in tune: print(note) # Output the current note being played tb.play(note) # Play the note on the buzzer sleep(float(duration)) # Delay for the duration of the note tb.stop() # Stop playing after the tune is complete
La melodía se define como una secuencia de notas (frecuencia) y duraciones (segundos).
# Define a musical tune as a sequence of notes and durations
tune = [('C#4', 0.2), ('D4', 0.2), (None, 0.2),
    ('Eb4', 0.2), ('E4', 0.2), (None, 0.6),
    ('F#4', 0.2), ('G4', 0.2), (None, 0.6),
    ('Eb4', 0.2), ('E4', 0.2), (None, 0.2),
    ('F#4', 0.2), ('G4', 0.2), (None, 0.2),
    ('C4', 0.2), ('B4', 0.2), (None, 0.2),
    ('F#4', 0.2), ('G4', 0.2), (None, 0.2),
    ('B4', 0.2), ('Bb4', 0.5), (None, 0.6),
    ('A4', 0.2), ('G4', 0.2), ('E4', 0.2),
    ('D4', 0.2), ('E4', 0.2)]
La función
play(tune)se llama dentro de un bloquetry. UnaKeyboardInterrupt(como Ctrl+C) detendrá el programa de manera ordenada.try: play(tune) # Execute the play function to start playing the tune except KeyboardInterrupt: # Handle KeyboardInterrupt for graceful termination pass