Pan-Tilt 摄像头模块
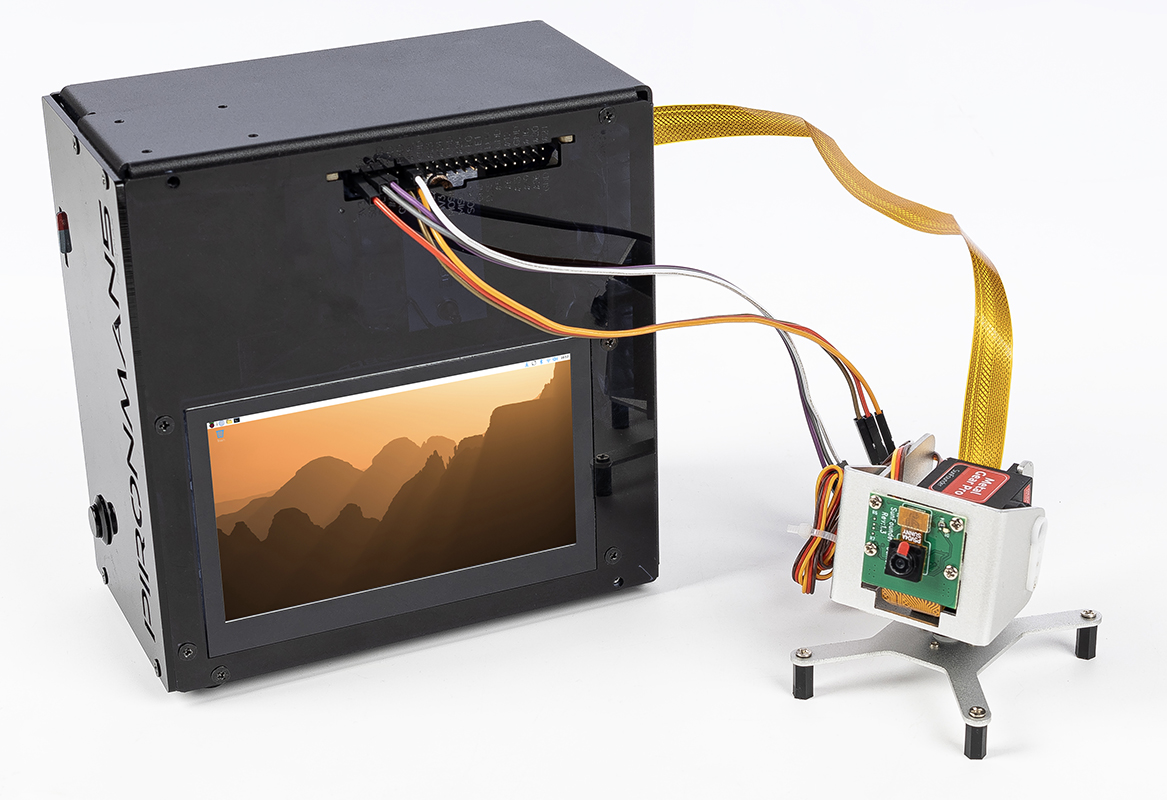
在本章节中,你将学习如何使用两个 SG90 舵机,通过 GPIO 引脚控制一个云台(Pan-Tilt)摄像头模块。完成本节后,你将拥有一个已经安装并可正常工作的 Pan-Tilt 模块,可用于你的项目中。
硬件连接
在开始之前,请确保 Raspberry Pi 已经关闭电源。
连接示意:
Device |
GPIO Pin |
Physical Pin |
|---|---|---|
Pan Servo (Orange) |
GPIO17 |
Pin 11 |
Tilt Servo (Orange) |
GPIO18 |
Pin 12 |
VCC (Red) |
5V |
Pin 2 or 4 |
GND (Brown) |
GND |
Pin 6, 9, 14, 20, 25, 30, 34, 39 |
Camera Module |
CSI Interface |
Connect to camera port |
警告
虽然 SG90 舵机在测试时可以直接从 Raspberry Pi 的 5V 引脚供电,但长时间使用或两个舵机同时运动可能会导致电压下降,从而引起系统不稳定。 在长期项目中,建议使用 外部 5V 电源 (并确保与 Raspberry Pi 共地)。
连接步骤:
连接舵机:
将 Pan 舵机的橙色信号线连接到 GPIO17(物理引脚 11)
将 Tilt 舵机的橙色信号线连接到 GPIO18(物理引脚 12)
将两个舵机的红色 VCC 线连接到 5V 引脚(物理引脚 2 或 4)
将两个舵机的棕色 GND 线连接到任意 GND 引脚(例如物理引脚 6)
连接摄像头:
轻轻掀起 CSI 摄像头接口的塑料卡扣
插入摄像头排线,使金属触点 朝向远离以太网接口的一侧
将塑料卡扣压回去以固定排线
测试舵机
在运行完整的 Pan-Tilt 示例之前,我们先分别测试每个舵机,确保它们工作正常。
1. 启用 GPIO 和 I2C(如果需要):
sudo raspi-config
# Navigate to: Interface Options -> I2C -> Enable
# Reboot after enabling
2. 简单的舵机测试脚本:
创建测试文件 servo_test.py:
#!/usr/bin/env python3
# servo_test.py - Simple servo test

from gpiozero import Servo
import time

# Test Pan servo on GPIO17
pan = Servo(17, min_pulse_width=0.5/1000, max_pulse_width=2.5/1000)

print("Testing Pan servo (GPIO17)...")
print("Moving to 0° position...")
pan.value = -1  # 0°
time.sleep(2)

print("Moving to 90° position...")
pan.value = 0   # 90°
time.sleep(2)

print("Moving to 180° position...")
pan.value = 1   # 180°
time.sleep(2)

pan.close()
print("Pan servo test complete")
3. 运行测试:
python3 servo_test.py
如果舵机能够平滑地在各个角度之间移动,则说明工作正常。 然后将引脚改为 18,再测试 Tilt 舵机。
测试摄像头
1. 启用摄像头接口:
sudo raspi-config
# Navigate to: Interface Options -> Camera -> Enable
# Or for newer systems: Interface Options -> Legacy Camera -> Enable
sudo reboot
2. 测试摄像头拍摄:
对于 Raspberry Pi OS Bullseye 及更新版本(使用 libcamera):
# Take a test photo
libcamera-jpeg -o test.jpg -t 2000 --width 640 --height 480

# Preview camera feed
libcamera-hello -t 0
对于较旧系统(使用 raspistill):
# Take a test photo
raspistill -o test.jpg -t 2000 -w 640 -h 480

# Preview camera feed
raspivid -t 0
3. 验证照片:
ls -l test.jpg
# Open the image (if you have a GUI)
xdg-open test.jpg
Pan-Tilt 示例
现在我们将舵机控制与摄像头功能结合,创建一个完整的云台控制程序。 该示例支持使用 WSAD 键控制方向,并通过 T 键拍照。
1. 创建控制脚本:
nano ptz_wsad_simple.py
复制以下代码:
#!/usr/bin/env python3
# -*- coding: utf-8 -*-
# ptz_wsad_simple.py - Control PTZ with WSAD keys, ultra simple version

from gpiozero import Servo
import os
from datetime import datetime

# Initialize servos
# SG90 parameters: min pulse width 0.5ms (0°), max pulse width 2.5ms (180°)
pan = Servo(17, min_pulse_width=0.5/1000, max_pulse_width=2.5/1000)
tilt = Servo(18, min_pulse_width=0.5/1000, max_pulse_width=2.5/1000)

# Initial position (center)
pan.value = 0
tilt.value = 0

print("\n=== SG90 PTZ Control ===")
print("W: Up")
print("S: Down")
print("A: Left")
print("D: Right")
print("T: Take photo")
print("C: Center")
print("Q: Quit")
print("-" * 30)

def take_photo():
    """Take photo function"""
    # Create photo directory if it doesn't exist
    photo_dir = "/home/pi/Pictures/ptz"
    os.makedirs(photo_dir, exist_ok=True)

    # Generate filename with timestamp
    timestamp = datetime.now().strftime("%Y%m%d_%H%M%S")
    filename = f"{photo_dir}/ptz_{timestamp}.jpg"

    # Take photo using libcamera (for Raspberry Pi Bullseye and above)
    # Alternative for older systems: use raspistill
    os.system(f"libcamera-jpeg -o {filename} -t 1 --width 640 --height 480")

    # Alternative command for older systems:
    # os.system(f"raspistill -o {filename} -t 1 -w 640 -h 480")

    print(f"Photo saved: {filename}")

try:
    while True:
        # Get user input
        cmd = input("Enter command: ").lower().strip()

        if cmd == 'w':
            # Move up (increase tilt angle)
            tilt.value = min(1.0, tilt.value + 0.2)
            print(f"↑ Up ({tilt.value:.1f})")

        elif cmd == 's':
            # Move down (decrease tilt angle)
            tilt.value = max(-1.0, tilt.value - 0.2)
            print(f"↓ Down ({tilt.value:.1f})")

        elif cmd == 'a':
            # Move left (decrease pan angle)
            pan.value = max(-1.0, pan.value - 0.2)
            print(f"← Left ({pan.value:.1f})")

        elif cmd == 'd':
            # Move right (increase pan angle)
            pan.value = min(1.0, pan.value + 0.2)
            print(f"→ Right ({pan.value:.1f})")

        elif cmd == 't':
            # Take photo
            take_photo()

        elif cmd == 'c':
            # Center the PTZ
            pan.value = 0
            tilt.value = 0
            print("PTZ centered")

        elif cmd == 'q':
            # Quit program
            print("Exiting program")
            break

        else:
            print("Invalid command, please use W/S/A/D/T/C/Q")

except KeyboardInterrupt:
    print("\nProgram interrupted by user")

finally:
    # Clean up GPIO resources
    pan.close()
    tilt.close()
    print("GPIO cleaned up")
2. 赋予脚本可执行权限:
chmod +x ptz_wsad_simple.py
3. 运行 Pan-Tilt 控制程序:
python3 ptz_wsad_simple.py
4. 控制摄像头:
按 W/S 控制俯仰向上/向下
按 A/D 控制水平向左/向右
按 T 拍照(照片将保存到
/home/pi/Pictures/ptz/)按 C 将摄像头恢复到居中位置
按 Q 退出程序
摄像头拍摄:
该脚本使用 libcamera-jpeg (适用于较新的 Raspberry Pi OS 版本)进行拍照。
照片会自动按时间戳命名保存,以避免被覆盖。