人脸检测
这个项目也是基于 计算机视觉 项目,增加了人脸检测算法。
运行代码
备注
这个项目需要访问树莓派的桌面来查看相机模块拍摄的画面。
你可以将屏幕连接到PiCar-X上,或者参考教程 远程桌面,用VNC或XRDP访问它。
一旦进入树莓派的桌面,打开Terminal并输入以下命令来运行它,或者直接用Python编辑器打开并运行它。
cd /home/pi/picar-x/example
sudo python3 human_face_detect.py
代码运行后,检测到的人脸将在屏幕中框选出。
代码
import cv2
from picamera.array import PiRGBArray
from picamera import PiCamera
import time


def human_face_detect(img):
    resize_img = cv2.resize(img, (320,240), interpolation=cv2.INTER_LINEAR)         # In order to reduce the amount of calculation, resize the image to 320 x 240 size
    gray = cv2.cvtColor(resize_img, cv2.COLOR_BGR2GRAY)    # Convert to grayscale
    faces = face_cascade.detectMultiScale(gray, 1.3, 2)    # Detect faces on grayscale images
    face_num = len(faces)   # Number of detected faces
    if face_num  > 0:
        for (x,y,w,h) in faces:

            x = x*2   # Because the image is reduced to one-half of the original size, the x, y, w, and h must be multiplied by 2.
            y = y*2
            w = w*2
            h = h*2
            cv2.rectangle(img,(x,y),(x+w,y+h),(255,0,0),2)  # Draw a rectangle on the face

    return img


with PiCamera() as camera:
    print("start human face detect")
    camera.resolution = (640,480)
    camera.framerate = 24
    rawCapture = PiRGBArray(camera, size=camera.resolution)
    time.sleep(2)

    for frame in camera.capture_continuous(rawCapture, format="bgr",use_video_port=True): # use_video_port=True
        img = frame.array
        img =  human_face_detect(img)
        cv2.imshow("video", img)  #OpenCV image show
        rawCapture.truncate(0)  # Release cache

        k = cv2.waitKey(1) & 0xFF
        # 27 is the ESC key, which means that if you press the ESC key to exit
        if k == 27:
            break

    print('quit ...')
    cv2.destroyAllWindows()
    camera.close()
这个怎么运作?
在与此项目相同的路径 (picar-x/example/) 中,放置一个文件 haarcascade_frontalhuman face_default.xml。 该文件是在 OpenCV 中训练的人脸检测模型文件。
该文件由 OpenCV 的 Cascade Classifier 调用。
face_cascade = cv2.CascadeClassifier('haarcascade_frontalface_default.xml')
使用基于 Haar 特征的级联分类器的对象检测是 Paul Viola 和 Michael Jones 在他们的论文《Rapid Object Detection using a Boosted Cascade of Simple Features》于 2001 年提出的一种有效的对象检测方法。
这是一种基于机器学习的方法,从大量正负图像中训练级联函数,然后用于检测其他图像中的对象。
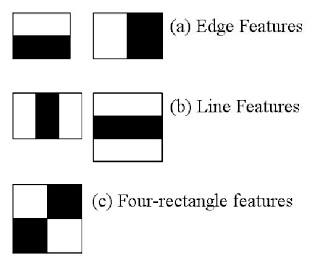
当使用人脸检测时,算法最初需要大量的正图像(人脸图像)和负图像(没有人脸的图像)来训练分类器。 从那里,然后需要提取面部特征。 为此,使用了下图中显示的 Haar 特征,类似于卷积核。 每个特征是通过从黑色矩形下的像素总和中减去白色矩形下的像素总和获得的单个值。
human_human face_detect() 函数分三步处理图片:
将图片转换为灰度。
在灰度图像上检测人脸,得到检测人脸的边界矩形。
在图像上为识别的对象绘制一个框架。
def human_face_detect(img):
    resize_img = cv2.resize(img, (320,240), interpolation=cv2.INTER_LINEAR)         # In order to reduce the amount of calculation, resize the image to 320 x 240 size
    gray = cv2.cvtColor(resize_img, cv2.COLOR_BGR2GRAY)    # Convert to grayscale
    faces = face_cascade.detectMultiScale(gray, 1.3, 2)    # Detect faces on grayscale images
    face_num = len(faces)   # Number of detected faces
    if face_num  > 0:
        for (x,y,w,h) in faces:

            x = x*2   # Because the image is reduced to one-half of the original size, the x, y, w, and h must be multiplied by 2.
            y = y*2
            w = w*2
            h = h*2
            cv2.rectangle(img,(x,y),(x+w,y+h),(255,0,0),2)  # Draw a rectangle on the face

    return img