颜色检测
该项目将在之前的 计算机视觉 项目中添加颜色检测算法。
备注
由于打印机碳粉或打印介质(如棕褐色纸)的差异,打印的颜色可能与 Python 颜色模型的色调略有不同。 这会导致不太准确的颜色识别。
运行代码
备注
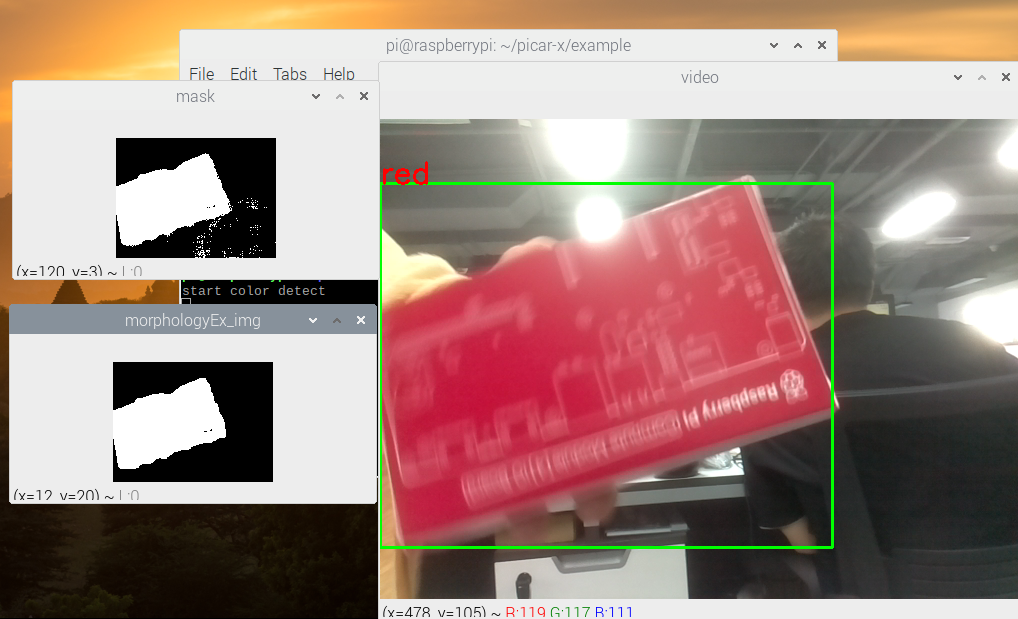
这个项目需要访问树莓派的桌面来查看相机模块拍摄的画面。
你可以将屏幕连接到PiCar-X上,或者参考教程 远程桌面,用VNC或XRDP访问它。
一旦进入树莓派的桌面,打开Terminal并输入以下命令来运行它,或者直接用Python编辑器打开并运行它。
cd /home/pi/picar-x/example
sudo python3 color_detect.py
当代码运行时,如果 PiCar-X 捕捉到一个红色物体,它会将其框出来。您还可以 'red' 将代码中的 更改为另一种颜色以进行检测。
代码
import cv2
from picamera.array import PiRGBArray
from picamera import PiCamera
import numpy as np
import time

color_dict = {'red':[0,4],'orange':[5,18],'yellow':[22,37],'green':[42,85],'blue':[92,110],'purple':[115,165],'red_2':[165,180]}  #Here is the range of H in the HSV color space represented by the color

kernel_5 = np.ones((5,5),np.uint8) #Define a 5×5 convolution kernel with element values of all 1.

def color_detect(img,color_name):

    # The blue range will be different under different lighting conditions and can be adjusted flexibly.  H: chroma, S: saturation v: lightness
    resize_img = cv2.resize(img, (160,120), interpolation=cv2.INTER_LINEAR)  # In order to reduce the amount of calculation, the size of the picture is reduced to (160,120)
    hsv = cv2.cvtColor(resize_img, cv2.COLOR_BGR2HSV)              # Convert from BGR to HSV
    color_type = color_name

    mask = cv2.inRange(hsv,np.array([min(color_dict[color_type]), 60, 60]), np.array([max(color_dict[color_type]), 255, 255]) )           # inRange():Make the ones between lower/upper white, and the rest black
    if color_type == 'red':
            mask_2 = cv2.inRange(hsv, (color_dict['red_2'][0],0,0), (color_dict['red_2'][1],255,255))
            mask = cv2.bitwise_or(mask, mask_2)

    morphologyEx_img = cv2.morphologyEx(mask, cv2.MORPH_OPEN, kernel_5,iterations=1)              # Perform an open operation on the image

    # Find the contour in morphologyEx_img, and the contours are arranged according to the area from small to large.
    _tuple = cv2.findContours(morphologyEx_img,cv2.RETR_EXTERNAL,cv2.CHAIN_APPROX_SIMPLE)
    # compatible with opencv3.x and openc4.x
    if len(_tuple) == 3:
        _, contours, hierarchy = _tuple
    else:
        contours, hierarchy = _tuple

    color_area_num = len(contours) # Count the number of contours

    if color_area_num > 0:
        for i in contours:    # Traverse all contours
            x,y,w,h = cv2.boundingRect(i)      # Decompose the contour into the coordinates of the upper left corner and the width and height of the recognition object

            # Draw a rectangle on the image (picture, upper left corner coordinate, lower right corner coordinate, color, line width)
            if w >= 8 and h >= 8: # Because the picture is reduced to a quarter of the original size, if you want to draw a rectangle on the original picture to circle the target, you have to multiply x, y, w, h by 4.
                x = x * 4
                y = y * 4
                w = w * 4
                h = h * 4
                cv2.rectangle(img,(x,y),(x+w,y+h),(0,255,0),2)  # Draw a rectangular frame
                cv2.putText(img,color_type,(x,y), cv2.FONT_HERSHEY_SIMPLEX, 1,(0,0,255),2)# Add character description

    return img,mask,morphologyEx_img

with PiCamera() as camera:
    print("start color detect")
    camera.resolution = (640,480)
    camera.framerate = 24
    rawCapture = PiRGBArray(camera, size=camera.resolution)
    time.sleep(2)

    for frame in camera.capture_continuous(rawCapture, format="bgr",use_video_port=True):# use_video_port=True
        img = frame.array
        img,img_2,img_3 =  color_detect(img,'red')  # Color detection function
        cv2.imshow("video", img)    # OpenCV image show
        cv2.imshow("mask", img_2)    # OpenCV image show
        cv2.imshow("morphologyEx_img", img_3)    # OpenCV image show
        rawCapture.truncate(0)   # Release cache

        k = cv2.waitKey(1) & 0xFF
        # 27 is the ESC key, which means that if you press the ESC key to exit
        if k == 27:
            break

    print('quit ...')
    cv2.destroyAllWindows()
    camera.close()
这个怎么运作?
首先将 HSV颜色空间 中H的范围定义为字典,方便后面的颜色判断算法:
color_dict = {'red':[0,4],'orange':[5,18],'yellow':[22,37],'green':[42,85],'blue':[92,110],'purple':[115,165],'red_2':[165,180]}
然后,定义大小为 5x5 的 卷积核 ,将用于形态学操作,如过滤。
kernel_5 = np.ones((5,5),np.uint8)
接下来, color_detect() 函数将分四步处理图片:
提取目标颜色的数据作为新的二值图像(数组)。
执行高级形态变换。
在二值图像中寻找轮廓。
在图像上为识别的对象绘制一个框架。
def color_detect(img,color_name):

    # The blue range will be different under different lighting conditions and can be adjusted flexibly.  H: chroma, S: saturation v: lightness
    resize_img = cv2.resize(img, (160,120), interpolation=cv2.INTER_LINEAR)  # In order to reduce the amount of calculation, the size of the picture is reduced to (160,120)
    hsv = cv2.cvtColor(resize_img, cv2.COLOR_BGR2HSV)              # Convert from BGR to HSV
    color_type = color_name

    mask = cv2.inRange(hsv,np.array([min(color_dict[color_type]), 60, 60]), np.array([max(color_dict[color_type]), 255, 255]) )           # inRange():Make the ones between lower/upper white, and the rest black
    if color_type == 'red':
            mask_2 = cv2.inRange(hsv, (color_dict['red_2'][0],0,0), (color_dict['red_2'][1],255,255))
            mask = cv2.bitwise_or(mask, mask_2)

    morphologyEx_img = cv2.morphologyEx(mask, cv2.MORPH_OPEN, kernel_5,iterations=1)              # Perform an open operation on the image

    # Find the contour in morphologyEx_img, and the contours are arranged according to the area from small to large.
    _tuple = cv2.findContours(morphologyEx_img,cv2.RETR_EXTERNAL,cv2.CHAIN_APPROX_SIMPLE)
    # compatible with opencv3.x and openc4.x
    if len(_tuple) == 3:
        _, contours, hierarchy = _tuple
    else:
        contours, hierarchy = _tuple

    color_area_num = len(contours) # Count the number of contours

    if color_area_num > 0:
        for i in contours:    # Traverse all contours
            x,y,w,h = cv2.boundingRect(i)      # Decompose the contour into the coordinates of the upper left corner and the width and height of the recognition object

            # Draw a rectangle on the image (picture, upper left corner coordinate, lower right corner coordinate, color, line width)
            if w >= 8 and h >= 8: # Because the picture is reduced to a quarter of the original size, if you want to draw a rectangle on the original picture to circle the target, you have to multiply x, y, w, h by 4.
                x = x * 4
                y = y * 4
                w = w * 4
                h = h * 4
                cv2.rectangle(img,(x,y),(x+w,y+h),(0,255,0),2)  # Draw a rectangular frame
                cv2.putText(img,color_type,(x,y), cv2.FONT_HERSHEY_SIMPLEX, 1,(0,0,255),2)# Add character description

    return img,mask,morphologyEx_img
img , mask , morphologyEx_img 显示在三个窗口中,可以直接观察每一步的处理结果。