Note
Hello, welcome to the SunFounder Raspberry Pi & Arduino & ESP32 Enthusiasts Community on Facebook! Dive deeper into Raspberry Pi, Arduino, and ESP32 with fellow enthusiasts.
Why Join?
Expert Support: Solve post-sale issues and technical challenges with help from our community and team.
Learn & Share: Exchange tips and tutorials to enhance your skills.
Exclusive Previews: Get early access to new product announcements and sneak peeks.
Special Discounts: Enjoy exclusive discounts on our newest products.
Festive Promotions and Giveaways: Take part in giveaways and holiday promotions.
👉 Ready to explore and create with us? Click [here] and join today!
Lesson 8 Slide Switch
Introduction
In this lesson, we are going to use a slide switch to turn on/off an external LED. The slide switch is a device to connect or disconnect the circuit by sliding its handle. They are quite common in our surroundings. Now let’s see how it works.
Components

Experimental Principle
Slide Switch
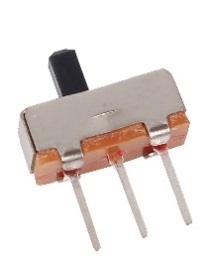
Just as its name suggests, slide switch is to connect or disconnect the circuit by sliding its switch handle so as to switch the circuit. The common types of slide switch include single pole double throw, single pole triple throw, double pole double throw, and double pole triple throw and so on. Generally, it is used in circuits with a low voltage and features flexibility and stabilization. Slide switches are commonly used in all kinds of instruments/meters equipment, electronic toys and other fields related.
How it works: The middle pin is fixed. When the handle is pushed to the left, the left two pins are connected; push it to the right, the two pins on the right connect, thus switching circuits.

See the circuit symbol for slide switch and 2 is the middle pin.

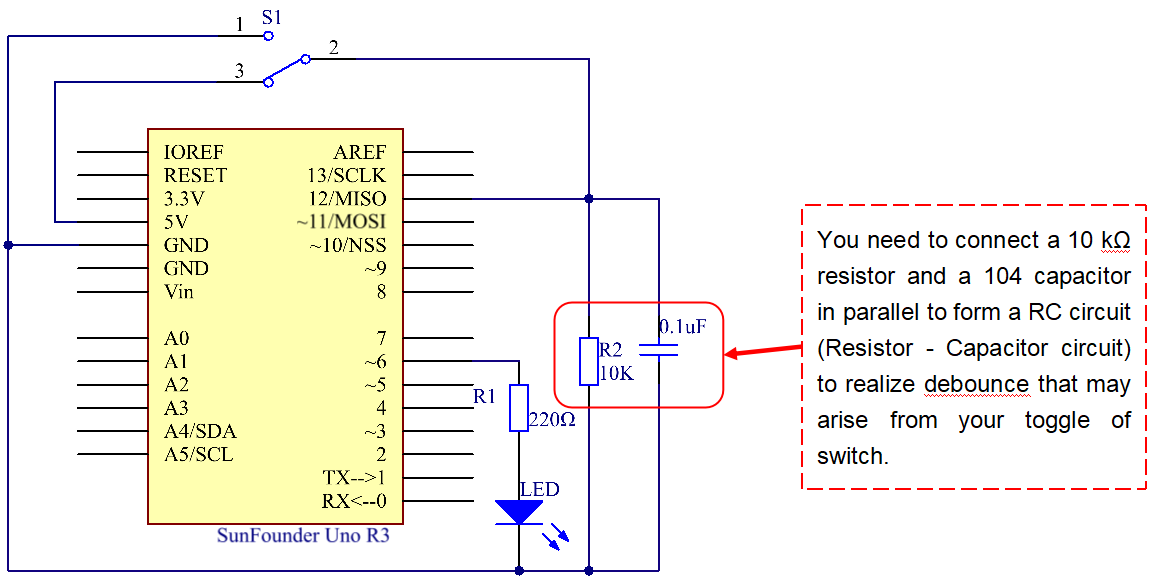
Principle:
Here we use a slide switch to control the on/off of an LED which is simple. Connect the middle pin of the switch to pin 12. Connect one pin at one end to VCC. After connecting a 10K resistor and a 104 capacitor, connect the last one pin to GND (to let the switch output stable level signal). Connect an LED to pin 6. Push the handle of the slide switch to the pin connected with pin 12 which is High level, we can light up the LED at pin 6 by programming.
Experimental Procedures
Step 1: Build the circuit

Step 2: Open the code file
Step 3: Select correct Board and Port
Step 4: Upload the sketch to the SunFounder Uno board
When you toggle the switch to pin12, the LED lights.

Code
Code Analysis 8-1 Read the switch state to turn on/off the LED
void loop()

{

    //read the state of the switch value

    switchState = digitalRead(switchPin);

    if (switchState == HIGH )       //if it is,the state is HIGH

    {

        digitalWrite(ledPin, HIGH); //turn the led on

    }

    else

    {

        digitalWrite(ledPin, LOW);  //turn the led off

    }

}
First, read the state of the switchPin and see whether you have moved the switch handle. If it has been pushed to pin 12, then the switchState is High level, so set ledPin as High level, which means to light up the LED; otherwise, to turn it off.