Bemerkung
Hallo und willkommen in der SunFounder Raspberry Pi & Arduino & ESP32 Enthusiasten-Gemeinschaft auf Facebook! Tauchen Sie tiefer ein in die Welt von Raspberry Pi, Arduino und ESP32 mit anderen Enthusiasten.
Warum beitreten?
Expertenunterstützung: Lösen Sie Nachverkaufsprobleme und technische Herausforderungen mit Hilfe unserer Gemeinschaft und unseres Teams.
Lernen & Teilen: Tauschen Sie Tipps und Anleitungen aus, um Ihre Fähigkeiten zu verbessern.
Exklusive Vorschauen: Erhalten Sie frühzeitigen Zugang zu neuen Produktankündigungen und exklusiven Einblicken.
Spezialrabatte: Genießen Sie exklusive Rabatte auf unsere neuesten Produkte.
Festliche Aktionen und Gewinnspiele: Nehmen Sie an Gewinnspielen und Feiertagsaktionen teil.
👉 Sind Sie bereit, mit uns zu erkunden und zu erschaffen? Klicken Sie auf [hier] und treten Sie heute bei!
Metronom
Hier machen wir ein Metronom, das Metronom ist in 5 Stufen unterteilt, je höher die Stufe, desto dringender der Summerruf.
Verdrahtung
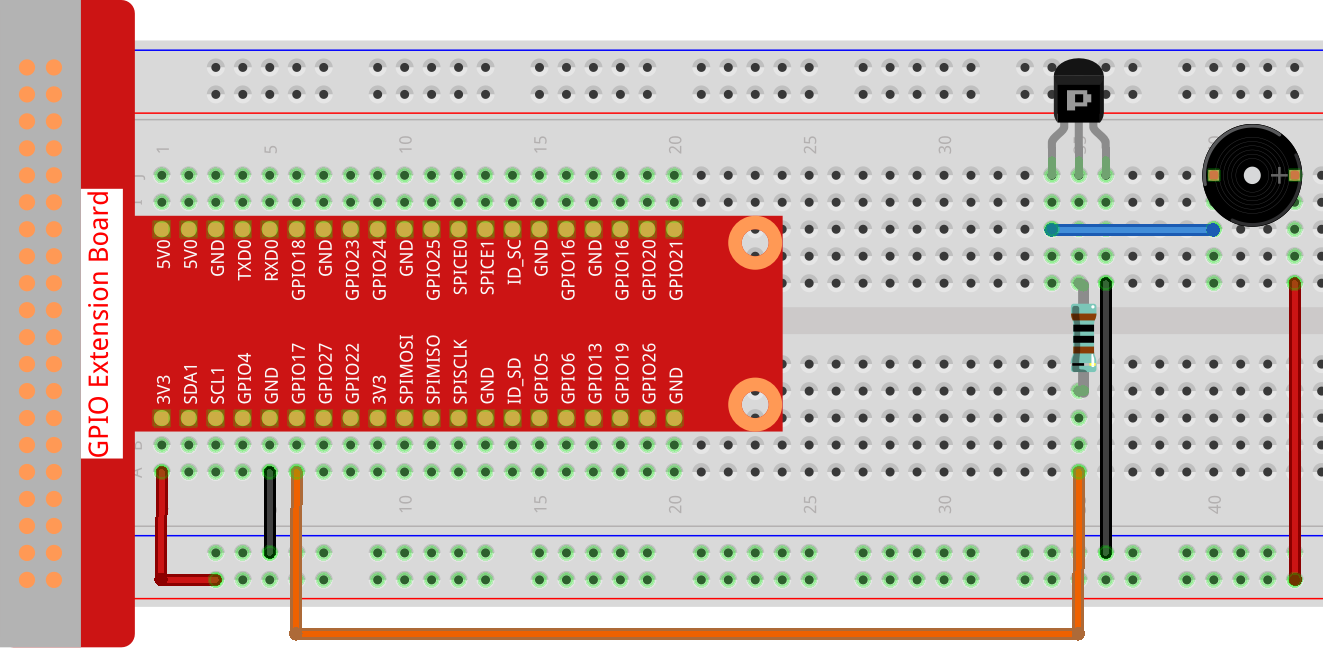
Bemerkung
Hier wird ein aktiver Summer verwendet, der mit einem weißen Aufkleber versehen ist.
Skizzieren
import processing.io.*;

int level = 0;
int buzzerPin = 17;
int levelRange=5;
Slider mySlider;

void setup() {
    size(400, 200);
    frameRate(50);
    mySlider = new Slider(width * 0.2,height * 0.4,width * 0.8,height * 0.6,0,levelRange,level);
    GPIO.pinMode(buzzerPin, GPIO.OUTPUT);
}

void draw() {

    background(255);
    mySlider.show();
    if(level==0){
        GPIO.digitalWrite(buzzerPin, GPIO.HIGH);
    }else if((frameCount/5) % (levelRange-level+1) ==0){
        GPIO.digitalWrite(buzzerPin, GPIO.LOW);
    }else{
        GPIO.digitalWrite(buzzerPin, GPIO.HIGH);
    }
}

void mouseDragged(){
    level = mySlider.dragPoint(mouseX,mouseY);
}

class Slider{
    float slotPointAX;
    float slotPointBX;
    float slotPointAY;
    float slotPointBY;
    float linePoint;
    float depth;
    int maxRange;
    int minRange;
    int value;

    Slider(float ax, float ay, float bx, float by, int min, int max, int v){
        slotPointAX = ax;
        slotPointAY = ay;
        slotPointBX = bx;
        slotPointBY = by;
        maxRange = max;
        minRange = min;
        value = v;
        linePoint = slotPointAX;// + map(value, minRange, maxRange, slotPointAX, slotPointBX);
        depth = (slotPointBY - slotPointAY)*0.75;
    }

    void show(){
        rectMode(CORNERS);
        fill(200);
        stroke(255,0,0);
        rect(slotPointAX, slotPointAY, slotPointBX, slotPointBY);
        fill(255,0,0);
        rect(slotPointAX, slotPointAY, linePoint, slotPointBY);
        fill(200);
        textSize(depth);
        text(minRange, slotPointAX, slotPointBY+depth);
        text(maxRange, slotPointBX, slotPointBY+depth);
        text(value, linePoint, slotPointAY);
    }

    int dragPoint(float mx, float my){
        if(mx>=slotPointAX && mx<=slotPointBX && my>=slotPointAY && my<=slotPointBY){
            value = int(map(mx,slotPointAX,slotPointBX,minRange,maxRange));
            linePoint = map(value,minRange,maxRange,slotPointAX,slotPointBX);
        }
        return value;
    }
}
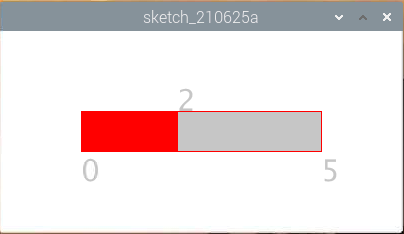
Wie es funktioniert?
Hier haben wir eine Slider -Klasse erstellt und sie als WIDGET fungieren lassen.
Slider(ax, ay, bx, by, min, max, v)
In der Deklaration muss es in 7 Parametern übergeben werden.
Die ersten vier Parameter bestimmen die Größe des Widgets, gefolgt von den Koordinaten (x1, y1) des Startpunkts in der oberen linken Ecke und (x2, y2) in der unteren rechten Ecke.
Die letzten drei Parameter bestimmen seinen Zahlenbereich (min bis max) und den Anfangswert.
Es hat zwei Methoden, die Wirkung von dragPoint() besteht darin,
den Schieberegler verschiebbar zu machen und den aktuellen Positionswert des Schiebereglers zurückzugeben.
int dragPoint(float mx, float my){
    if(mx>=slotPointAX && mx<=slotPointBX && my>=slotPointAY && my<=slotPointBY){
        value = int(map(mx,slotPointAX,slotPointBX,minRange,maxRange));
        linePoint = map(value,minRange,maxRange,slotPointAX,slotPointBX);
    }
    return value;
}
Eine andere Methode show() besteht darin, den Slider anzuzeigen.
Gleichzeitig werden der Bereichswert und der aktuelle Wert an der entsprechenden Stelle angezeigt.
void show(){
    rectMode(CORNERS);
    fill(200);
    stroke(255,0,0);
    rect(slotPointAX, slotPointAY, slotPointBX, slotPointBY);
    fill(255,0,0);
    rect(slotPointAX, slotPointAY, linePoint, slotPointBY);
    fill(200);
    textSize(depth);
    text(minRange, slotPointAX, slotPointBY+depth);
    text(maxRange, slotPointBX, slotPointBY+depth);
    text(value, linePoint, slotPointAY);
}
Weitere Informationen finden Sie unter Processing Reference.