Note
Hello, welcome to the SunFounder Raspberry Pi & Arduino & ESP32 Enthusiasts Community on Facebook! Dive deeper into Raspberry Pi, Arduino, and ESP32 with fellow enthusiasts.
Why Join?
Expert Support: Solve post-sale issues and technical challenges with help from our community and team.
Learn & Share: Exchange tips and tutorials to enhance your skills.
Exclusive Previews: Get early access to new product announcements and sneak peeks.
Special Discounts: Enjoy exclusive discounts on our newest products.
Festive Promotions and Giveaways: Take part in giveaways and holiday promotions.
👉 Ready to explore and create with us? Click [here] and join today!
OLED Display Module
Introduction
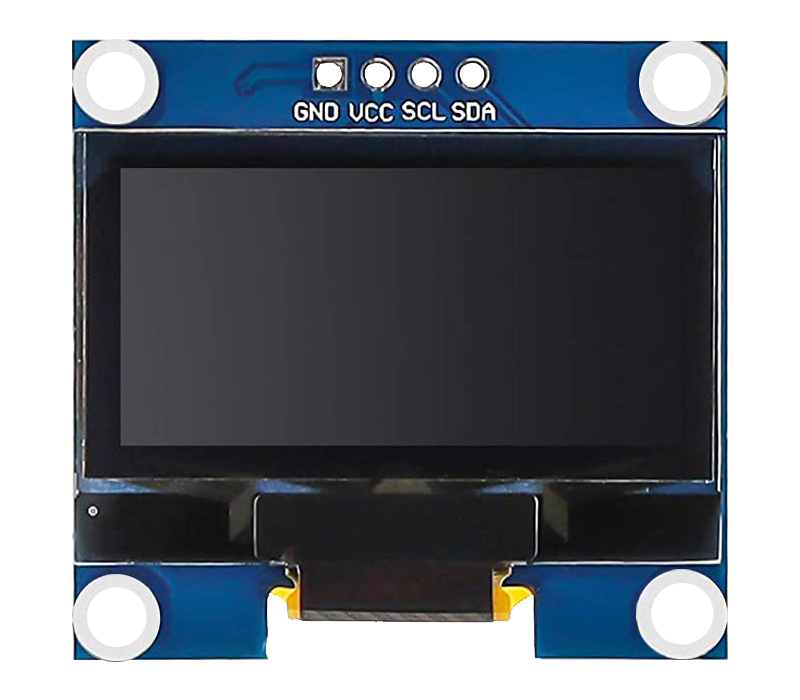
An OLED (Organic Light-Emitting Diode) display module is a device that can display text, graphics and images on a thin and flexible screen using organic materials that emit light when electric current is applied.
The SSD1306 I2C OLED display module operates by controlling an OLED (Organic Light-Emitting Diode) display using the powerful single-chip CMOS OLED driver controller, the SSD1306. This controller manages all RAM buffering and demands minimal effort from the connected microcontroller, such as an Arduino. OLED displays are renowned for their extremely light and potentially flexible nature, producing brighter and crisper images compared to traditional displays due to being almost paper-thin.
The main advantage of an OLED Display is that it emits its own light and doesn’t need another source of backlight. Due to this, OLED Displays often have better contrast, brightness and viewing angles when compared to LCD displays.
Another important feature of OLED Displays is deep black levels. Since each pixel emits its own light in an OLED Display, to produce black color, the individual pixel can be turned OFF.
Due to lower power consumption (only pixels which are lit up draw current), OLED displays are also popular in battery operated devices like Smart Watches, Health Trackers and other wearables.
Principle
An OLED display module consists of an OLED panel and an OLED driver chip that is mounted on the back of the module. The OLED panel is made of many tiny pixels that can produce different colors of light. Each pixel consists of several layers of organic materials sandwiched between two electrodes (anode and cathode). When electric current flows through the electrodes, the organic materials emit light of different wavelengths depending on their composition.
The OLED driver chip is a chip that can control the pixels of the OLED panel using a serial communication protocol called I2C (Inter-Integrated Circuit).
The OLED driver chip converts the signals from the Arduino into commands for the OLED panel. The Arduino can send data to the OLED driver chip using a library that can control the I2C protocol. One such library is the Adafruit SSD1306 library1. With this library, you can initialize the OLED display module, set the brightness level, print text, graphics or images, etc.
Usage
Hardware components
Arduino Uno R4 or R3 board * 1
OLED Display Module * 1
Jumper Wires
Circuit Assembly

Code
Note
To install the library, use the Arduino Library Manager and search for “Adafruit SSD1306” and “Adafruit GFX” and install it.
Code explanation
Library Inclusion and Initial Definitions: The necessary libraries for interfacing with the OLED are included. Following that, definitions regarding the OLED’s dimensions and I2C address are provided.
Adafruit SSD1306: This library is designed to help with the interfacing of the SSD1306 OLED display. It provides methods to initialize the display, control its settings, and display content.
Adafruit GFX Library: This is a core graphics library for displaying text, producing colors, drawing shapes, etc., on various screens including OLEDs.
Note
To install the library, use the Arduino Library Manager and search for “Adafruit SSD1306” and “Adafruit GFX” and install it.
#include <SPI.h>
#include <Wire.h>
#include <Adafruit_GFX.h>
#include <Adafruit_SSD1306.h>

#define SCREEN_WIDTH 128  // OLED display width, in pixels
#define SCREEN_HEIGHT 64  // OLED display height, in pixels

#define OLED_RESET -1
#define SCREEN_ADDRESS 0x3C
Bitmap Data: Bitmap data for displaying a custom icon on the OLED screen. This data represents an image in a format that the OLED can interpret.
You can use this online tool called image2cpp that can turn your image into an array.
The
PROGMEMkeyword denotes that the array is stored in the program memory of the Arduino microcontroller. Storing data in program memory(PROGMEM) instead of RAM can be helpful for large amounts of data, which would otherwise take up too much space in RAM.static const unsigned char PROGMEM sunfounderIcon[] = {...};
Setup Function (Initialization and Display): The
setup()function initializes the OLED and displays a series of patterns, texts, and animations.void setup() { ... // Serial initialization and OLED object initialization ... // Displaying various text, numbers, and animations }
Additional Ideas
Use buttons to change the displayed messages or toggle between different patterns and animations.
Display sensor readings (like temperature or humidity) on the OLED in real-time.