Note
Hello, welcome to the SunFounder Raspberry Pi & Arduino & ESP32 Enthusiasts Community on Facebook! Dive deeper into Raspberry Pi, Arduino, and ESP32 with fellow enthusiasts.
Why Join?
Expert Support: Solve post-sale issues and technical challenges with help from our community and team.
Learn & Share: Exchange tips and tutorials to enhance your skills.
Exclusive Previews: Get early access to new product announcements and sneak peeks.
Special Discounts: Enjoy exclusive discounts on our newest products.
Festive Promotions and Giveaways: Take part in giveaways and holiday promotions.
👉 Ready to explore and create with us? Click [here] and join today!
Vibration Sensor Module (SW-420)

Introduction
SW-420 vibration sensor is a module that can detect vibrations or shocks on a surface. It can be used for various purposes, such as detecting door knocks, machine malfunctions, car collisions, or alarm systems. It operates from 3.3 V to 5 V. The module has three peripherals, two LEDs, one for the power status and the other for the sensor output. In addition, there is a potentiometer that can be further used to control the threshold point of the vibration.
Principle
SW-420 vibration sensor module consists of a SW-420 vibration switch and an LM393 voltage comparator. A SW-420 vibration switch is a device that has a spring and a rod inside a tube. When the switch is exposed to a vibration, the spring touches the rod and closes the circuit. The vibration sensor in the module detects these oscillations and converts them into electrical signals. The LM393 comparator chip then compares these signals with a reference voltage set by the potentiometer. If the amplitude of the signal exceeds this reference voltage, the output of the comparator goes high (1), otherwise it goes low (0).
Module Schematic Diagram

Usage
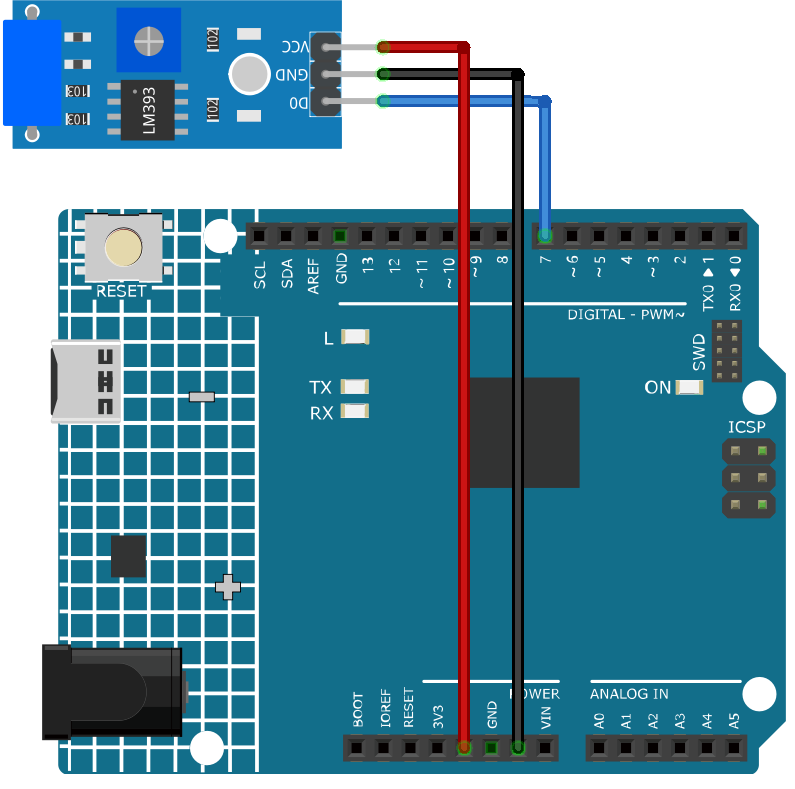
Hardware components
Arduino Uno R4 or R3 board * 1
Vibration Sensor Module(SW-420) * 1
Jumper Wires
Circuit Assembly
Code
Code explanation
The first line of code is a constant integer declaration for the vibration sensor pin. We use digital pin 7 to read the output from the vibration sensor.
const int sensorPin = 7;
In the
setup()function, we initialize the serial communication at a baud rate of 9600 to print readings from the vibration sensor to the serial monitor. We also set the vibration sensor pin as an input.void setup() { Serial.begin(9600); // Start serial communication at 9600 baud rate pinMode(sensorPin, INPUT); // Set the sensorPin as an input pin }
The
loop()function is where we continuously check for any vibrations detected by the sensor. If the sensor detects a vibration, it prints “Detected vibration…” to the serial monitor. If no vibration is detected, it prints “…”. The loop repeats every 100 milliseconds.void loop() { if (digitalRead(sensorPin)) { // Check if there is any vibration detected by the sensor Serial.println("Detected vibration..."); // Print "Detected vibration..." if vibration detected } else { Serial.println("..."); // Print "..." otherwise } // Add a delay to avoid flooding the serial monitor delay(100); }
Additional Ideas
Could connect an LED to turn ON when vibration is detected
An alarm sound or buzzer could be triggered on vibration sense