Nota
¡Hola! Bienvenido a la Comunidad de Entusiastas de SunFounder Raspberry Pi & Arduino & ESP32 en Facebook. Sumérgete más en Raspberry Pi, Arduino y ESP32 con otros entusiastas.
¿Por qué unirse?
Soporte Experto: Resuelve problemas post-venta y desafíos técnicos con la ayuda de nuestra comunidad y equipo.
Aprende y Comparte: Intercambia consejos y tutoriales para mejorar tus habilidades.
Avances Exclusivos: Obtén acceso anticipado a anuncios de nuevos productos y adelantos.
Descuentos Especiales: Disfruta de descuentos exclusivos en nuestros productos más recientes.
Promociones y Sorteos Festivos: Participa en sorteos y promociones de temporada.
👉 ¿Listo para explorar y crear con nosotros? Haz clic en [Aquí] y únete hoy.
1.3.3 Relé
Introducción
En este proyecto, aprenderemos a usar un relé. Es uno de los componentes más utilizados en los sistemas de control automático. Cuando el voltaje, la corriente, la temperatura, la presión, etc., alcanzan, superan o están por debajo del valor predeterminado, el relé conectará o interrumpirá el circuito, para controlar y proteger el equipo.
Componentes Necesarios
En este proyecto, necesitamos los siguientes componentes.
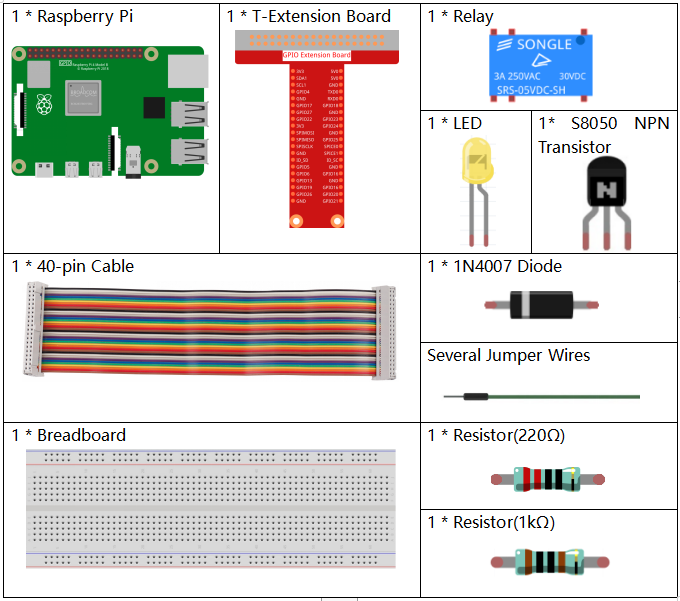
Es definitivamente conveniente comprar un kit completo, aquí está el enlace:
Nombre |
COMPONENTES EN ESTE KIT |
ENLACE |
|---|---|---|
Kit Raphael |
337 |
También puedes comprarlos por separado en los enlaces a continuación.
INTRODUCCIÓN DE COMPONENTES |
ENLACE DE COMPRA |
|---|---|
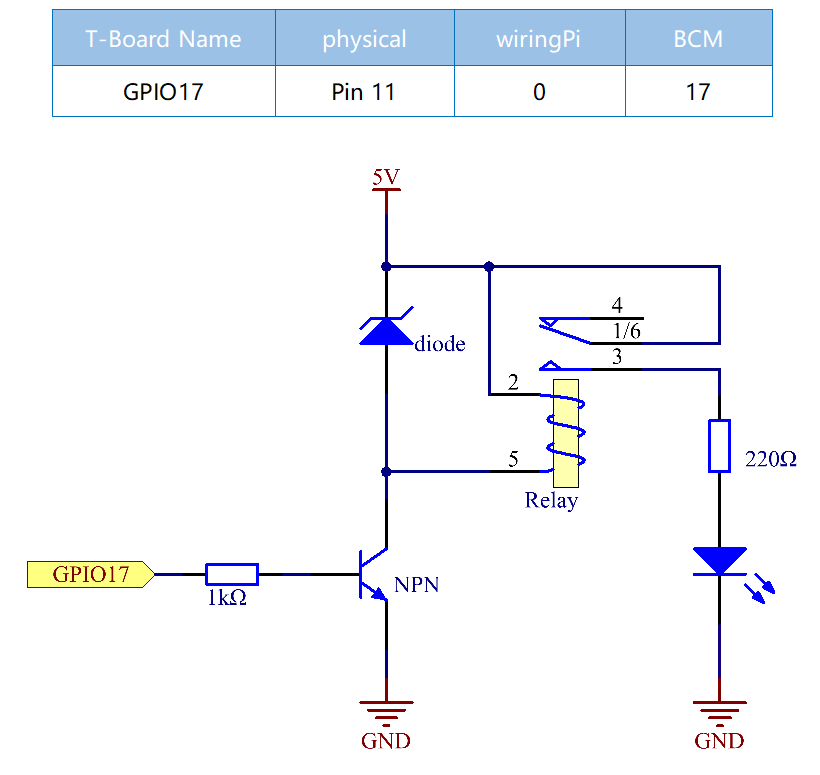
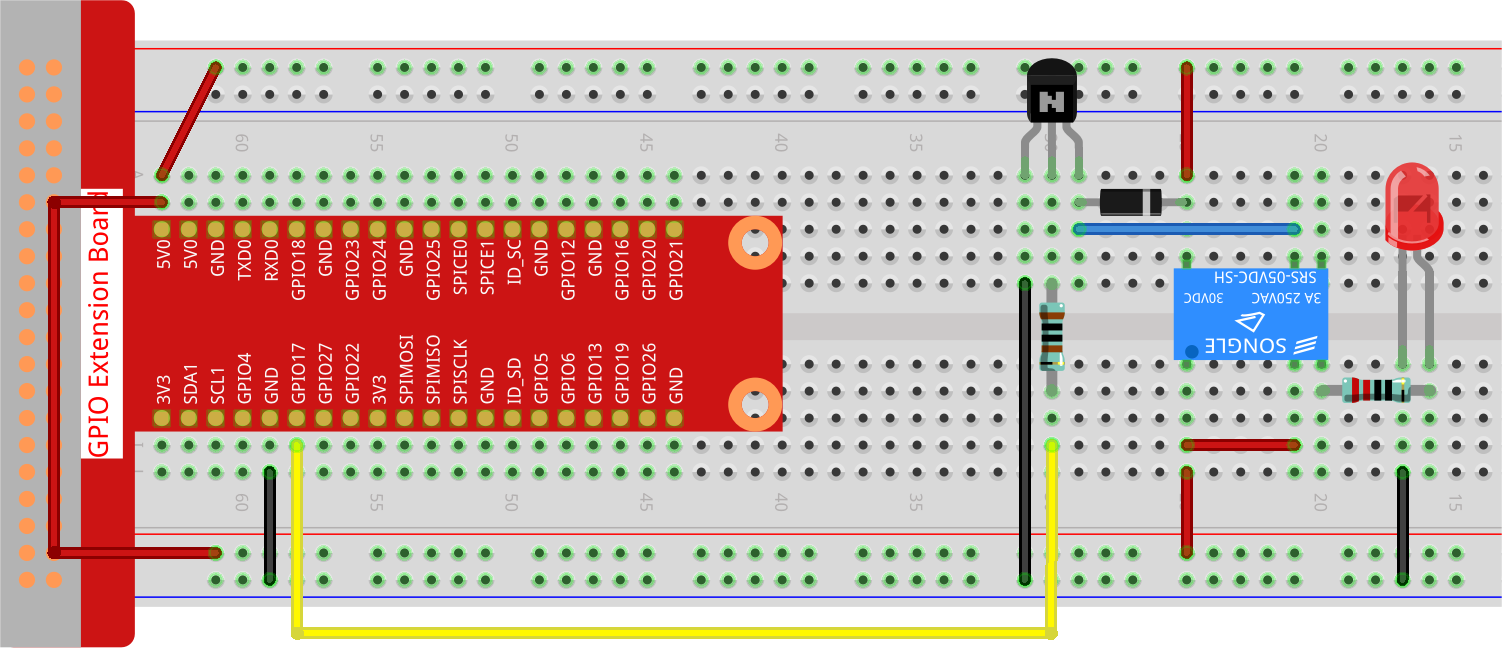
Diagrama Esquemático
Procedimientos Experimentales
Paso 1: Construye el circuito.
Paso 2: Abre el archivo de código.
cd ~/raphael-kit/python-pi5
Paso 3: Ejecuta.
sudo python3 1.3.3_Relay_zero.py
Mientras el código se está ejecutando, el LED se enciende. Además, puedes escuchar un tic-tac causado por la interrupción del contacto normalmente cerrado y el cierre del contacto normalmente abierto.
Advertencia
Si recibe el mensaje de error RuntimeError: Cannot determine SOC peripheral base address, consulte Si «gpiozero» no funciona.
Código
Nota
Puedes Modificar/Restablecer/Copiar/Ejecutar/Detener el código a continuación. Pero antes de eso, necesitas ir a la ruta del código fuente como raphael-kit/python-pi5. Después de modificar el código, puedes ejecutarlo directamente para ver el efecto.
#!/usr/bin/env python3
from gpiozero import OutputDevice  # Import the class for controlling GPIO pins
from time import sleep  # Import the sleep function for delay

# Initialize the relay connected to GPIO pin 17, starting in the 'off' state
relay = OutputDevice(17, initial_value=False)

try:
    # Loop to continuously toggle the relay's state every second
    while True:
        print('Relay open...')  # Inform that the relay is being activated
        relay.on()  # Turn on the relay (assuming active low configuration)
        sleep(1)   # Maintain the relay in the on state for 1 second

        print('...Relay close')  # Inform that the relay is being deactivated
        relay.off()  # Turn off the relay
        sleep(1)   # Maintain the relay in the off state for 1 second

except KeyboardInterrupt:
    # Handle a keyboard interrupt (Ctrl+C) to exit the loop
    relay.off()  # Ensure the relay is turned off before exiting
    pass
Explicación del Código
It imports
OutputDevicefromgpiozerofor controlling GPIO pins andsleepfromtimefor adding delays.#!/usr/bin/env python3 from gpiozero import OutputDevice # Import the class for controlling GPIO pins from time import sleep # Import the sleep function for delay
Inicializa un objeto
OutputDevicepara el relé conectado al pin GPIO 17. Elinitial_value=Falseconfigura el relé en el estadooffinicialmente (suponiendo configuración de activo bajo).# Initialize the relay connected to GPIO pin 17, starting in the 'off' state relay = OutputDevice(17, initial_value=False)
Dentro del bloque
try, un buclewhile Truealterna continuamente el estado del relé. El relé se enciende y se apaga con una pausa de 1 segundo entre cada estado, acompañado de declaraciones de impresión en la consola.try: # Loop to continuously toggle the relay's state every second while True: print('Relay open...') # Inform that the relay is being activated relay.on() # Turn on the relay (assuming active low configuration) sleep(1) # Maintain the relay in the on state for 1 second print('...Relay close') # Inform that the relay is being deactivated relay.off() # Turn off the relay sleep(1) # Maintain the relay in the off state for 1 second
Captura una interrupción del teclado (como Ctrl+C) para permitir la terminación del script de manera segura. El relé se apaga antes de salir del script.
except KeyboardInterrupt:
  # Handle a keyboard interrupt (Ctrl+C) to exit the loop
  relay.off()  # Ensure the relay is turned off before exiting
  pass