Nota
Hola, ¡bienvenido a la Comunidad de Entusiastas de SunFounder para Raspberry Pi, Arduino y ESP32 en Facebook! Sumérgete en el mundo de Raspberry Pi, Arduino y ESP32 con otros entusiastas.
¿Por qué unirse?
Soporte experto: Resuelve problemas postventa y desafíos técnicos con la ayuda de nuestra comunidad y equipo.
Aprende y comparte: Intercambia consejos y tutoriales para mejorar tus habilidades.
Previsualizaciones exclusivas: Obtén acceso anticipado a nuevos anuncios de productos y adelantos.
Descuentos especiales: Disfruta de descuentos exclusivos en nuestros productos más recientes.
Promociones y sorteos festivos: Participa en sorteos y promociones durante las festividades.
👉 ¿Listo para explorar y crear con nosotros? Haz clic en [Aquí] y únete hoy mismo.
1.3.2 Servomotor
Introducción
En este proyecto, aprenderemos cómo hacer que el servomotor gire.
Componentes necesarios
En este proyecto, necesitamos los siguientes componentes.
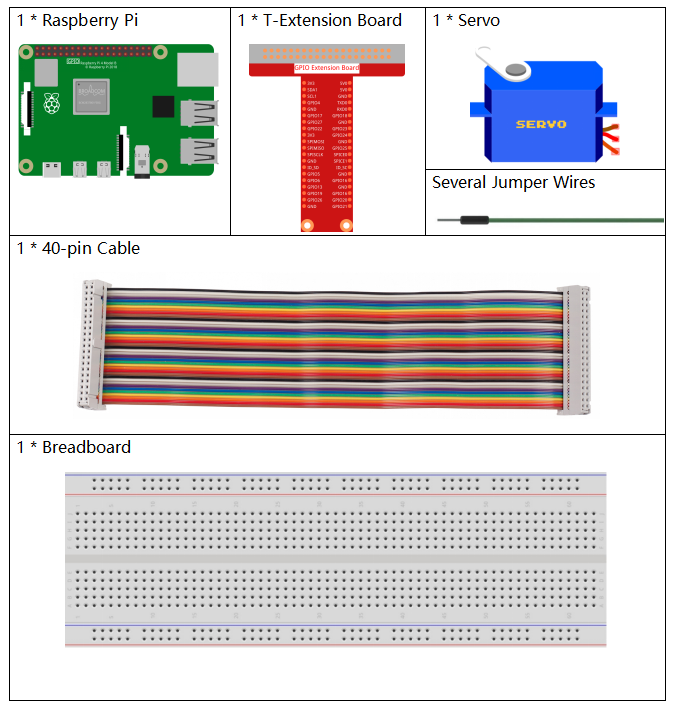
Es definitivamente conveniente comprar un kit completo, aquí está el enlace:
Nombre |
ELEMENTOS EN ESTE KIT |
ENLACE |
|---|---|---|
Kit Raphael |
337 |
También puedes comprarlos por separado en los enlaces a continuación.
INTRODUCCIÓN DEL COMPONENTE |
ENLACE DE COMPRA |
|---|---|
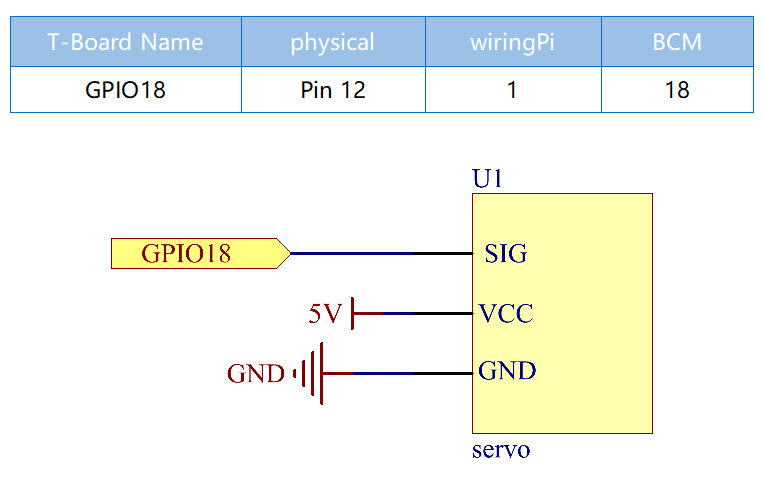
Diagrama esquemático
Procedimientos experimentales
Paso 1: Construye el circuito.

Paso 2: Ve a la carpeta del código.
cd ~/raphael-kit/python-pi5
Paso 3: Ejecuta el archivo ejecutable.
sudo python3 1.3.2_Servo_zero.py
Después de ejecutar el programa, el servomotor girará de 0 grados a 90 a 180 grados, y luego de 180 grados a 90 a 0 grados, en un ciclo.
Advertencia
Si recibe el mensaje de error RuntimeError: Cannot determine SOC peripheral base address, consulte Si «gpiozero» no funciona.
Código
Nota
Puedes Modificar/Reiniciar/Copiar/Ejecutar/Detener el código a continuación. Pero antes de eso, debes ir a la ruta del código fuente como raphael-kit/python-pi5. Después de modificar el código, puedes ejecutarlo directamente para ver el efecto.
#!/usr/bin/env python3
from gpiozero import Servo
from time import sleep

# Set the GPIO pin number where the servo motor is connected
myGPIO = 18

# Define a correction factor to fine-tune servo pulse width
myCorrection = 0.45
maxPW = (2.0 + myCorrection) / 1000  # Calculate maximum pulse width
minPW = (1.0 - myCorrection) / 1000  # Calculate minimum pulse width

# Initialize the Servo object with custom pulse widths
servo = Servo(myGPIO, min_pulse_width=minPW, max_pulse_width=maxPW)

try:
    while True:
        # Position the servo at the middle and wait
        servo.mid()
        print("mid")  # Indicate current position
        sleep(0.5)    # Brief pause for 0.5 seconds

        # Move the servo to its minimum position and wait
        servo.min()
        print("min")  # Indicate current position
        sleep(1)      # Hold position for 1 second

        # Return the servo to the middle position and wait
        servo.mid()
        print("mid")  # Indicate current position
        sleep(0.5)    # Brief pause for 0.5 seconds

        # Move the servo to its maximum position and wait
        servo.max()
        print("max")  # Indicate current position
        sleep(1)      # Hold position for 1 second

except KeyboardInterrupt:
    # Gracefully terminate the script on a keyboard interrupt (Ctrl+C)
    pass
Explicación del Código
Estas declaraciones de importación traen la clase
Servopara el control del servomotor y la funciónsleeppara la temporización.#!/usr/bin/env python3 from gpiozero import Servo from time import sleep
Establece el número de pin GPIO 18 para conectar el servomotor.
# Set the GPIO pin number where the servo motor is connected
myGPIO = 18
Estas líneas definen un factor de corrección y lo utilizan para calcular las anchuras de pulso máximas y mínimas para el servo, ajustando su rango de movimiento.
# Define a correction factor to fine-tune servo pulse width
myCorrection = 0.45
maxPW = (2.0 + myCorrection) / 1000  # Calculate maximum pulse width
minPW = (1.0 - myCorrection) / 1000  # Calculate minimum pulse width
Inicializa el objeto Servo con el pin GPIO especificado y anchos de pulso personalizados.
# Initialize the Servo object with custom pulse widths
servo = Servo(myGPIO, min_pulse_width=minPW, max_pulse_width=maxPW)
El bloque
trycontiene un buclewhile Truepara mover continuamente el servo. El servo se posiciona en los puntos medio, mínimo y máximo, con cada posición impresa y mantenida durante una duración especificada.try: while True: # Position the servo at the middle and wait servo.mid() print("mid") # Indicate current position sleep(0.5) # Brief pause for 0.5 seconds # Move the servo to its minimum position and wait servo.min() print("min") # Indicate current position sleep(1) # Hold position for 1 second # Return the servo to the middle position and wait servo.mid() print("mid") # Indicate current position sleep(0.5) # Brief pause for 0.5 seconds # Move the servo to its maximum position and wait servo.max() print("max") # Indicate current position sleep(1) # Hold position for 1 second except KeyboardInterrupt: # Gracefully terminate the script on a keyboard interrupt (Ctrl+C) pass