Nota
Hello, welcome to the SunFounder Raspberry Pi & Arduino & ESP32 Enthusiasts Community on Facebook! Dive deeper into Raspberry Pi, Arduino, and ESP32 with fellow enthusiasts.
Why Join?
Expert Support: Solve post-sale issues and technical challenges with help from our community and team.
Learn & Share: Exchange tips and tutorials to enhance your skills.
Exclusive Previews: Get early access to new product announcements and sneak peeks.
Special Discounts: Enjoy exclusive discounts on our newest products.
Festive Promotions and Giveaways: Take part in giveaways and holiday promotions.
👉 Ready to explore and create with us? Click [Aquí] and join today!
1.1.5 4-Digit 7-Segment Display
Introducción
A continuación, sigue mis instrucciones para intentar controlar la pantalla de 7 segmentos de 4 dígitos.
Componentes Necesarios
En este proyecto, necesitaremos los siguientes componentes.
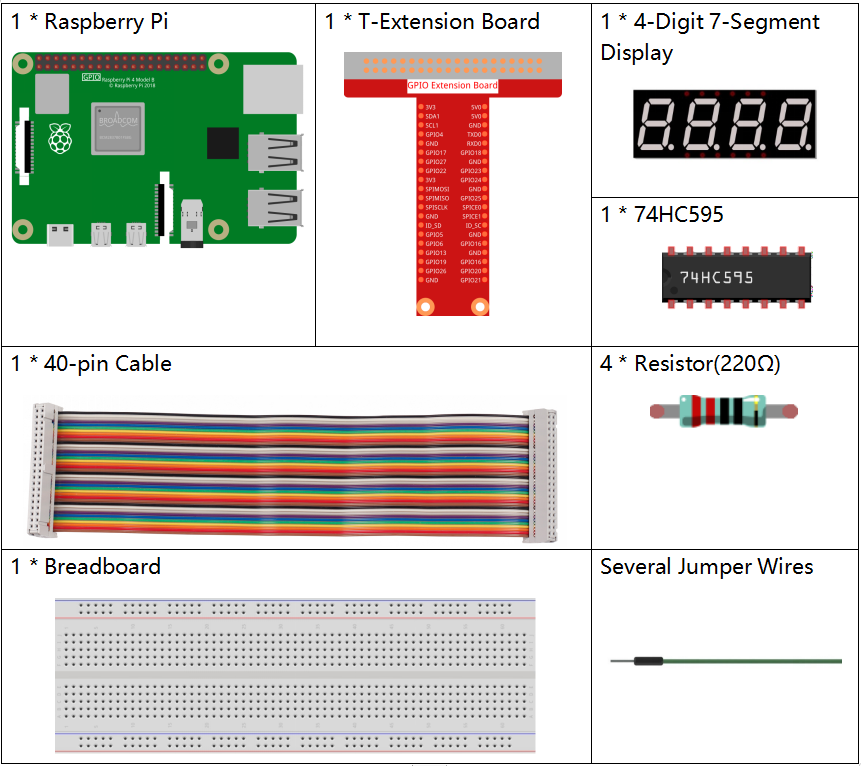
Es definitivamente conveniente comprar un kit completo, aquí está el enlace:
Nombre |
ARTÍCULOS EN ESTE KIT |
ENLACE |
|---|---|---|
Raphael Kit |
337 |
También puedes comprarlos por separado en los siguientes enlaces.
INTRODUCCIÓN DEL COMPONENTE |
ENLACE DE COMPRA |
|---|---|
- |
|
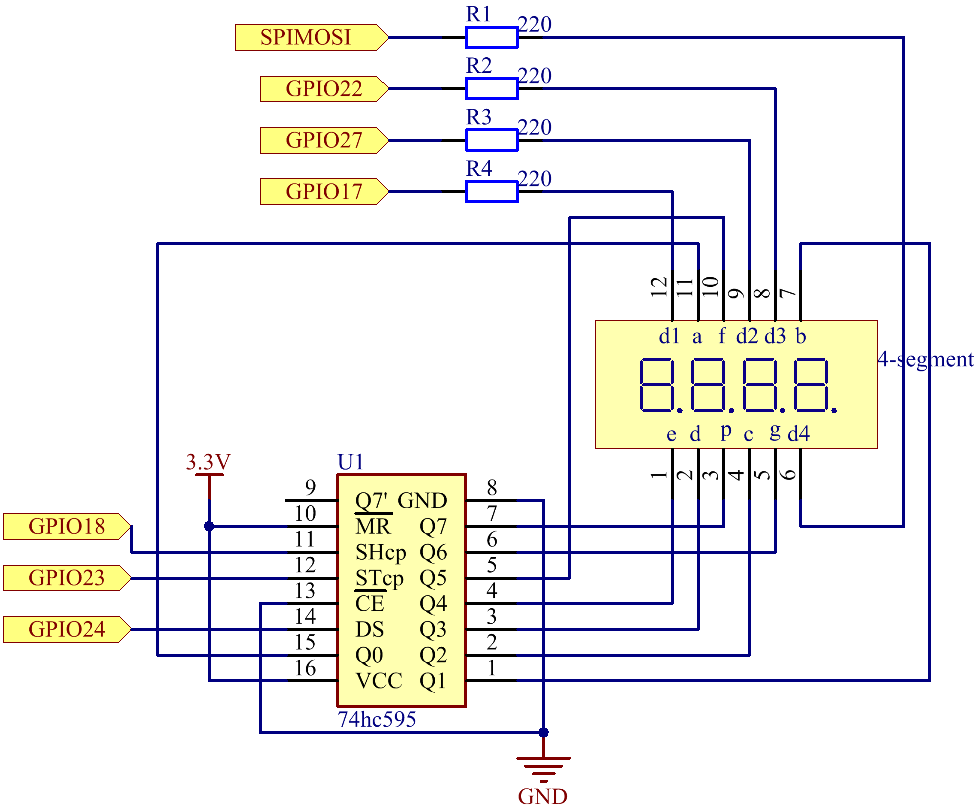
Diagrama Esquemático
Nombre de la T-Board |
Pin física |
BCM |
GPIO17 |
Pin 11 |
17 |
GPIO27 |
Pin 13 |
27 |
GPIO22 |
Pin 15 |
22 |
SPIMOSI |
Pin 19 |
10 |
GPIO18 |
Pin 12 |
18 |
GPIO23 |
Pin 16 |
23 |
GPIO24 |
Pin 18 |
24 |
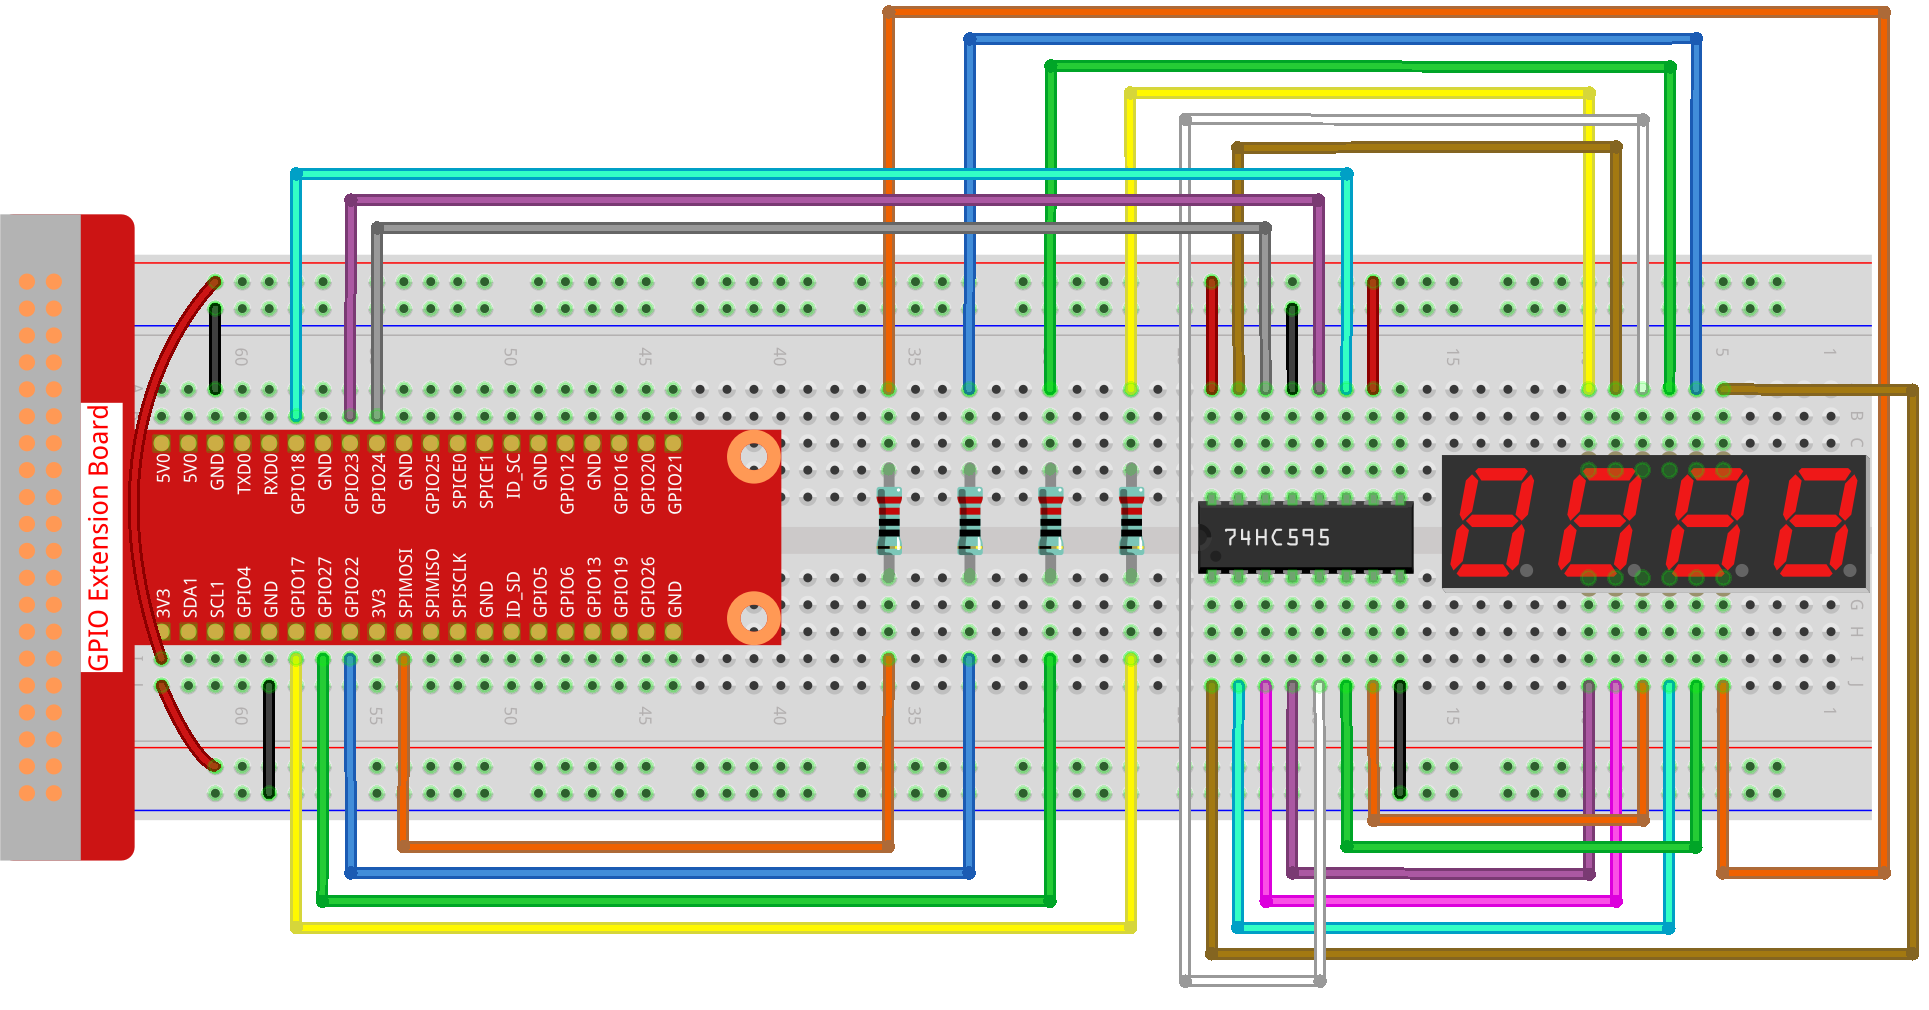
Procedimientos Experimentales
Paso 1: Construir el circuito.
Paso 2: Ir a la carpeta del código.
cd ~/raphael-kit/python-pi5
Paso 3: Ejecutar el archivo ejecutable.
sudo python3 1.1.5_4-Digit_zero.py
Después de ejecutar el código, el programa realiza un conteo, aumentando de 1 en 1 cada segundo, y la pantalla de 4 dígitos muestra el conteo.
Advertencia
Si recibe el mensaje de error RuntimeError: Cannot determine SOC peripheral base address, consulte Si «gpiozero» no funciona.
Código
Nota
Puedes Modificar/Restablecer/Copiar/Ejecutar/Detener el código a continuación. Pero antes de eso, necesitas ir a la ruta del código fuente como raphael-kit/python-pi5. Después de modificar el código, puedes ejecutarlo directamente para ver el efecto.
#!/usr/bin/env python3
from gpiozero import OutputDevice
import time
import threading

# Define GPIO pins for the 74HC595 shift register
SDI = OutputDevice(24)   # Serial Data Input
RCLK = OutputDevice(23)  # Register Clock
SRCLK = OutputDevice(18) # Shift Register Clock

# Define GPIO pins for digit selection on the 7-segment display
placePin = [OutputDevice(pin) for pin in (10, 22, 27, 17)]

# Define segment codes for numbers 0-9 for the 7-segment display
number = (0xc0, 0xf9, 0xa4, 0xb0, 0x99, 0x92, 0x82, 0xf8, 0x80, 0x90)

counter = 0  # Initialize counter for display
timer1 = 0   # Initialize timer for counter increment

def clearDisplay():
    """ Clear the 7-segment display. """
    for _ in range(8):
        SDI.on()
        SRCLK.on()
        SRCLK.off()
    RCLK.on()
    RCLK.off()

def hc595_shift(data):
    """ Shift a byte of data to the 74HC595 shift register. """
    for i in range(8):
        SDI.value = 0x80 & (data << i)  # Set SDI high/low based on data bit
        SRCLK.on()  # Pulse the Shift Register Clock
        SRCLK.off()
    RCLK.on()  # Latch data on the output by pulsing Register Clock
    RCLK.off()

def pickDigit(digit):
    """ Select a digit for display on the 7-segment display. """
    for pin in placePin:
        pin.off()  # Turn off all digit selection pins
    placePin[digit].on()  # Turn on the selected digit

def timer():
    """ Timer function to increment the counter every second. """
    global counter, timer1
    timer1 = threading.Timer(1.0, timer)  # Reset timer for next increment
    timer1.start()
    counter += 1  # Increment counter
    print("%d" % counter)  # Print current counter value

def setup():
    """ Setup initial state and start the timer. """
    global timer1
    timer1 = threading.Timer(1.0, timer)  # Initialize and start the timer
    timer1.start()

def loop():
    """ Main loop to update the 7-segment display with counter value. """
    global counter
    while True:
        for i in range(4):  # Loop through each digit
            clearDisplay()  # Clear display before setting new digit
            pickDigit(i)    # Select digit for display

            # Choose the digit of counter to display
            digit = (counter // (10 ** i)) % 10

            hc595_shift(number[digit])  # Shift digit value to 74HC595
            time.sleep(0.001)  # Short delay for display stability

def destroy():
    """ Cleanup GPIO resources and stop timer on exit. """
    global timer1
    timer1.cancel()  # Stop the timer
    for device in [SDI, RCLK, SRCLK] + placePin:
        device.close()  # Close GPIO devices

try:
    setup()  # Initialize the setup
    while True:
        loop()  # Start the main loop

except KeyboardInterrupt:
    # Handle script interruption (e.g., Ctrl+C)
    destroy()  # Cleanup resources on exit
Explicación del Código
Estos cuatro pines controlan los pines de ánodo común de los displays de 7 segmentos de cuatro dígitos.
# Define GPIO pins for digit selection on the 7-segment display
placePin = [OutputDevice(pin) for pin in (10, 22, 27, 17)]
Un arreglo de códigos de segmentos de 0 a 9 en hexadecimal (ánodo común).
# Define segment codes for numbers 0-9 for the 7-segment display
number = (0xc0, 0xf9, 0xa4, 0xb0, 0x99, 0x92, 0x82, 0xf8, 0x80, 0x90)
Inicializa un temporizador que activa la función
timercada segundo. Esto configura el incremento recurrente del contador.def setup(): """ Setup initial state and start the timer. """ global timer1 timer1 = threading.Timer(1.0, timer) # Initialize and start the timer timer1.start()
Después de que el temporizador alcanza 1.0s, se llama a la función del temporizador; se suma 1 al contador, y el temporizador se usa nuevamente para ejecutarse repetidamente cada segundo.
def timer():
    """ Timer function to increment the counter every second. """
    global counter, timer1
    timer1 = threading.Timer(1.0, timer)  # Reset timer for next increment
    timer1.start()
    counter += 1  # Increment counter
    print("%d" % counter)  # Print current counter value
Desplaza un byte de datos al registro de desplazamiento 74HC595, controlando los segmentos de la pantalla.
def hc595_shift(data):
    """ Shift a byte of data to the 74HC595 shift register. """
    for i in range(8):
        SDI.value = 0x80 & (data << i)  # Set SDI high/low based on data bit
        SRCLK.on()  # Pulse the Shift Register Clock
        SRCLK.off()
    RCLK.on()  # Latch data on the output by pulsing Register Clock
    RCLK.off()
Actualiza continuamente la pantalla con el valor actual del contador, mostrando cada dígito secuencialmente.
def loop():
    """ Main loop to update the 7-segment display with counter value. """
    global counter
    while True:
        for i in range(4):  # Loop through each digit
            clearDisplay()  # Clear display before setting new digit
            pickDigit(i)    # Select digit for display
            digit = (counter // (10 ** i)) % 10
            hc595_shift(number[digit])  # Shift digit value to 74HC595
            time.sleep(0.001)  # Short delay for display stability
Limpia la pantalla de 7 segmentos apagando todos los segmentos antes de mostrar el siguiente dígito.
def clearDisplay():
    """ Clear the 7-segment display. """
    for _ in range(8):
        SDI.on()
        SRCLK.on()
        SRCLK.off()
    RCLK.on()
    RCLK.off()
Selecciona qué dígito de la pantalla de 7 segmentos activar. Cada dígito es controlado por un pin GPIO separado.
def pickDigit(digit):
    """ Select a digit for display on the 7-segment display. """
    for pin in placePin:
        pin.off()  # Turn off all digit selection pins
    placePin[digit].on()  # Turn on the selected digit
Libera correctamente los recursos GPIO y detiene el temporizador cuando el programa es interrumpido.
except KeyboardInterrupt:
    # Handle script interruption (e.g., Ctrl+C)
    destroy()  # Cleanup resources on exit