Note
Hello, welcome to the SunFounder Raspberry Pi & Arduino & ESP32 Enthusiasts Community on Facebook! Dive deeper into Raspberry Pi, Arduino, and ESP32 with fellow enthusiasts.
Why Join?
Expert Support: Solve post-sale issues and technical challenges with help from our community and team.
Learn & Share: Exchange tips and tutorials to enhance your skills.
Exclusive Previews: Get early access to new product announcements and sneak peeks.
Special Discounts: Enjoy exclusive discounts on our newest products.
Festive Promotions and Giveaways: Take part in giveaways and holiday promotions.
👉 Ready to explore and create with us? Click [here] and join today!
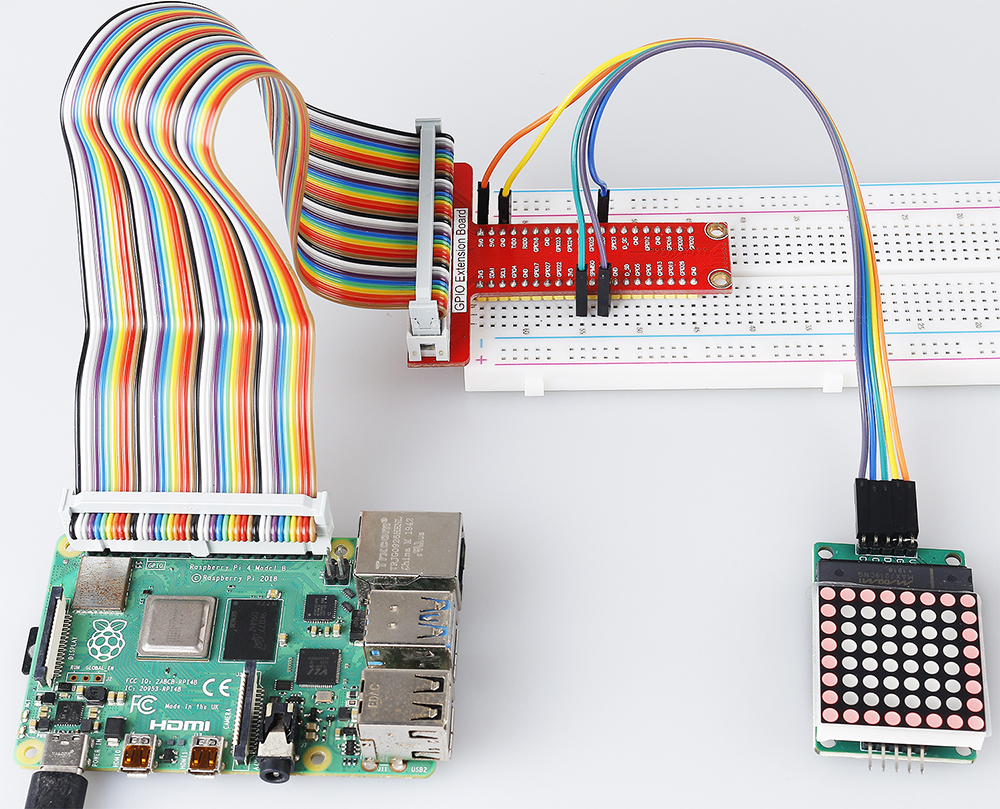
1.1.6 LED Dot Matrix
Introduction
As the name suggests, an LED dot matrix is a matrix composed of LEDs. The lighting up and dimming of the LEDs formulate different characters and patterns.
Required Components
In this project, we need the following components.
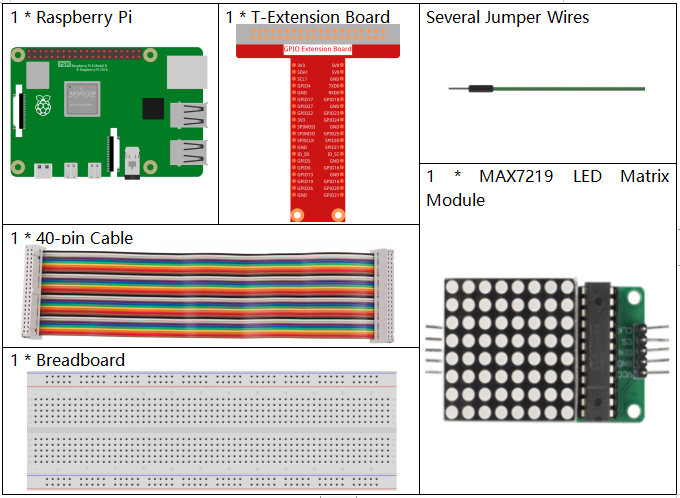
It’s definitely convenient to buy a whole kit, here’s the link:
Name |
ITEMS IN THIS KIT |
LINK |
|---|---|---|
Raphael Kit |
337 |
You can also buy them separately from the links below.
COMPONENT INTRODUCTION |
PURCHASE LINK |
|---|---|
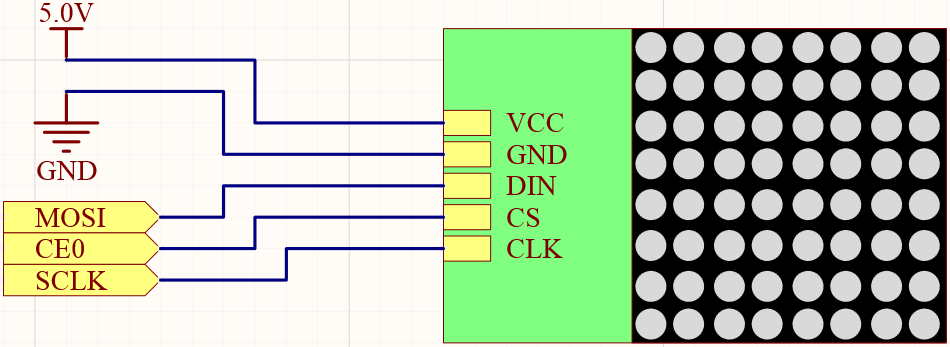
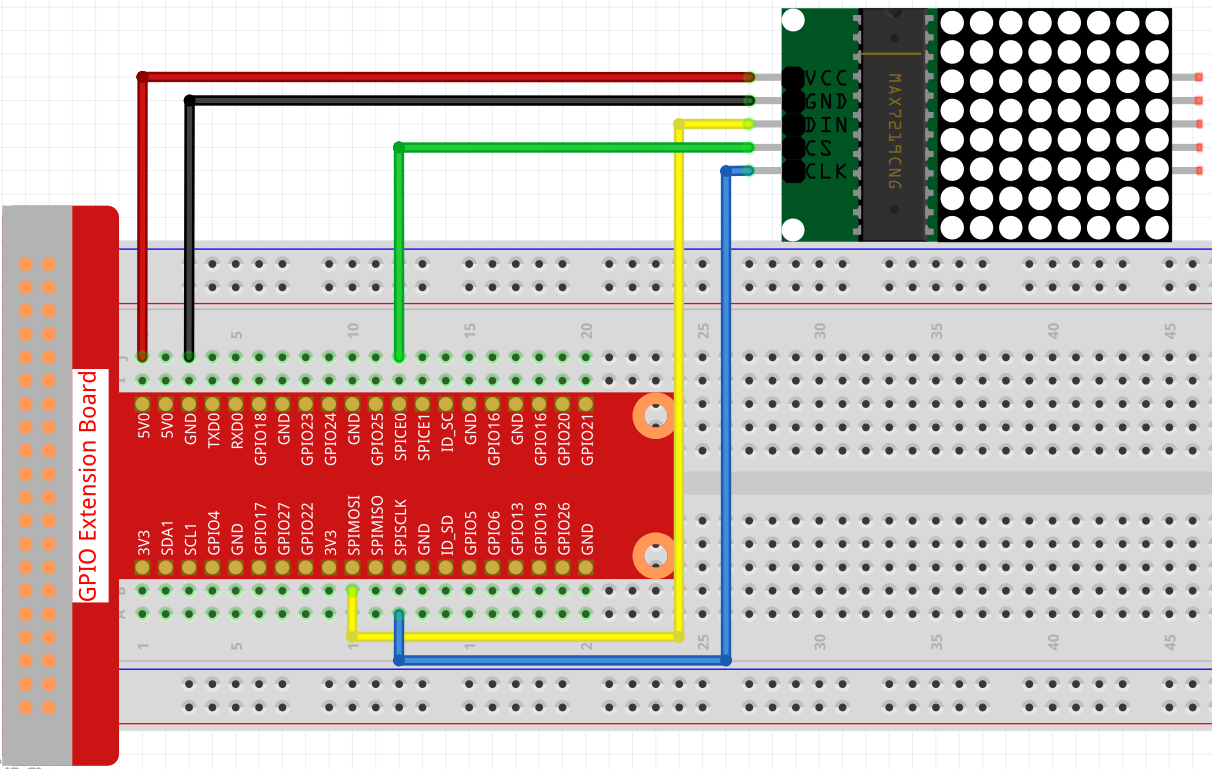
Schematic Diagram
T-Board Name |
physical |
wiringPi |
BCM |
SPIMOSI |
Pin 19 |
12 |
MOSI |
SPICE0 |
pin 24 |
10 |
CE0 |
SPISCLK |
Pin 23 |
14 |
SCLK |
Experimental Procedures
Step 1: Build the circuit.
Step 2: Turn on the SPI before starting the experiment, refer to SPI Configuration for details.
Step 3: Install Luma.LED_Matrix module.
Step 4: Change directory.
cd ~/raphael-kit/python/
Step 5: Runs the 1.1.6_LedMatrix.py Python script using the Python interpreter from the my_env virtual environment.
sudo ~/my_env/bin/python3 1.1.6_LedMatrix.py
After running the code, the LED Matrix will display a rectangle for two seconds, then the text ‘A’ for two seconds, and finally scroll to display the text “Hello, Nice to meet you!
Code
Note
You can Modify/Reset/Copy/Run/Stop the code below. But before that, you need to go to source code path like raphael-kit/python. After modifying the code, you can run it directly to see the effect.
from luma.core.interface.serial import spi, noop
from luma.core.render import canvas
from luma.core.virtual import viewport
from luma.led_matrix.device import max7219
from luma.core.legacy import text
from luma.core.legacy.font import proportional, CP437_FONT, LCD_FONT
import time

serial = spi(port=0, device=0, gpio=noop())
device = max7219(serial, rotate=1)
virtual = viewport(device, width=200, height=400)

def displayRectangle():
   with canvas(device) as draw:
      draw.rectangle(device.bounding_box, outline="white", fill="black")

def displayLetter():
   with canvas(device) as draw:
      text(draw, (0, 0), "A", fill="white", font=proportional(CP437_FONT))

def scrollToDisplayText():
   with canvas(virtual) as draw:
      text(draw, (0, 0), "Hello, Nice to meet you!", fill="white", font=proportional(CP437_FONT))

   for offset in range(150):
      virtual.set_position((offset,0))
      time.sleep(0.1)

def main():
   while True:
      displayRectangle()
      time.sleep(2)
      displayLetter()
      time.sleep(2)
      scrollToDisplayText()

def destroy():
   pass

if __name__ == '__main__':
   try:
      main()
   except KeyboardInterrupt:
      destroy()
Code Explanation
from luma.core.interface.serial import spi, noop
from luma.core.render import canvas
from luma.core.virtual import viewport
from luma.led_matrix.device import max7219
from luma.core.legacy import text
from luma.core.legacy.font import proportional, CP437_FONT, LCD_FONT
import time
Import the relevant libraries, of which luma.core is a component library that provides a Pillow-compatible canvas for Python 3, as well as other drawing primitives and text rendering features that support small displays on Raspberry Pi and other single-board computers.
You can visit https://luma-core.readthedocs.io/en/latest/intro.html to learn more.
serial = spi(port=0, device=0, gpio=noop())
device = max7219(serial, rotate=1)
Initialize the luma.led_matrix.device.max7219 class.
Note
If you want to modify the display direction of the LED Matrix, you can do so by modifying the value of rotate, where 0 means no rotation, 1 means 90° clockwise rotation, 2 means 180° rotation, and 3 means 270° clockwise rotation.
def displayRectangle():
    with canvas(device) as draw:
        draw.rectangle(device.bounding_box, outline="white", fill="black")
Display a hollow rectangle in the edge area of the LED Matrix and modify the value of fill to white to display a solid rectangle.
def displayLetter():
    with canvas(device) as draw:
        text(draw, (0, 0), "A", fill="white", font=proportional(CP437_FONT))
An “A” is displayed on the (0, 0) coordinate of the LED Matrix, where CP437_FONT is a font suitable for 8*8 dot matrix screens.
virtual = viewport(device, width=200, height=400)
There is no way to display a line of text in a single 8x8 LED matrix. We need to use the luma.core.virtual.viewport method so that the text can be scrolled through the virtual viewport.
def scrollToDisplayText():
    with canvas(virtual) as draw:
        text(draw, (0, 0), "Hello, Nice to meet you!", fill="white", font=proportional(CP437_FONT))

    for offset in range(150):
        virtual.set_position((offset,0))
        time.sleep(0.1)
scrollToDisplayText() implements “Hello, Nice to meet you!” as a scrolling text on the LED Matrix.
First, we pass virtual as an argument to the canvas() function, so that we can use the virtual window as the current display window. Then the text() function displays “Hello, Nice to meet you!” on the LED Matrix.
Using the for loop function, we move the virtual window in the X direction so that we can see the “Hello, Nice to meet you!” text scrolling.
Phenomenon Picture