Note
Hello, welcome to the SunFounder Raspberry Pi & Arduino & ESP32 Enthusiasts Community on Facebook! Dive deeper into Raspberry Pi, Arduino, and ESP32 with fellow enthusiasts.
Why Join?
Expert Support: Solve post-sale issues and technical challenges with help from our community and team.
Learn & Share: Exchange tips and tutorials to enhance your skills.
Exclusive Previews: Get early access to new product announcements and sneak peeks.
Special Discounts: Enjoy exclusive discounts on our newest products.
Festive Promotions and Giveaways: Take part in giveaways and holiday promotions.
👉 Ready to explore and create with us? Click [here] and join today!
PuTTY
If you are a Windows user, you can use some applications of SSH. Here, we recommend PuTTY.
Step 1
Download PuTTY.
Step 2
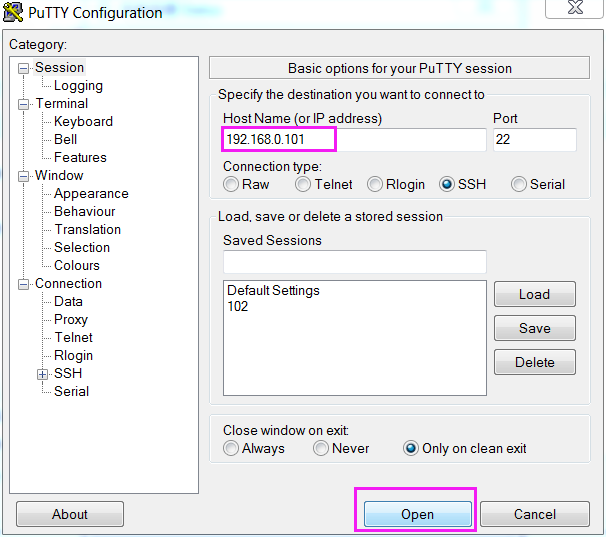
Open PuTTY and click Session on the left tree-alike structure. Enter the IP address of the RPi in the text box under Host Name (or IP address) and 22 under Port (by default it is 22).
Step 3
Click Open. Note that when you first log in to the Raspberry Pi with the IP address, there prompts a security reminder. Just click Yes.
Step 4
When the PuTTY window prompts "login as:", type in "pi" (the user name of the RPi), and password: "raspberry" (the default one, if you haven’t changed it).
Note
When you input the password, the characters do not display on window accordingly, which is normal. What you need is to input the correct password.
If inactive appears next to PuTTY, it means that the connection has been broken and needs to be reconnected.

Step 5
Here, we get the Raspberry Pi connected and it is time to conduct the next steps.