注釈
こんにちは!SunFounderのRaspberry Pi & Arduino & ESP32愛好者コミュニティへようこそ!このFacebookグループで、Raspberry Pi、Arduino、ESP32の世界をもっと深く探求し、他の愛好者たちと交流しましょう。
参加のメリット
専門的なサポート: 購入後の問題や技術的な課題を、コミュニティや私たちのチームがサポートします。
学びと共有: 技術を向上させるためのヒントやチュートリアルを交換しましょう。
限定プレビュー: 新製品の発表やプレビューをいち早くチェックできます。
特別割引: 最新製品を特別価格で購入できます。
イベントやプレゼント企画: キャンペーンやプレゼント企画に参加できます。
👉 私たちと一緒に新しい創造を始めましょう![ここ]をクリックして、今すぐ参加してください!
33. RF522-RFIDモジュールの探求
レジで長時間待たされる日々は、RFID技術のおかげで過去のものとなりました!RFIDを使用した自動チェックアウトシステムを想像してください。カートに商品を入れ、そのまま出口へ進むだけで、RFIDタグが付いた各商品が瞬時に検出・記録されます。もう一つ一つの商品をスキャンする必要はありません!
このエキサイティングなレッスンでは、RC522 RFIDリーダー/ライター・モジュールを使ってRFID技術の世界に飛び込みます。このモジュールは、低消費電力、手頃な価格、耐久性、簡単なインターフェース、そして広範な普及によって、ホビイストの間で特に人気があります。
このレッスンで学ぶこと:
RFID技術の基礎とその応用について理解する
RC522 RFIDリーダーモジュールをArduinoとインターフェースする方法を学ぶ
RC522モジュールを使ってRFIDタグに個人データを書き込む
RFIDタグから書き込んだデータを読み取り、確認する
RFIDタグ情報をI2C LCDに表示する
RC522モジュールとRFID技術とは?
RC522モジュール
RC522 RFIDリーダーモジュールは、13.56MHzの周波数で動作し、ISO 14443A規格に準拠したRFIDタグと通信するように設計されています。このコンパクトで多用途なデバイスは、アクセス制御、在庫追跡、非接触決済システムなどの用途に最適で、4ピンのSPI接続を介してマイクロコントローラとインターフェースし、最大10Mbpsのデータレートをサポートします。さらに、I2CおよびUART通信プロトコルもサポートしています。
2.5〜3.3Vで動作し、5V耐性のあるロジックピンを持つため、Arduinoやその他の5Vロジックマイクロコントローラとの統合が容易で、ロジックレベルコンバータが不要です。

VCC: モジュールに電源を供給します(2.5〜3.3V)。Arduinoの3.3V出力に接続します。5Vに接続しないでください。モジュールが故障する可能性があります。
RST: モジュールをリセットし、電源をオフにします。低電圧でパワーダウンモードに入り、立ち上がりエッジでリセットされます。
GND: グランドピンで、ArduinoのGNDに接続します。
IRQ: 割り込みピンで、RFIDタグが近くにあるときにマイクロコントローラに通知します。
MISO / SCL / Tx: SPIのマスター入力スレーブ出力、I2Cのシリアルクロック、およびUARTのシリアルデータ出力として機能します。
MOSI: モジュールへのSPI入力。
SCK: SPIバスマスター(Arduino)からのシリアルクロック入力。
SS / SDA / Rx: SPIの信号入力、I2Cのシリアルデータ、およびUARTのシリアルデータ入力。四角でマークされることが多いです。
RFID技術
RFIDシステム、つまり無線周波数識別システムは、識別するオブジェクトに取り付けられたタグと、このタグを読み取るリーダーという2つの主要なコンポーネントで構成されています。
リーダーにはRFモジュールとアンテナが含まれており、高周波の電磁場を生成します。タグは通常パッシブで、バッテリーを持たず、情報の保存と処理を行うマイクロチップと、信号を受信・送信するアンテナで構成されています。

タグがリーダーに近づくと、リーダーの電磁場がタグのチップに電力を供給し、アンテナを通じて電子の流れを誘発します。
その後、チップは保存されたデータを無線信号としてリーダーに送り返します。このプロセスは「バックキャッタリング」として知られています。リーダーはこの信号をキャプチャし、デコードして情報をコンピュータやマイクロコントローラに送信し、さらなる処理を行います。
回路の構築
モジュールについてすべて理解したところで、次はArduinoに接続してみましょう!
必要なコンポーネント
1 * Arduino Uno R3 |
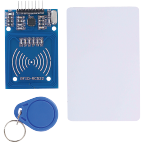
1 * RFIDモジュールとタグ |
1 * I2C LCD1602 |
|
|
|
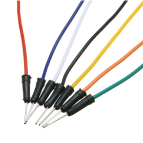
ジャンパーワイヤー |
1 * ブレッドボード |
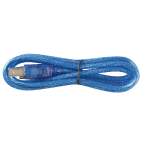
1 * USBケーブル |
|
|
|


構築手順
配線図に従うか、以下の手順に従って回路を構築します。

まず、RC522-RFIDモジュールをブレッドボードに挿入します。
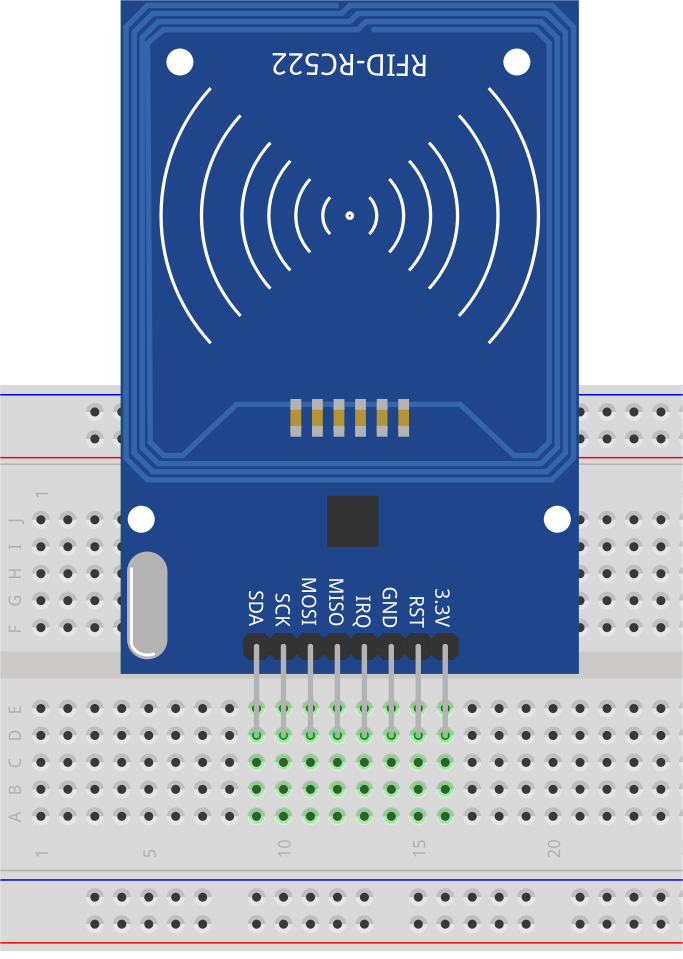
次に、RC522-RFIDモジュールとArduino Uno R3を接続します。
RC522-RFID |
Arduino UNO R3 |
|---|---|
3.3V |
3.3V |
RST |
9 |
GND |
GND |
IRQ |
|
MISO |
12 |
MOSI |
11 |
SCK |
13 |
SDA |
10 |

最後に、I2C LCD1602モジュールを接続します。GNDをArduino Uno R3のGNDに、VCCを5Vピンに、SDAをA4ピンに、SCLをA5ピンに接続します。
コード作成 - 書き込みと読み取り
このセクションでは、MFRC522 RFIDモジュールを使用するために必要なライブラリをインストールし、タグに情報を書き込み、タグから情報を読み取るためのサンプルコードを開きます。
情報の書き込み
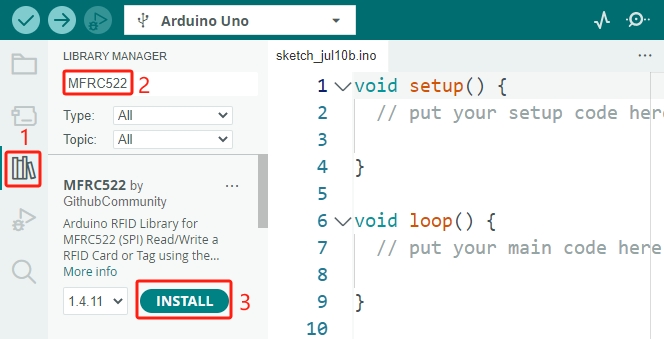
MFRC522 RFIDモジュールを使用するためには、適切なライブラリをインクルードする必要があります。まず、 ライブラリマネージャー で
MFRC522を検索し、 インストール をクリックします。
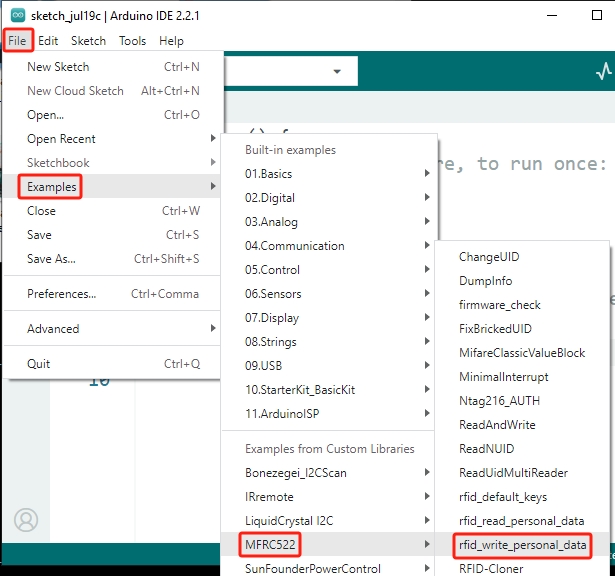
次に、 ファイル -> サンプル -> MFRC522 をクリックすると、さまざまな機能を示すサンプルコードが表示されます。
rfid_write_personal_dataサンプルコードを開きます。
アップロード をクリックして、コードをArduinoボードにアップロードします。その後、シリアルモニタを開くと、プロンプトメッセージが表示されます。

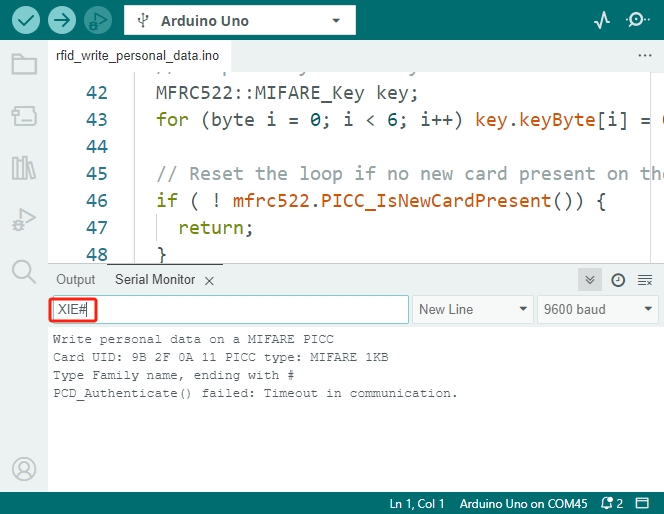
次に、提供された白いカードやタグをMFRC522モジュールの近くに置きます。タグのUID、PICCタイプ、ファミリーネームの入力を求めるメッセージが表示されます。最後に「#」を入力します。
Write personal data on a MIFARE PICC
Card UID: 9B 2F 0A 11 PICC type: MIFARE 1KB
Type Family name, ending with #
次に入力を開始します。例えば、
XIE#と入力します。Enterキーを押して入力をArduinoボードに送信すると、それがRFIDモジュールに転送されます。
注釈
データを入力する際は、カードやタグをRFIDモジュールのアンテナに近づけたままにしておいてください。そうしないとエラーが発生します。
データの書き込みが成功したメッセージが表示され、その後にファーストネームの入力を求められます。
Write personal data on a MIFARE PICC
Card UID: 9B 2F 0A 11 PICC type: MIFARE 1KB
Type Family name, ending with #
PCD_Authenticate() success:
MIFARE_Write() success:
MIFARE_Write() success:
Type First name, ending with #
次に、ファーストネームを入力します。例えば、
Daisy#と入力します。データの書き込みが成功したメッセージが再度表示されます。
Write personal data on a MIFARE PICC
Card UID: 9B 2F 0A 11 PICC type: MIFARE 1KB
Type Family name, ending with #
PCD_Authenticate() success:
MIFARE_Write() success:
MIFARE_Write() success:
Type First name, ending with #
MIFARE_Write() success:
MIFARE_Write() success:
情報の読み取り
先ほど、カードまたはタグに名前を書き込みました。次に、別のサンプルコードを開き、このカードから情報を読み取り、データが正しく書き込まれたかを確認しましょう。
同様に、 ファイル -> サンプル -> MFRC522 をクリックし、
rfid_read_personal_dataサンプルコードを開きます。

コードを開いたら、Arduinoボードにアップロードします。その後、カードをRFIDモジュールのアンテナの近くに置きます。UIDと先ほど書き込んだ名前の情報が表示されます。
**Card Detected:**
Card UID: 9B 2F 0A 11
Card SAK: 08
PICC type: MIFARE 1KB
Name:
Daisy XIE
**End Reading**
コード作成 - LCDへの表示
ここでは、カードの名前とUIDをI2C LCDに表示する方法を学びます。
注釈
I2C LCD1602に不慣れな場合は、以下のプロジェクトで基本的な使い方を学ぶことができます。
LiquidCrystal I2C ライブラリを使用します。このライブラリは、 ライブラリマネージャー からインストールできます。
Arduino IDEを開き、 ファイル メニューから「新規スケッチ」を選択して新しいプロジェクトを開始します。
スケッチを
Lesson33_RFID_LCDとして保存し、Ctrl + Sを押すか「保存」をクリックします。RFIDおよびLCDモジュールと通信するために、SPIおよびI2C通信用のライブラリをインクルードします。RFIDリーダーのリセットピン(
RST_PIN)とスレーブセレクトピン(SS_PIN)を定義します。
#include <SPI.h>                // Include the SPI library for SPI communication
#include <MFRC522.h>            // Include the library for the RFID module
#include <Wire.h>               // Include the Wire library for I2C communication
#include <LiquidCrystal_I2C.h>  // Include the library for the I2C LCD

#define RST_PIN 9  // Reset pin for the RFID module
#define SS_PIN 10  // Slave select pin for the RFID module
RFIDリーダーとLCDディスプレイを、指定されたピン接続とLCDの設定(アドレス0x27、16列、2行)で初期化します。
// Create an instance of the MFRC522 class to interface with the RFID module
MFRC522 mfrc522(SS_PIN, RST_PIN);
// Create an instance of the LiquidCrystal_I2C class for the LCD
LiquidCrystal_I2C lcd(0x27, 16, 2);
setup()関数では、シリアル通信、SPIバス、RFIDリーダー、およびLCDを初期化します。LCDのバックライトを設定し、シリアルモニタに準備完了のメッセージを送信します。
void setup() {
  Serial.begin(9600);                         // Start serial communication at 9600bps
  SPI.begin();                                // Initialize the SPI bus
  mfrc522.PCD_Init();                         // Initialize the RFID reader
  lcd.init();                                 // Initialize the LCD display
  lcd.backlight();                            // Turn on the backlight of the LCD
  Serial.println(F("Ready to read a card"));  // Print a message to start read
}
loop()関数は、常に新しいRFIDカードが検出されたかをチェックします。カードが検出されると、UIDを読み取り表示し、ブロック4からデータを読み取り表示し、少しの間ポーズを置いてからLCDをクリアします。
void loop() {
  // Check if a new RFID card is present and can be read
  if (!mfrc522.PICC_IsNewCardPresent() || !mfrc522.PICC_ReadCardSerial()) {
    return;  // If no new card is present, exit the loop
  }

  displayCardUID();           // Function to display the UID of the card
  readAndDisplayBlock(4);     // Function to read and display block4 of the RFID card
  mfrc522.PICC_HaltA();       // Halt the RFID card to stop reading
  mfrc522.PCD_StopCrypto1();  // Stop encryption on the communication
  delay(5000);                // Delay for 5 seconds
  lcd.clear();                // Clear the LCD display
}
displayCardUID()関数: カードのUIDをシリアルモニタとLCDの両方に表示するための関数です。UIDを16進数形式で表示します。
// Function to display the UID of the RFID card
void displayCardUID() {
  Serial.print(F("Card UID:"));                  // Print the text "Card UID:"
  lcd.clear();                                   // Clear the LCD display
  lcd.setCursor(0, 0);                           // Set the LCD cursor to the top-left
  lcd.print("UID:");                             // Print "UID:" on the LCD
  for (byte i = 0; i < mfrc522.uid.size; i++) {  // Loop through each byte of the UID
    Serial.print(mfrc522.uid.uidByte[i] < 0x10 ? " 0" : " ");
    Serial.print(mfrc522.uid.uidByte[i], HEX);  // Print UID byte in hexadecimal
    lcd.print(mfrc522.uid.uidByte[i] < 0x10 ? " 0" : " ");
    lcd.print(mfrc522.uid.uidByte[i], HEX);  // Print UID byte on the LCD in hexadecimal
  }
  Serial.println();  // Print a newline on the serial monitor
}
authenticateBlock関数: RFIDカードから特定のブロックを読み取り、そのブロックへのアクセスを認証し、取得したデータをLCDに表示する関数です。
// Function to authenticate and read a block from the RFID card
bool authenticateBlock(byte block, byte *buffer, byte &size) {
  MFRC522::StatusCode status;  // Variable to hold the status of RFID operations
  MFRC522::MIFARE_Key key;     // Variable to hold the authentication key
  // Set the key to the default key known as FFFFFFFFFFFFh
  for (byte i = 0; i < 6; i++) key.keyByte[i] = 0xFF;  // Default key A for authentication

  // Authenticate the desired block with the key
  status = mfrc522.PCD_Authenticate(MFRC522::PICC_CMD_MF_AUTH_KEY_A, block, &key, &(mfrc522.uid));
  if (status != MFRC522::STATUS_OK) {
    Serial.print(F("Authentication failed: "));
    Serial.println(mfrc522.GetStatusCodeName(status));
    return false;  // If authentication failed, return false
  }

  // Read the block after successful authentication
  status = mfrc522.MIFARE_Read(block, buffer, &size);
  if (status != MFRC522::STATUS_OK) {
    Serial.print(F("Reading failed: "));
    Serial.println(mfrc522.GetStatusCodeName(status));
    return false;  // If reading failed, return false
  }
  buffer[size - 1] = '\0';  // Ensure the string is null-terminated
  return true;              // Return true if reading is successful
}
readAndDisplayBlock関数: この関数は、事前に定義されたキーを使用してRFIDカード上の特定のブロックを認証し、認証が成功した場合にデータを読み取ります。
// Function to read a block and display its contents
void readAndDisplayBlock(byte block) {
  byte buffer[18];                               // Buffer to store the data read from the RFID card
  byte size = sizeof(buffer);                    // Variable to store the size of the data read
  if (authenticateBlock(block, buffer, size)) {  // If authentication and reading are successful
    lcd.setCursor(0, 1);                         // Set the cursor to the second line of the LCD
    lcd.print("Name: ");                         // Print "Name:"
    // Print the name starting from the second character to skip the size byte
    lcd.print((char *)buffer + 1);
    Serial.print("Name: ");
    Serial.println((char *)buffer + 1);  // Print the name on the serial monitor
  }
}
以下のコードをArduino Uno R3にアップロードできます。その後、カードまたはタグをRFIDモジュールのアンテナに近づけると、名前とIDがLCDとシリアルモニタの両方に表示されます。
#include <SPI.h>                // Include the SPI library for SPI communication
#include <MFRC522.h>            // Include the library for the RFID module
#include <Wire.h>               // Include the Wire library for I2C communication
#include <LiquidCrystal_I2C.h>  // Include the library for the I2C LCD

#define RST_PIN 9  // Reset pin for the RFID module
#define SS_PIN 10  // Slave select pin for the RFID module

// Create an instance of the MFRC522 class to interface with the RFID module
MFRC522 mfrc522(SS_PIN, RST_PIN);
// Create an instance of the LiquidCrystal_I2C class for the LCD
LiquidCrystal_I2C lcd(0x27, 16, 2);

void setup() {
  Serial.begin(9600);                         // Start serial communication at 9600bps
  SPI.begin();                                // Initialize the SPI bus
  mfrc522.PCD_Init();                         // Initialize the RFID reader
  lcd.init();                                 // Initialize the LCD display
  lcd.backlight();                            // Turn on the backlight of the LCD
  Serial.println(F("Ready to read a card"));  // Print a message to start read
}

void loop() {
  // Check if a new RFID card is present and can be read
  if (!mfrc522.PICC_IsNewCardPresent() || !mfrc522.PICC_ReadCardSerial()) {
    return;  // If no new card is present, exit the loop
  }

  displayCardUID();           // Function to display the UID of the card
  readAndDisplayBlock(4);     // Function to read and display block4 of the RFID card
  mfrc522.PICC_HaltA();       // Halt the RFID card to stop reading
  mfrc522.PCD_StopCrypto1();  // Stop encryption on the communication
  delay(5000);                // Delay for 5 seconds
  lcd.clear();                // Clear the LCD display
}

// Function to display the UID of the RFID card
void displayCardUID() {
  Serial.print(F("Card UID:"));                  // Print the text "Card UID:"
  lcd.clear();                                   // Clear the LCD display
  lcd.setCursor(0, 0);                           // Set the LCD cursor to the top-left
  lcd.print("UID:");                             // Print "UID:" on the LCD
  for (byte i = 0; i < mfrc522.uid.size; i++) {  // Loop through each byte of the UID
    Serial.print(mfrc522.uid.uidByte[i] < 0x10 ? " 0" : " ");
    Serial.print(mfrc522.uid.uidByte[i], HEX);  // Print UID byte in hexadecimal
    lcd.print(mfrc522.uid.uidByte[i] < 0x10 ? " 0" : " ");
    lcd.print(mfrc522.uid.uidByte[i], HEX);  // Print UID byte on the LCD in hexadecimal
  }
  Serial.println();  // Print a newline on the serial monitor
}

// Function to authenticate and read a block from the RFID card
bool authenticateBlock(byte block, byte *buffer, byte &size) {
  MFRC522::StatusCode status;  // Variable to hold the status of RFID operations
  MFRC522::MIFARE_Key key;     // Variable to hold the authentication key
  // Set the key to the default key known as FFFFFFFFFFFFh
  for (byte i = 0; i < 6; i++) key.keyByte[i] = 0xFF;  // Default key A for authentication

  // Authenticate the desired block with the key
  status = mfrc522.PCD_Authenticate(MFRC522::PICC_CMD_MF_AUTH_KEY_A, block, &key, &(mfrc522.uid));
  if (status != MFRC522::STATUS_OK) {
    Serial.print(F("Authentication failed: "));
    Serial.println(mfrc522.GetStatusCodeName(status));
    return false;  // If authentication failed, return false
  }

  // Read the block after successful authentication
  status = mfrc522.MIFARE_Read(block, buffer, &size);
  if (status != MFRC522::STATUS_OK) {
    Serial.print(F("Reading failed: "));
    Serial.println(mfrc522.GetStatusCodeName(status));
    return false;  // If reading failed, return false
  }
  buffer[size - 1] = '\0';  // Ensure the string is null-terminated
  return true;              // Return true if reading is successful
}

// Function to read a block and display its contents
void readAndDisplayBlock(byte block) {
  byte buffer[18];                               // Buffer to store the data read from the RFID card
  byte size = sizeof(buffer);                    // Variable to store the size of the data read
  if (authenticateBlock(block, buffer, size)) {  // If authentication and reading are successful
    lcd.setCursor(0, 1);                         // Set the cursor to the second line of the LCD
    lcd.print("Name: ");                         // Print "Name:"
    // Print the name starting from the second character to skip the size byte
    lcd.print((char *)buffer + 1);
    Serial.print("Name: ");
    Serial.println((char *)buffer + 1);  // Print the name on the serial monitor
  }
}
Question
RC522-RFIDモジュールを使用してカードやタグの情報を読み取ったり書き込んだりし、それをLCDに表示する方法を理解したところで、日常使用のための一般的なアクセス制御システムをどのように設計しますか?設計のアプローチを説明してください。
Summary
このレッスンでは、RC522モジュールを使用してRFID技術の力を活用する方法を学びました。基本的な概念を探求し、必要な回路を構築し、RFIDタグに個人データを書き込み、読み取り、その情報をLCDに表示しました。このレッスンを終える頃には、RFID技術を自分のプロジェクトに統合し、システムをより効率的で使いやすくするための知識を身に付けたことでしょう。