Lesson 5: Unleashing Mars Rover Mobility
Get ready, young explorers! We’ve mastered controlling motors, now we’re taking those skills to the red planet. In this lesson, we’re bringing the Mars Rover to life!
We’ll learn how to assemble the motors into the Rocker-Bogie suspension system system and then, using our coding skills, we’ll guide our Rover across imagined Martian landscapes.
It’s a Martian adventure in our classroom. Let’s get started!
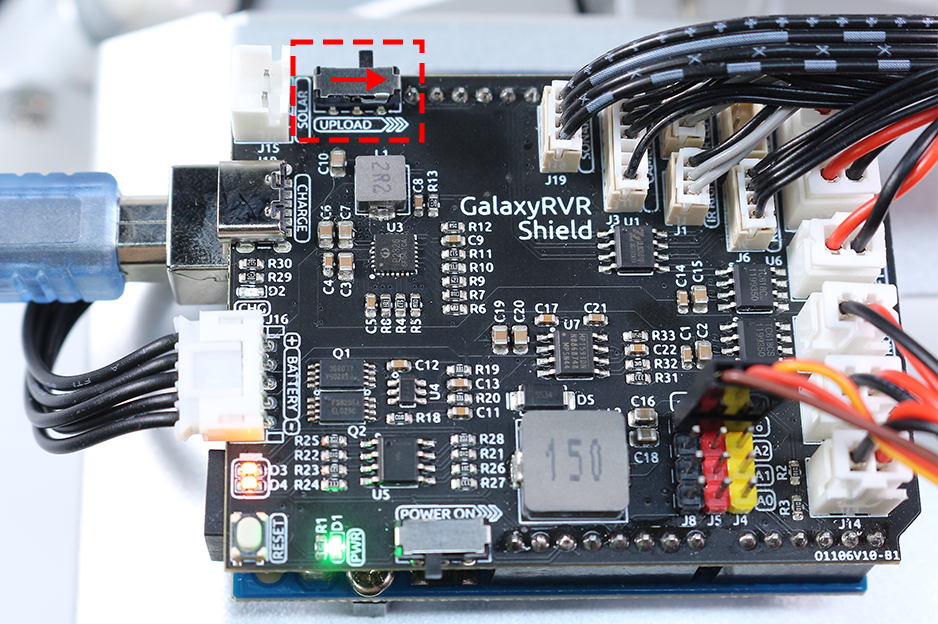
Note
If you are learning this course after fully assembling the GalaxyRVR, you need to move this switch to the right before uploading the code.
Learning Objectives
Understand how to assemble the motors into the Mars Rover’s Rocker-Bogie suspension system.
Learn to use Arduino to control the motion of the Mars Rover.
Practice writing a program to control the Mars Rover’s motion on different terrains.
Materials needed
SunFounder R3 Board
TT Motors
GalaxyRVR Shield
Battery
Mars Rover Model (Equipped with Rocker-Bogie System)
Basic tools and accessories (e.g. screwdriver, screws, etc.)
USB Cable
Arduino IDE
Computer
Steps
Step 1: Assembling the Rover Components
In this step, we will assemble the battery, R3 board, GalaxyRVR Shield, motors, and wheels onto the pre-assembled rocker-bogie system. This will bring the GalaxyRVR to a runnable state.
Congratulations! We’ve successfully built our very own rover, and it’s ready to start exploring. Let’s get moving!
Step 2: Set the Rover in Motion
Now it’s time to breathe life into our creation and send it off on its maiden voyage. But how do we communicate with our rover? How do we tell it where to go and what to do? That’s where our coding skills come into play!
In the real world, if we want a car to move forward, we push the accelerator, and both wheels start spinning. The wheels on the right side turn clockwise, while those on the left side turn counterclockwise.

Imagine you’re sitting in the driver’s seat, the world whizzing past you as you cruise along the open road - that’s exactly the experience we’re going to give our rover.
Now, let’s translate that experience into the language our rover understands - code!
#include <SoftPWM.h>

// Define the pins of motors
const int in1 = 2;
const int in2 = 3;
const int in3 = 4;
const int in4 = 5;

void setup() {
    // Initialize SoftPWM
    SoftPWMBegin();
}

void loop() {
    // Set the left motors rotate counterclockwise
    SoftPWMSet(in1, 255);  // Full speed
    SoftPWMSet(in2, 0);    // Stop

    // Set the right motors rotate clockwise
    SoftPWMSet(in3, 0);    // Stop
    SoftPWMSet(in4, 255);  // Full speed

}
In this code, we’re speaking to our rover, telling it exactly what to do.
With the SoftPWMSet() function, we’re acting like the car’s accelerator and brakes,
controlling the speed and direction of each motor.
We tell the left motors to spin counterclockwise and the right motors to spin clockwise, and just like that, our rover moves forward!
Absolutely, the concept of reversing the rover is straightforward once you understand how to move it forward. To make the rover move backward, we just need to reverse the direction of rotation of each motor.
Here’s how we’d do that in code, we do just the opposite. The right wheels should now rotate counterclockwise, and the left wheels should rotate clockwise.
#include <SoftPWM.h>

// Define the pins of motors
const int in1 = 2;
const int in2 = 3;
const int in3 = 4;
const int in4 = 5;

void setup() {
    // Initialize SoftPWM
    SoftPWMBegin();
}

void loop() {
    // Set the left motors to rotate clockwise
    SoftPWMSet(in1, 0);    // Stop
    SoftPWMSet(in2, 255);  // Full speed

    // Set the right motors to rotate counterclockwise
    SoftPWMSet(in3, 255);  // Full speed
    SoftPWMSet(in4, 0);    // Stop

}
In this code, we use SoftPWMSet() to tell the left motors to rotate clockwise and the right motors to rotate counterclockwise.
Isn’t it fascinating that we can control our rover’s journey simply with code? The next time you’re in a car, take a moment to think about the journey of your rover, exploring the world one rotation at a time. Stay tuned, because our rover’s journey is just beginning!
Step 3: Making the Rover Move in Other Directions
Now that we know how to move our Mars Rover forward and backward, what if we want it to turn left or right?
Just as in real life driving, there are two main ways for a car to turn left.
The first way is by having the wheels on the left side rotate slower than the ones on the right. This difference in speed will make the rover turn towards the left.
The second way is by making both left and right motors rotate in the same direction (clockwise in this case), which will make the rover spin to the left on its axis.
Let’s see how we can implement both ways in code:
Method 1: Different speeds on each side
#include <SoftPWM.h>

// Define the pins of motors
const int in1 = 2;
const int in2 = 3;
const int in3 = 4;
const int in4 = 5;

void setup() {
    // Initialize SoftPWM
    SoftPWMBegin();
}

void loop() {
    // Set the left motors rotate counterclockwise in low speed
    SoftPWMSet(in1, 40);
    SoftPWMSet(in2, 0);

    // Set the right motors rotate clockwise in higher speed
    SoftPWMSet(in3, 0);
    SoftPWMSet(in4, 200);

    delay(2000);  // Last for 2 seconds
}
In this code, we have decreased the speed of the left motors while keeping the right motors at a higher speed. This will make the rover turn towards the left.
Method 2: Rotating all motors in the same direction
#include <SoftPWM.h>

// Define the motor pins
const int in1 = 2;
const int in2 = 3;
const int in3 = 4;
const int in4 = 5;

void setup() {
    // Initialize SoftPWM
    SoftPWMBegin();
}

void loop() {
    // Set all motors to rotate clockwise
    SoftPWMSet(in1, 0);
    SoftPWMSet(in2, 255);
    SoftPWMSet(in3, 0);
    SoftPWMSet(in4, 255);
}
In this code, we set all motors to rotate clockwise. The rover will spin around its own axis and the direction will change to the left.
For making the rover turn right, the concepts are the same but the directions are reversed. Can you figure out how to do it?
Step 4: Moving in All Directions
As we develop more functionalities for our Mars Rover, our code could become quite long and messy. In programming, it’s a good practice to keep your code organized and maintainable. One way to achieve this is by creating separate functions for separate tasks.
In this case, we can create separate functions for each direction the rover can move. This not only makes our code easier to understand but also allows us to re-use these functions anywhere in our program without having to re-write the same lines of code.
Let’s see how we can do this:
With this structure, our main loop remains simple and easy to follow. We can clearly see that the rover moves forward, then backward, then turns left and right, and finally stops.
The details of how each of these actions is achieved are hidden away in separate functions. This is a key aspect of good programming practices known as abstraction.
Step 5: Sharing and Reflection
Congratulations on completing this exploration journey with the Mars Rover! This is a practical application of your knowledge of science and engineering, and you did a fantastic job!
Now, you can share how your rover overcomes various terrain obstacles. You could film your rover navigating different terrains, or show off your rover to your friends.
Reflecting on your learning process is also very important. What have you learned during this process? Did any new ideas or creative thoughts emerge? What have you gained in controlling motors and programming?
You can continue to explore, discover new knowledge, and constantly improve yourself. Keep it up, future scientists and engineers!