Nota
¡Hola! Bienvenido a la Comunidad de Entusiastas de SunFounder para Raspberry Pi, Arduino y ESP32 en Facebook. Sumérgete en el mundo de Raspberry Pi, Arduino y ESP32 junto a otros entusiastas.
¿Por qué unirse?
Soporte Experto: Resuelve problemas postventa y desafíos técnicos con la ayuda de nuestra comunidad y equipo.
Aprende y Comparte: Intercambia consejos y tutoriales para mejorar tus habilidades.
Avances Exclusivos: Accede anticipadamente a anuncios de nuevos productos y adelantos exclusivos.
Descuentos Especiales: Aprovecha descuentos exclusivos en nuestros productos más recientes.
Promociones Festivas y Sorteos: Participa en sorteos y promociones especiales.
👉 ¿Listo para explorar y crear con nosotros? Haz clic en [Aquí] y únete hoy mismo.
Metronome
Aquí vamos a crear un metrónomo, dividido en 5 niveles. Cuanto mayor sea el nivel, más rápido sonará el zumbador.
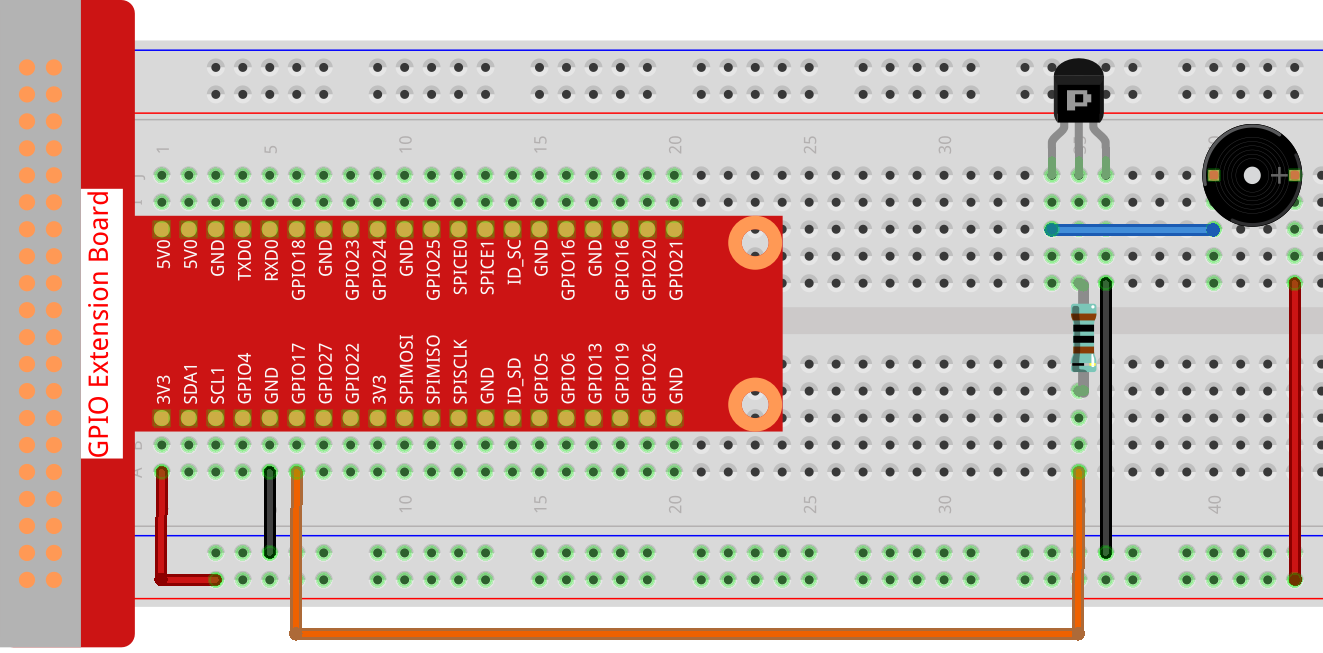
Conexión
Nota
Aquí se utiliza un zumbador activo que lleva una etiqueta blanca.
Sketch
import processing.io.*;

int level = 0;
int buzzerPin = 17;
int levelRange=5;
Slider mySlider;

void setup() {
    size(400, 200);
    frameRate(50);
    mySlider = new Slider(width * 0.2,height * 0.4,width * 0.8,height * 0.6,0,levelRange,level);
    GPIO.pinMode(buzzerPin, GPIO.OUTPUT);
}

void draw() {

    background(255);
    mySlider.show();
    if(level==0){
        GPIO.digitalWrite(buzzerPin, GPIO.HIGH);
    }else if((frameCount/5) % (levelRange-level+1) ==0){
        GPIO.digitalWrite(buzzerPin, GPIO.LOW);
    }else{
        GPIO.digitalWrite(buzzerPin, GPIO.HIGH);
    }
}

void mouseDragged(){
    level = mySlider.dragPoint(mouseX,mouseY);
}

class Slider{
    float slotPointAX;
    float slotPointBX;
    float slotPointAY;
    float slotPointBY;
    float linePoint;
    float depth;
    int maxRange;
    int minRange;
    int value;

    Slider(float ax, float ay, float bx, float by, int min, int max, int v){
        slotPointAX = ax;
        slotPointAY = ay;
        slotPointBX = bx;
        slotPointBY = by;
        maxRange = max;
        minRange = min;
        value = v;
        linePoint = slotPointAX;// + map(value, minRange, maxRange, slotPointAX, slotPointBX);
        depth = (slotPointBY - slotPointAY)*0.75;
    }

    void show(){
        rectMode(CORNERS);
        fill(200);
        stroke(255,0,0);
        rect(slotPointAX, slotPointAY, slotPointBX, slotPointBY);
        fill(255,0,0);
        rect(slotPointAX, slotPointAY, linePoint, slotPointBY);
        fill(200);
        textSize(depth);
        text(minRange, slotPointAX, slotPointBY+depth);
        text(maxRange, slotPointBX, slotPointBY+depth);
        text(value, linePoint, slotPointAY);
    }

    int dragPoint(float mx, float my){
        if(mx>=slotPointAX && mx<=slotPointBX && my>=slotPointAY && my<=slotPointBY){
            value = int(map(mx,slotPointAX,slotPointBX,minRange,maxRange));
            linePoint = map(value,minRange,maxRange,slotPointAX,slotPointBX);
        }
        return value;
    }
}
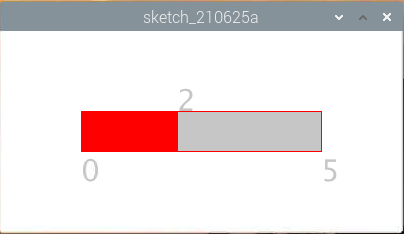
¿Cómo funciona?
Aquí, hemos creado una clase Slider que actúa como un WIDGET.
Slider(ax, ay, bx, by, min, max, v)
En la declaración, se deben pasar 7 parámetros.
Los primeros cuatro parámetros determinan el tamaño del widget, con las coordenadas (x1, y1) del punto inicial en la esquina superior izquierda y (x2, y2) en la esquina inferior derecha.
Los últimos tres parámetros determinan su rango numérico (min a max) y el valor inicial.
Tiene dos métodos. El método dragPoint() permite arrastrar el control deslizante y devuelve el valor de la posición actual del control deslizante.
int dragPoint(float mx, float my){
    if(mx>=slotPointAX && mx<=slotPointBX && my>=slotPointAY && my<=slotPointBY){
        value = int(map(mx,slotPointAX,slotPointBX,minRange,maxRange));
        linePoint = map(value,minRange,maxRange,slotPointAX,slotPointBX);
    }
    return value;
}
El otro método, show(), muestra el control deslizante. Al mismo tiempo, se muestran el valor del rango y el valor actual en la posición correspondiente.
void show(){
    rectMode(CORNERS);
    fill(200);
    stroke(255,0,0);
    rect(slotPointAX, slotPointAY, slotPointBX, slotPointBY);
    fill(255,0,0);
    rect(slotPointAX, slotPointAY, linePoint, slotPointBY);
    fill(200);
    textSize(depth);
    text(minRange, slotPointAX, slotPointBY+depth);
    text(maxRange, slotPointBX, slotPointBY+depth);
    text(value, linePoint, slotPointAY);
}
Para más información, consulta Processing Reference.