注釈
こんにちは、SunFounderのRaspberry Pi & Arduino & ESP32愛好家コミュニティへようこそ!Facebook上でRaspberry Pi、Arduino、ESP32についてもっと深く掘り下げ、他の愛好家と交流しましょう。
参加する理由は?
エキスパートサポート:コミュニティやチームの助けを借りて、販売後の問題や技術的な課題を解決します。
学び&共有:ヒントやチュートリアルを交換してスキルを向上させましょう。
独占的なプレビュー:新製品の発表や先行プレビューに早期アクセスしましょう。
特別割引:最新製品の独占割引をお楽しみください。
祭りのプロモーションとギフト:ギフトや祝日のプロモーションに参加しましょう。
👉 私たちと一緒に探索し、創造する準備はできていますか?[ここ]をクリックして今すぐ参加しましょう!
1.3.1 モーター
はじめに
このプロジェクトでは、L293Dを使用してDCモーターを駆動し、時計回りおよび反時計回りに回転させる方法を学びます。DCモーターは大電流が必要なため、安全を確保する目的で電源モジュールを使用してモーターに電力を供給します。
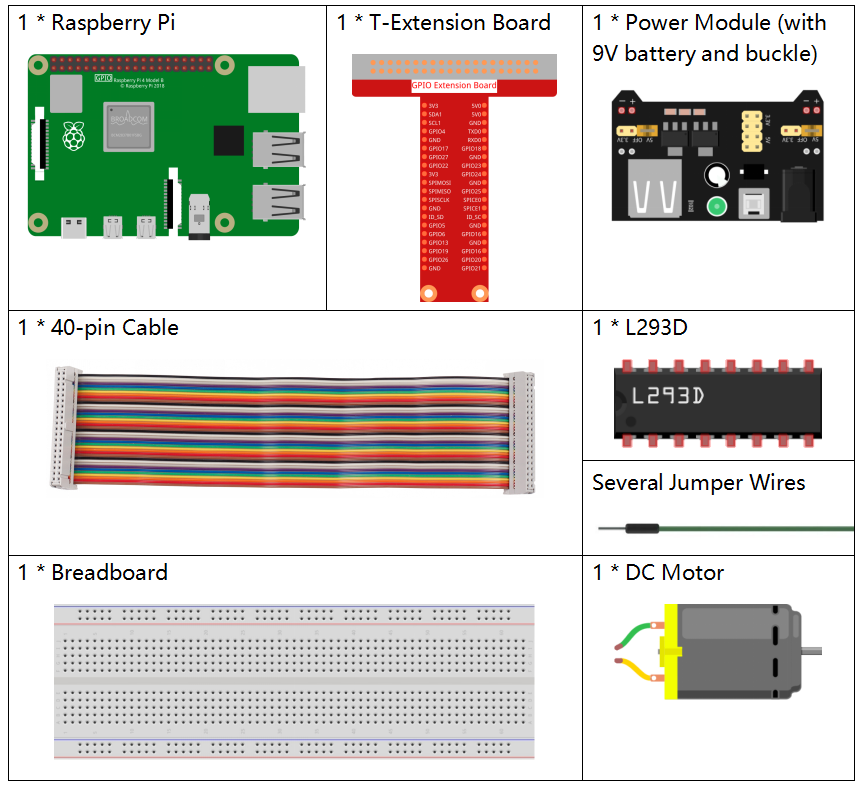
必要な部品
このプロジェクトで必要なコンポーネントは以下のとおりです。
一式をまとめて購入すると便利です、リンクはこちら:
名前 |
このキットのアイテム |
リンク |
|---|---|---|
Raphael Kit |
337 |
以下のリンクから個別にも購入可能です。
コンポーネントの説明 |
購入リンク |
|---|---|
- |
|
- |
|
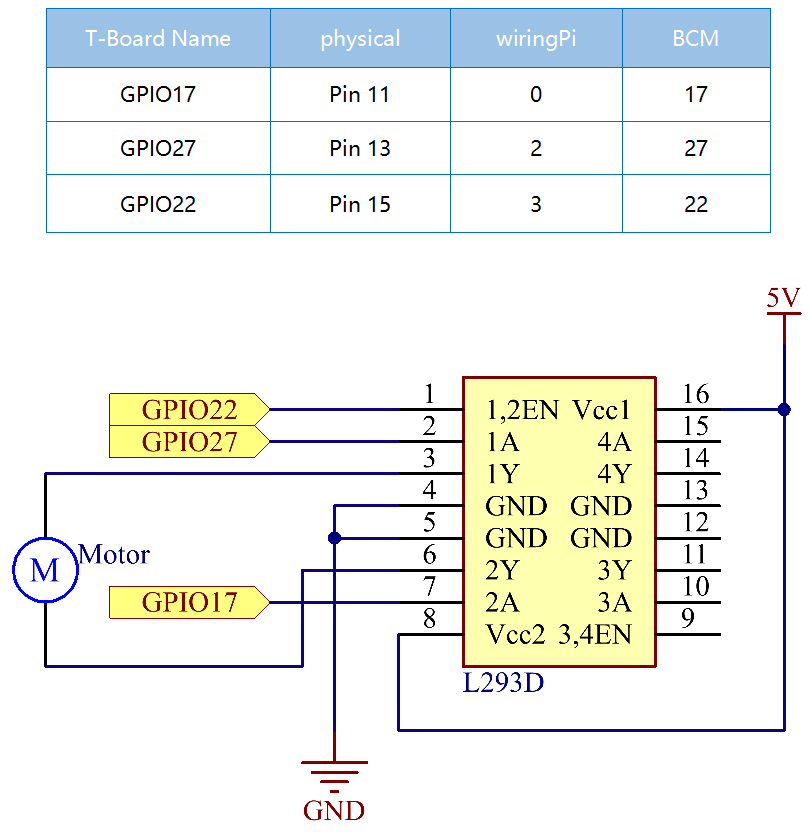
回路図
ブレッドボードに電源モジュールを差し込み、5Vのピンにジャンパーキャップを挿入すると5Vの電圧が出力されます。L293Dの1番ピンをGPIO22に接続し、それをハイレベルに設定します。ピン2をGPIO27、ピン7をGPIO17に接続し、一方をハイ、もう一方をローに設定します。これでモーターの回転方向を変更できます。
実験手順
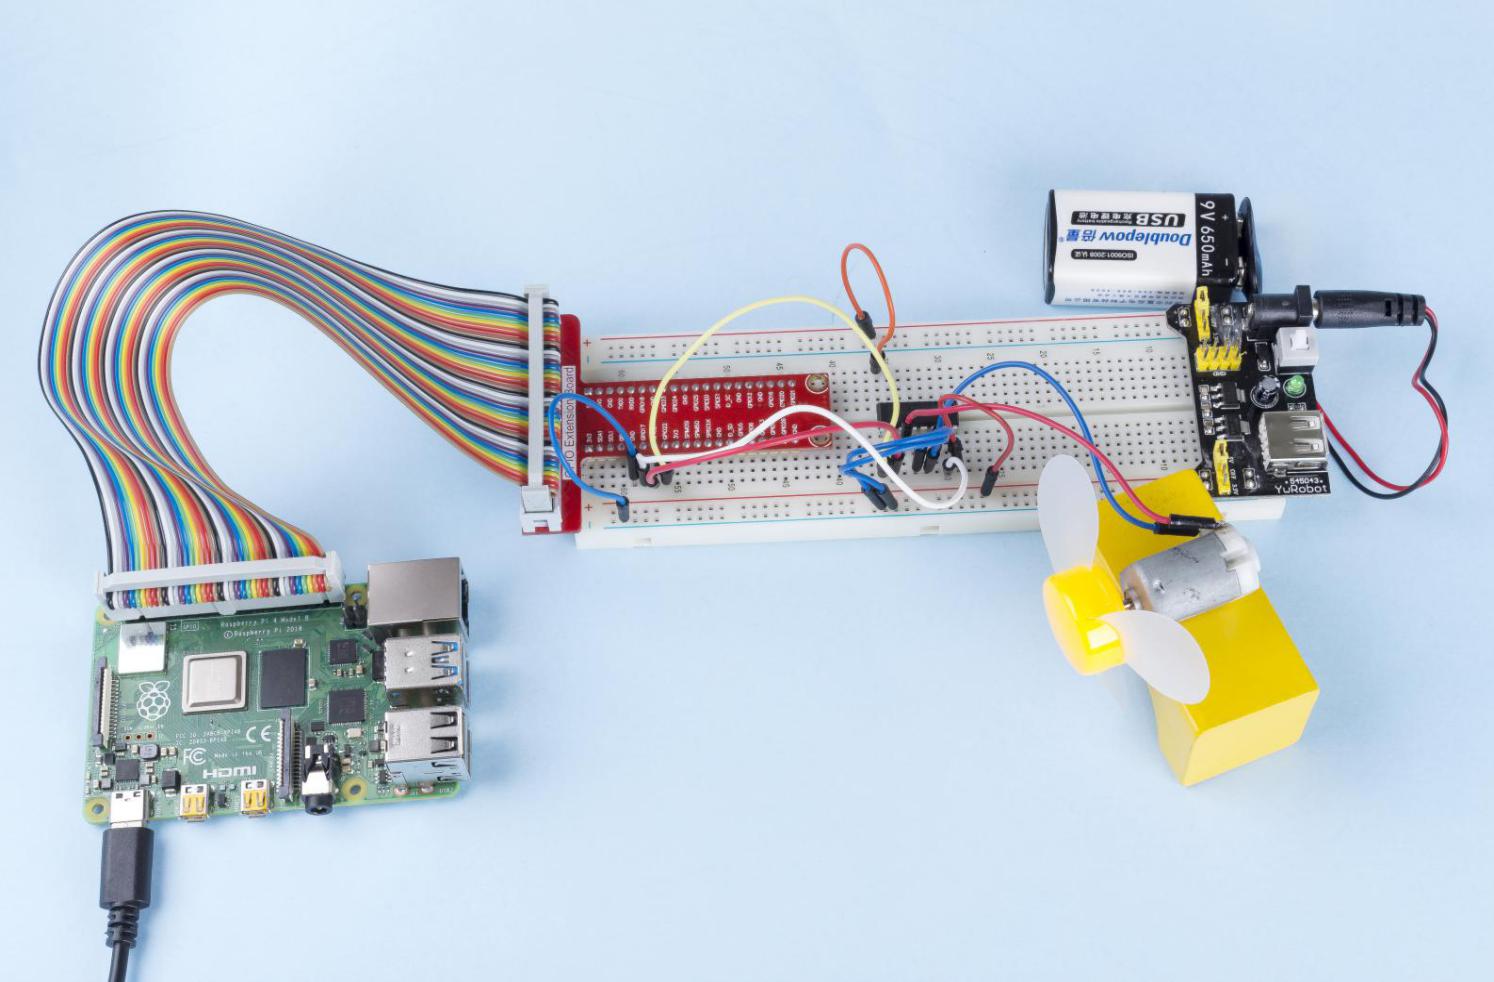
ステップ1: 回路を組む。

注釈
キット内の9Vバッテリーバックルを使用して、電源モジュールに9Vのバッテリーを接続できます。電源モジュールのジャンパーキャップをブレッドボードの5Vバスストリップに挿入します。

ステップ2: コードのフォルダに移動する。
cd ~/raphael-kit/python
ステップ3: 実行。
sudo python3 1.3.1_Motor.py
コードを実行すると、モーターは最初に5秒間時計回りに回転し、次に5秒間停止します。その後、5秒間反時計回りに回転し、再び5秒間停止します。この一連の動作は繰り返し実行されます。
コード
注釈
下のコードは 修正/リセット/コピー/実行/停止 が可能です。ただし、その前に raphael-kit/python のようなソースコードのパスに移動する必要があります。コードを修正した後、その効果を直接確認できます。
import RPi.GPIO as GPIO
import time

# Set up pins
MotorPin1   = 17
MotorPin2   = 27
MotorEnable = 22

def setup():
    # Set the GPIO modes to BCM Numbering
    GPIO.setmode(GPIO.BCM)
    # Set pins to output
    GPIO.setup(MotorPin1, GPIO.OUT)
    GPIO.setup(MotorPin2, GPIO.OUT)
    GPIO.setup(MotorEnable, GPIO.OUT, initial=GPIO.LOW)

# Define a motor function to spin the motor
# direction should be
# 1(clockwise), 0(stop), -1(counterclockwise)
def motor(direction):
    # Clockwise
    if direction == 1:
        # Set direction
        GPIO.output(MotorPin1, GPIO.HIGH)
        GPIO.output(MotorPin2, GPIO.LOW)
        # Enable the motor
        GPIO.output(MotorEnable, GPIO.HIGH)
        print ("Clockwise")
    # Counterclockwise
    if direction == -1:
        # Set direction
        GPIO.output(MotorPin1, GPIO.LOW)
        GPIO.output(MotorPin2, GPIO.HIGH)
        # Enable the motor
        GPIO.output(MotorEnable, GPIO.HIGH)
        print ("Counterclockwise")
    # Stop
    if direction == 0:
        # Disable the motor
        GPIO.output(MotorEnable, GPIO.LOW)
        print ("Stop")

def main():
    # Define a dictionary to make the script more readable
    # CW as clockwise, CCW as counterclockwise, STOP as stop
    directions = {'CW': 1, 'CCW': -1, 'STOP': 0}
    while True:
        # Clockwise
        motor(directions['CW'])
        time.sleep(5)
        # Stop
        motor(directions['STOP'])
        time.sleep(5)
        # Anticlockwise
        motor(directions['CCW'])
        time.sleep(5)
        # Stop
        motor(directions['STOP'])
        time.sleep(5)

def destroy():
    # Stop the motor
    GPIO.output(MotorEnable, GPIO.LOW)
    # Release resource
    GPIO.cleanup()

# If run this script directly, do:
if __name__ == '__main__':
    setup()
    try:
        main()
    # When 'Ctrl+C' is pressed, the program
    # destroy() will be executed.
    except KeyboardInterrupt:
        destroy()
コード解説
def motor(direction):
    # Clockwise
    if direction == 1:
        # Set direction
        GPIO.output(MotorPin1, GPIO.HIGH)
        GPIO.output(MotorPin2, GPIO.LOW)
        # Enable the motor
        GPIO.output(MotorEnable, GPIO.HIGH)
        print ("Clockwise")
...
motor() という関数を作成し、その引数にはdirectionを設定します。direction=1の条件が成立した場合、モーターは時計回りに回転します;direction=-1で反時計回り、direction=0で停止します。
def main():
    # Define a dictionary to make the script more readable
    # CW as clockwise, CCW as counterclockwise, STOP as stop
    directions = {'CW': 1, 'CCW': -1, 'STOP': 0}
    while True:
        # Clockwise
        motor(directions['CW'])
        time.sleep(5)
        # Stop
        motor(directions['STOP'])
        time.sleep(5)
        # Anticlockwise
        motor(directions['CCW'])
        time.sleep(5)
        # Stop
        motor(directions['STOP'])
        time.sleep(5)
main()関数内で、directions[]という配列を作成します。ここで、CWは1に、CCWは-1に、STOPは0に等しいと定義します。
このコードを実行すると、モーターは初めに5秒間時計回りに回転した後、5秒間停止します。その後、5秒間反時計回りに回転し、再び5秒間停止します。この一連の動作は繰り返されます。
これで、モーターブレードが回転しているのが確認できるはずです。
現象の画像