Note
Hello, welcome to the SunFounder Raspberry Pi & Arduino & ESP32 Enthusiasts Community on Facebook! Dive deeper into Raspberry Pi, Arduino, and ESP32 with fellow enthusiasts.
Why Join?
Expert Support: Solve post-sale issues and technical challenges with help from our community and team.
Learn & Share: Exchange tips and tutorials to enhance your skills.
Exclusive Previews: Get early access to new product announcements and sneak peeks.
Special Discounts: Enjoy exclusive discounts on our newest products.
Festive Promotions and Giveaways: Take part in giveaways and holiday promotions.
👉 Ready to explore and create with us? Click [here] and join today!
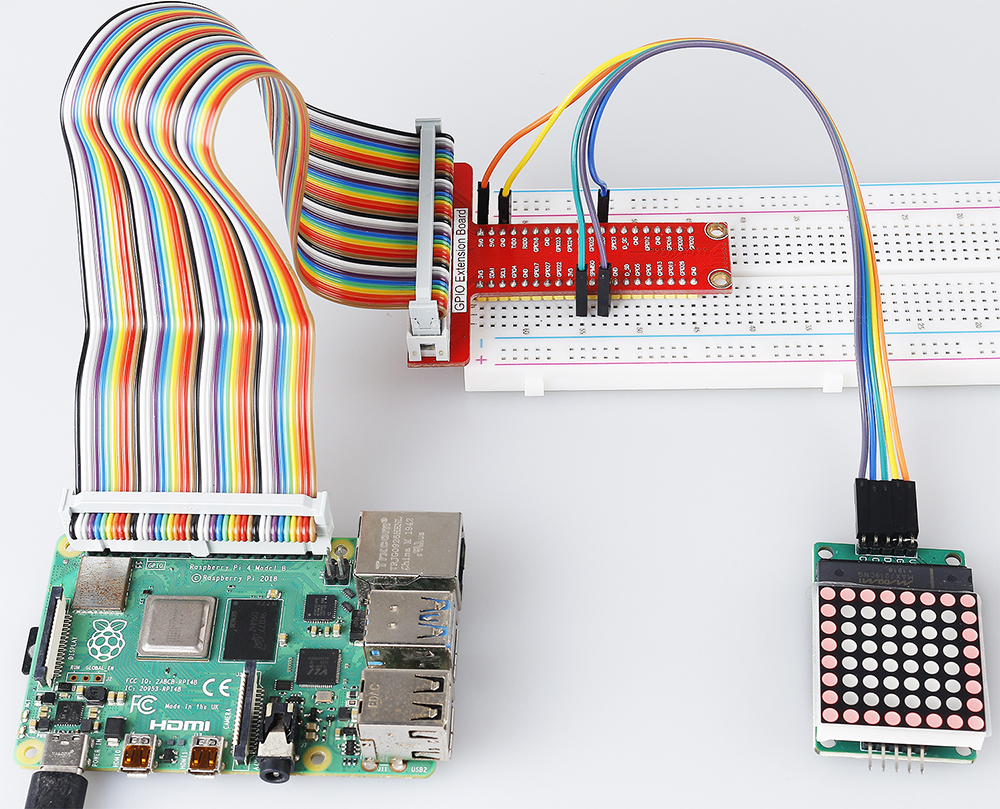
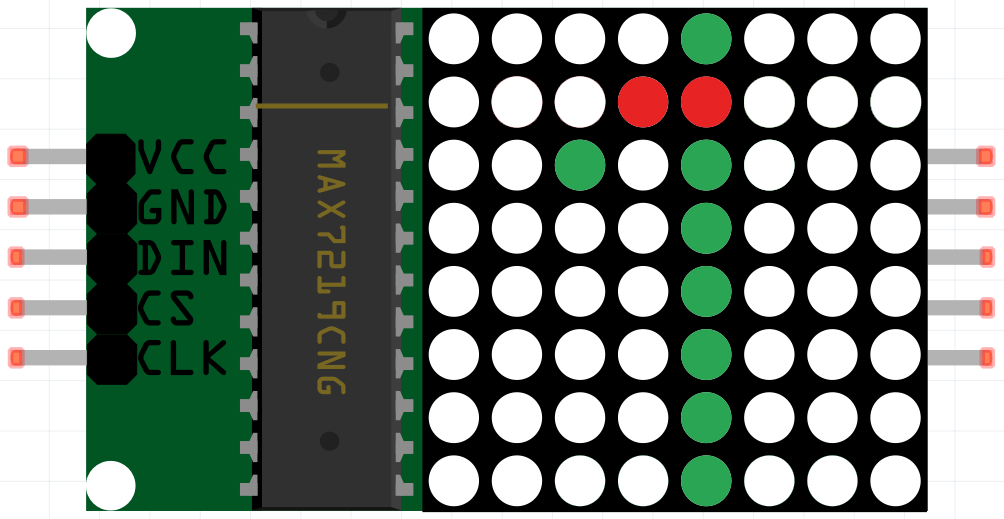
1.1.6 LED Dot Matrix Module
Introduction
In this project, you will learn about LED Matrix Module. LED Matrix Module uses the MAX7219 driver to drive the 8 x 8 LED Matrix.
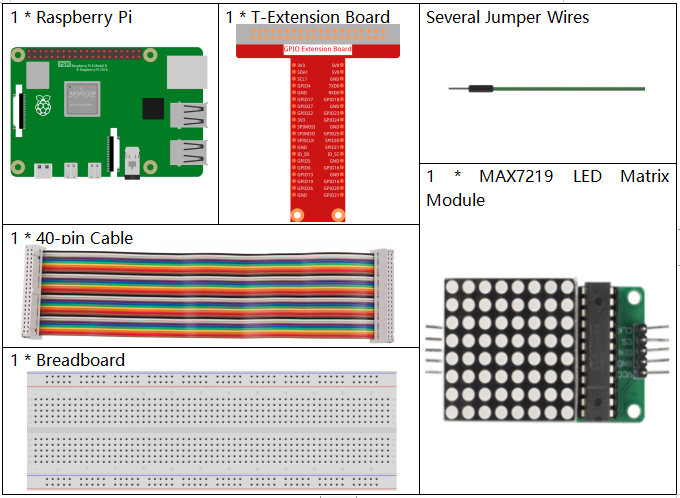
Required Components
In this project, we need the following components.
It’s definitely convenient to buy a whole kit, here’s the link:
Name |
ITEMS IN THIS KIT |
LINK |
|---|---|---|
Raphael Kit |
337 |
You can also buy them separately from the links below.
COMPONENT INTRODUCTION |
PURCHASE LINK |
|---|---|
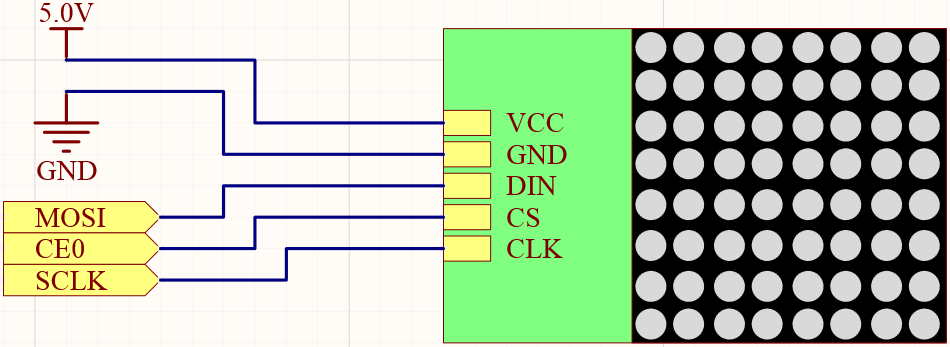
Schematic Diagram
T-Board Name |
physical |
wiringPi |
BCM |
SPIMOSI |
Pin 19 |
12 |
MOSI |
SPICE0 |
pin 24 |
10 |
CE0 |
SPISCLK |
Pin 23 |
14 |
SCLK |
Experimental Procedures
Step 1: Build the circuit.
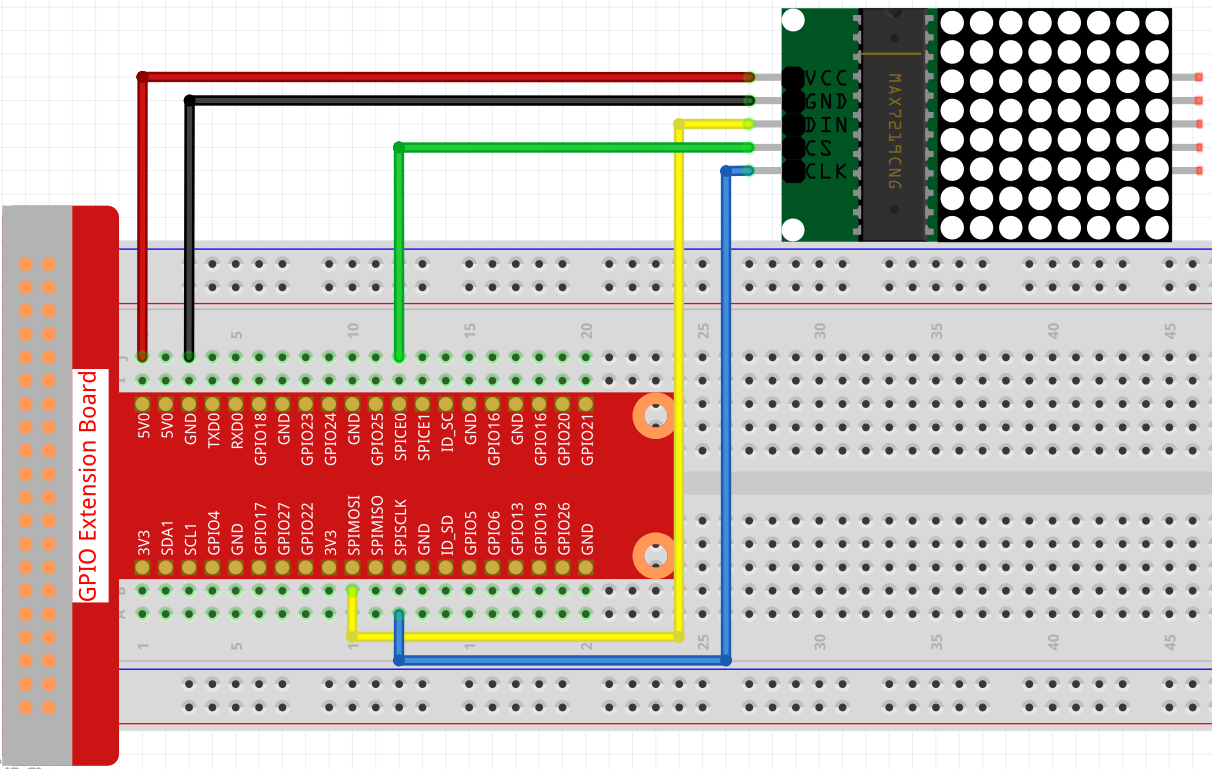
Note
Turn on the SPI before starting the experiment, refer to SPI Configuration for details.
Step 2: Go to the folder of the code.
cd ~/raphael-kit/nodejs/
Step 3: Install dependencies.
sudo npm install spi-device
Step 4: Run the code.
sudo node max7219_led_matrix.js
After running the code, the LED Dot Matrix displays from 0 to 9 and A to Z in sequence.
Code
const Gpio = require('pigpio').Gpio;
const spi = require('spi-device');

class MAX7219_LED_MATRIX {
    constructor(bus, device) {
        this.bus = bus;
        this.device = device;
    }
    delay(ms) {
        return new Promise((resolve, reject) => {setTimeout(resolve, ms)});
    }

    async write(addr, data) {
        return new Promise((resolve, reject)=>{
            const max7219 = spi.open(this.bus, this.device, (err)=>{
                if (err) reject(err);

                const message = [{
                    sendBuffer: Buffer.from([addr, data]),
                    receiveBuffer: Buffer.alloc(2),
                    byteLength: 2,
                    speedHz: 20000
                }];

                max7219.transfer(message, (err, message)=>{
                    if (err) reject(err);
                    else resolve();
                })
            })
        })
    }
    async init() {
        await this.write(0x09, 0x00);
        await this.write(0x0a, 0x03);
        await this.write(0x0b, 0x07);
        await this.write(0x0c, 0x01);
        await this.write(0x0f, 0x00);
    }
}

const DISP=[
    [0x3C,0x42,0x42,0x42,0x42,0x42,0x42,0x3C],//0
    [0x08,0x18,0x28,0x08,0x08,0x08,0x08,0x08],//1
    [0x7E,0x2,0x2,0x7E,0x40,0x40,0x40,0x7E],//2
    [0x3E,0x2,0x2,0x3E,0x2,0x2,0x3E,0x0],//3
    [0x8,0x18,0x28,0x48,0xFE,0x8,0x8,0x8],//4
    [0x3C,0x20,0x20,0x3C,0x4,0x4,0x3C,0x0],//5
    [0x3C,0x20,0x20,0x3C,0x24,0x24,0x3C,0x0],//6
    [0x3E,0x22,0x4,0x8,0x8,0x8,0x8,0x8],//7
    [0x0,0x3E,0x22,0x22,0x3E,0x22,0x22,0x3E],//8
    [0x3E,0x22,0x22,0x3E,0x2,0x2,0x2,0x3E],//9
    [0x8,0x14,0x22,0x3E,0x22,0x22,0x22,0x22],//A
    [0x3C,0x22,0x22,0x3E,0x22,0x22,0x3C,0x0],//B
    [0x3C,0x40,0x40,0x40,0x40,0x40,0x3C,0x0],//C
    [0x7C,0x42,0x42,0x42,0x42,0x42,0x7C,0x0],//D
    [0x7C,0x40,0x40,0x7C,0x40,0x40,0x40,0x7C],//E
    [0x7C,0x40,0x40,0x7C,0x40,0x40,0x40,0x40],//F
    [0x3C,0x40,0x40,0x40,0x40,0x44,0x44,0x3C],//G
    [0x44,0x44,0x44,0x7C,0x44,0x44,0x44,0x44],//H
    [0x7C,0x10,0x10,0x10,0x10,0x10,0x10,0x7C],//I
    [0x3C,0x8,0x8,0x8,0x8,0x8,0x48,0x30],//J
    [0x0,0x24,0x28,0x30,0x20,0x30,0x28,0x24],//K
    [0x40,0x40,0x40,0x40,0x40,0x40,0x40,0x7C],//L
    [0x81,0xC3,0xA5,0x99,0x81,0x81,0x81,0x81],//M
    [0x0,0x42,0x62,0x52,0x4A,0x46,0x42,0x0],//N
    [0x3C,0x42,0x42,0x42,0x42,0x42,0x42,0x3C],//O
    [0x3C,0x22,0x22,0x22,0x3C,0x20,0x20,0x20],//P
    [0x1C,0x22,0x22,0x22,0x22,0x26,0x22,0x1D],//Q
    [0x3C,0x22,0x22,0x22,0x3C,0x24,0x22,0x21],//R
    [0x0,0x1E,0x20,0x20,0x3E,0x2,0x2,0x3C],//S
    [0x0,0x3E,0x8,0x8,0x8,0x8,0x8,0x8],//T
    [0x42,0x42,0x42,0x42,0x42,0x42,0x22,0x1C],//U
    [0x42,0x42,0x42,0x42,0x42,0x42,0x24,0x18],//V
    [0x0,0x49,0x49,0x49,0x49,0x2A,0x1C,0x0],//W
    [0x0,0x41,0x22,0x14,0x8,0x14,0x22,0x41],//X
    [0x41,0x22,0x14,0x8,0x8,0x8,0x8,0x8],//Y
    [0x0,0x7F,0x2,0x4,0x8,0x10,0x20,0x7F],//Z
];

lm = new MAX7219_LED_MATRIX(0, 0);

async function main(){
    lm.init();
    while(1){
        for(let j=0;j<36;j++){
            for(let i=1;i<9;i++){
                lm.write(i, DISP[j][i-1]);
            }
            await lm.delay(1000);
        }
    }
}
main();
Code Explanation
const spi = require('spi-device');
Import the modules needed for spi communication.
Note
When you have multiple devices that need spi communication, just connect the cs pins to different pins.
class MAX7219_LED_MATRIX {
    constructor(bus, device) {
        this.bus = bus;
        this.device = device;
    }
    delay(ms) {
        return new Promise((resolve, reject) => {setTimeout(resolve, ms)});
    }

    async write(addr, data) {
        return new Promise((resolve, reject)=>{
            const max7219 = spi.open(this.bus, this.device, (err)=>{
                if (err) reject(err);

                const message = [{
                    sendBuffer: Buffer.from([addr, data]),
                    receiveBuffer: Buffer.alloc(2),
                    byteLength: 2,
                    speedHz: 20000
                }];

                max7219.transfer(message, (err, message)=>{
                    if (err) reject(err);
                    else resolve();
                })
            })
        })
    }
Implement a MAX7219_LED_MATRIX class, and the write() function encapsulated in it can light up the matrix.
Note
The async keyword is used to modify the function and is usually matched with the await keyword. The statement modified by the await keyword needs to wait for the previous code to finish running before executing, achieving the effect of synchronous blocking.
lm = new MAX7219_LED_MATRIX(0, 0);
Instantiate an object lm of the MAX7219_LED_MATRIX class, so that we can call the encapsulated write() function inside.
while(1){
    for(let j=0;j<36;j++){
        for(let i=0;i<8;i++){
            lm.write(i, DISP[j][i]);
        }
        await lm.delay(1000);
    }
}
The write(row,date) function allows you to display specified characters on the LED dot matrix,
The first parameter selects the row of the LED Matrix (8 rows in total),
The second parameter enters an 8-bit binary number to control the 8 LEDs of the row (0 means off, 1 means on).
The variable j is used to select the glyph, which is DISP[] . There are a total of 35 glyphs, 0~9 and A~Z.
For example, when j=1, the LED Maxtrix should display the image 1 .
The variable i is used to write the 8 data in the DISP[] glyph into the LED Matrix in turn. After the loop is completed, an 8x8 graphic can be generated.
For example, when j=1, i=1, the data of DISP[1][1] will be written here, that is, 0x18,
This will cause the second row of the LED Maxtrix to display the image 00011000.
Phenomenon Picture