FAQ
Quick Troubleshooting
电源按钮无法工作 → Power Button Not Working?
RGB 灯不亮 → RGB LEDs Not Working?
CPU 风扇不转 → CPU Fan Not Working?
仪表盘不显示数据 → The Dashboard Shows No Data
PI5 无法启动 → PI5 Fails to Boot (Red LED)?
1. Hardware
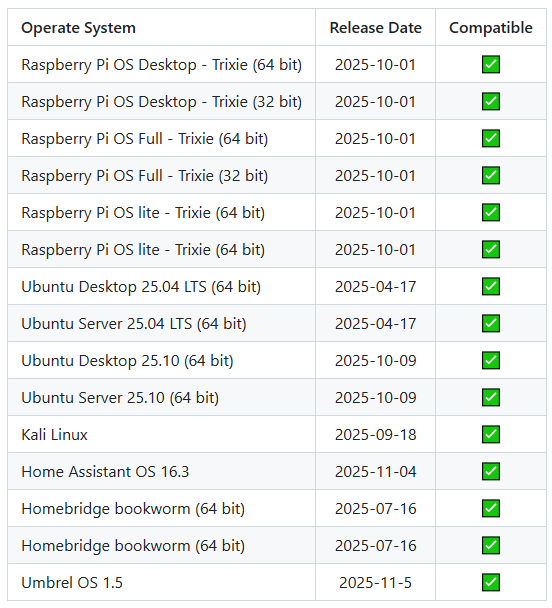
Compatible Systems
以下系统已通过 Raspberry Pi 5 的兼容性测试:
Power Button
电源按钮引出的是 Raspberry Pi 5 的电源按钮,其功能与 Raspberry Pi 5 的电源按钮完全一致。
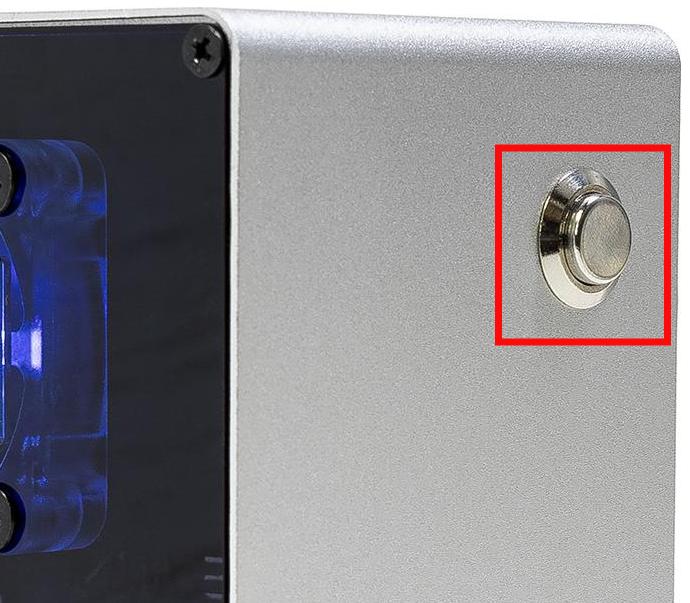
Shutdown
如果运行 Raspberry Pi OS Desktop 系统,可以快速连续按两次电源按钮关机。
如果运行 Raspberry Pi OS Lite 系统,按一次电源按钮即可关机。
长按电源按钮可强制关机。
Power on
如果 Raspberry Pi 主板已关机但仍连接电源,按一次即可从关机状态开机。
如果你运行的系统不支持关机按钮功能,可长按 5 秒强制关机,之后再按一次即可从关机状态开机。
Raspberry Pi AI HAT+
Raspberry Pi AI HAT+ 与 Pironman 5 不兼容。
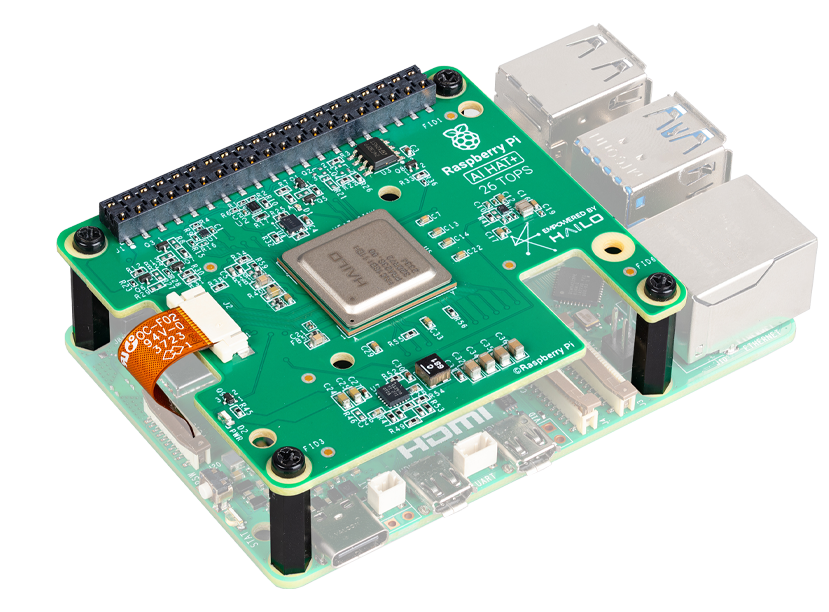
Raspberry Pi AI Kit 由 Raspberry Pi M.2 HAT+ 与 Hailo AI 加速模块组合而成。
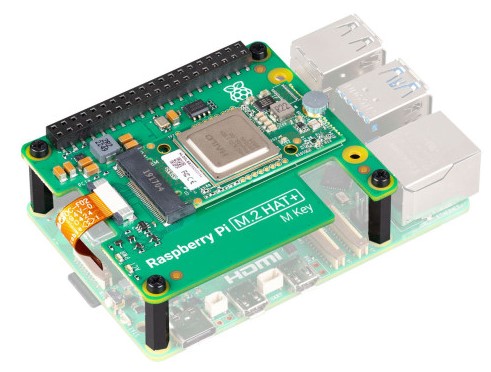
你可以将 Hailo AI 加速模块从 Raspberry Pi AI Kit 上拆下,直接插入 Pironman 5 Mini 的扩展板中使用。
Micro HDMI Cable
我们建议使用官方的 Raspberry Pi Micro HDMI 线缆。部分第三方线缆的接口长度小于 65 mm,可能会导致接触不良和显示问题。

2. Cooling and Fans
CPU Fan Not Working?
Pironman 5 上的 CPU 风扇由树莓派系统控制。CPU 风扇转速取决于树莓派 5 的 CPU 温度。
默认 CPU 风扇曲线:
< 50°C:关闭(0%)
50°C+:低速(30%)
60°C+:中速(50%)
67.5°C+:高速(70%)
75°C+:全速(100%)
检查当前 CPU 温度(示例输出:temp=48.7'C):
vcgencmd measure_temp
您可以使用以下命令手动控制 CPU 风扇:
pinctrl FAN_PWM op dl   # 启用风扇(低电平有效)
pinctrl FAN_PWM op dh   # 禁用风扇(高电平有效)
pinctrl FAN_PWM a0      # 自动模式
您也可以通过编辑以下文件来调整 CPU 风扇温度阈值:
nano /boot/firmware/config.txt
添加:
dtparam=cooling_fan=on
dtparam=fan_temp0=40000
dtparam=fan_temp0_hyst=10000
dtparam=fan_temp0_speed=125
此配置将在 40°C 时启动 CPU 风扇,PWM 速度级别为 125。
保存文件后,重启树莓派以使更改生效。
3. RGB
RGB LEDs Not Working?
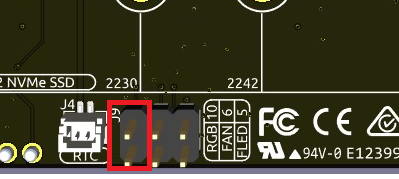
J9 上方的 IO 扩展板有两个引脚用于连接 RGB 灯至 GPIO10,请确保这两个引脚上的跳线帽已正确安装。
确认树莓派运行的是兼容的操作系统。
运行以下命令启用 SPI:
sudo raspi-config进入:
3 Interfacing Options→I3 SPI→YES然后重启树莓派。
如果问题仍然存在,请将以下日志文件发送给我们:
cat /var/log/pironman5/pironman5.log
4. Dashboard and Software
The Dashboard Shows No Data
如果仪表盘不显示数据,请先打开仪表盘的 日志 页面,检查是否有与 influxdb 相关的错误消息。
常见错误包括:
database not foundfailed to connect to influxdbconnection refusedtimeout
您可以尝试以下步骤来解决问题。
清除浏览器缓存,或使用 无痕/隐私 模式重新打开仪表盘页面。
检查以下服务是否正常运行:
sudo systemctl status pironman5 --no-pager
sudo systemctl status influxdb --no-pager
两个服务都应显示:
active (running)
如果任一服务运行不正常,请重新启动它们:
sudo systemctl restart influxdb
sudo systemctl restart pironman5
然后等待约 30 秒,刷新仪表盘页面。
检查
pironman5数据库是否存在:influx
然后运行:
SHOW DATABASES;
您应该看到:
pironman5
_internal
如果数据库缺失或损坏,您可以尝试从仪表盘中清除历史数据:
Settings → Clear All Data如果尝试以上所有步骤后问题仍然存在,我们建议重新安装 Raspberry Pi OS 和 Pironman 5 软件。
How to Disable the Web Dashboard
安装 pironman5 模块后,您可以访问 通过控制面板查看和控制。
若不需要该功能,并希望减少 CPU 和内存占用,可以在安装 pironman5 时添加 --disable-dashboard 参数来禁用控制面板:
cd ~/pironman5
sudo python3 install.py --disable-dashboard
如果您已经安装了 pironman5,可以卸载仪表盘模块和 influxdb:
/opt/pironman5/env/bin/pip3 uninstall pm-dashboard influxdb
sudo apt purge influxdb
sudo systemctl restart pironman5
How to Uninstall and Reinstall the Pironman 5 Software
卸载当前的
pironman5软件:cd ~/pironman5 sudo python3 install.py --uninstall
按提示重启树莓派,然后删除
pironman5目录:cd ~/ sudo rm -rf pironman5
运行以下命令为您的 Pironman 5 型号重新安装软件:
curl -sSL "https://raw.githubusercontent.com/sunfounder/pironman5/v1/install.sh" | sudo bash
How to Control Components Using the pironman5 Command
您可以参考以下教程,使用 pironman5 命令控制 Pironman 5 系列的组件。
5. Boot and Storage
PI5 Fails to Boot (Red LED)?
此问题可能是由于系统更新、启动顺序更改或引导程序损坏导致的。你可以尝试以下步骤来解决该问题:
重新连接电源,检查 PI5 是否能够正常启动。
在机箱外测试 PI5
将 PI5 从 Pironman 5 Mini 机箱中取出。
直接使用电源适配器给 PI5 供电(不安装在机箱内)。
检查是否可以正常启动。
恢复引导程序
如果 PI5 仍无法启动,可能是引导程序已损坏。你可以参考此指南:2. 更新引导程序(Bootloader),选择从 SD 卡或 NVMe/USB 启动。
将准备好的 SD 卡插入 PI5,通电后至少等待 10 秒。恢复完成后,取出并重新格式化 SD 卡。
然后使用 Raspberry Pi Imager 烧录最新的 Raspberry Pi OS,再尝试启动。
How to Change the Raspberry Pi Boot Order Using Commands
如果您已登录树莓派系统,可以通过命令修改启动顺序。
How to Modify the Boot Order with Raspberry Pi Imager
除了在 EEPROM 配置中修改 BOOT_ORDER,您还可以使用 Raspberry Pi Imager 更改启动顺序。
How to Copy the System from the SD Card to an NVMe SSD
如果您没有 NVMe 转 USB 适配器,可以先将系统安装到 Micro SD 卡上,成功启动后,再将系统复制到 NVMe SSD。
6. Advanced Usage
How to Remove the Protective Film
包装内包含两块亚克力板,正反两面均贴有黄色或透明保护膜,用于防止刮花。保护膜可能较难揭除,可使用螺丝刀轻轻刮起角落,再慢慢撕下整张膜。

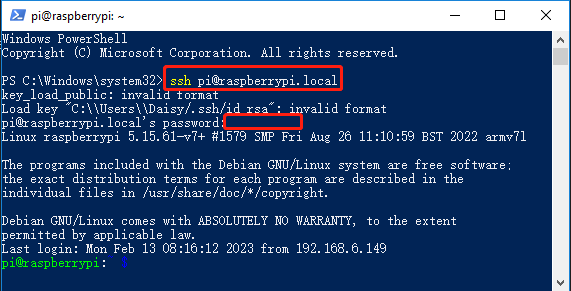
How to Install OpenSSH via Powershell?
当你使用 ssh <username>@<hostname>.local(或 ssh <username>@<IP address>)连接 Raspberry Pi 时,出现以下错误提示:
ssh: The term 'ssh' is not recognized as the name of a cmdlet, function, script file, or operable program. Check the
spelling of the name, or if a path was included, verify that the path is correct and try again.
说明你的电脑系统版本过旧,未预装 OpenSSH,需按照以下教程手动安装。
在 Windows 桌面搜索栏中输入
powershell,右键点击Windows PowerShell,选择 Run as administrator(以管理员身份运行)。
使用以下命令安装
OpenSSH.Client:Add-WindowsCapability -Online -Name OpenSSH.Client~~~~0.0.1.0
安装完成后,将返回以下输出:
Path          :
Online        : True
RestartNeeded : False
使用以下命令验证安装:
Get-WindowsCapability -Online | Where-Object Name -like 'OpenSSH*'
现在提示你
OpenSSH.Client已成功安装:Name : OpenSSH.Client~~~~0.0.1.0 State : Installed Name : OpenSSH.Server~~~~0.0.1.0 State : NotPresent
警告
如果没有出现上述提示,说明你的 Windows 系统版本仍然过旧,建议安装第三方 SSH 工具,如 PuTTY。
现在重启 PowerShell,继续以管理员身份运行。此时你将能够使用
ssh命令登录 Raspberry Pi,系统将提示你输入之前设置的密码。