Note
Welcome to the SunFounder Raspberry Pi, Arduino & ESP32 Community on Facebook!
Get technical support and troubleshooting help.
Learn and share projects, tips, and tutorials.
Access early product previews and updates.
Enjoy exclusive discounts and giveaways.
👉 Join us here: [here]
Using OpenClaw
What is OpenClaw?
Think of it as an upgraded version of ChatGPT. While traditional chatbots can only talk (generate text), OpenClaw can take action. It understands your natural language instructions and can actually perform operations on your computer, such as running commands, managing files, and calling various tools.
Here are some fantastic application scenarios:
Personal All-around Assistant: Let it help you manage your schedule, set reminders, and track tasks. You just need to tell it in a chat app (like Telegram, WhatsApp), and it will remember and execute.
Automation “Glue”: It can act as a binder for your various services. For example, you can have it monitor a website for price changes. Once a price drop is detected, it can automatically trigger an n8n automation workflow to send you an email notification.
Dedicated Development Assistant: Have it help you manage servers, run scripts, and check logs. You can simply say, “Check the system load for me,” and it can SSH into your server, execute the command, and return the results.
Hardware “Playmate”: This is a very interesting use case. You can have OpenClaw control hardware connected to a Raspberry Pi. For example, a developer used it to control a robotic vacuum cleaner with a mechanical arm, or even had it help analyze racing simulator data and display it on an LED screen. The official Raspberry Pi team even used it to build an automatic photo booth for a wedding, just through conversation, without writing a single line of code!
Why install openclaw on a Raspberry Pi?
Installing it on a Raspberry Pi has two main advantages:
Security Isolation: OpenClaw requires higher system permissions, which poses a risk on a primary computer. Using a Raspberry Pi as a dedicated device is like giving it a “sandbox”; even if something goes wrong, it won’t affect your main system.
24/7 Online: The Raspberry Pi has extremely low power consumption, allowing it to stay on all the time, ready to execute tasks at any moment.
Quick Start OpenClaw
If you want to experience the power of OpenClaw as quickly as possible, use this method. It will automatically install and launch an interactive setup wizard.
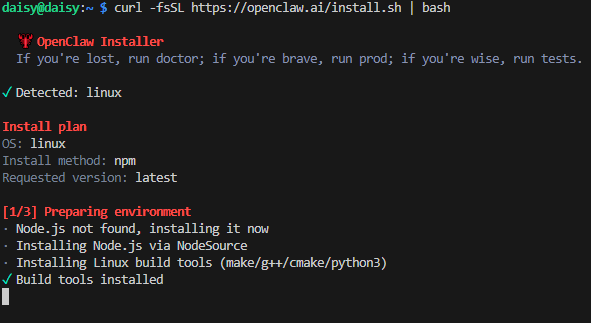
Open the terminal on your Raspberry Pi and run the following command directly. This command downloads the installation script from the official website and executes it:
curl -fsSL https://openclaw.ai/install.sh | bash
Note
Because new versions are updated rapidly, it’s normal if your installation steps differ slightly.
The script will automatically download and install OpenClaw.
You will then see a security prompt asking if you trust OpenClaw. Once you are sure it is safe and reliable, use the arrow keys to navigate to “Yes” and press Enter.

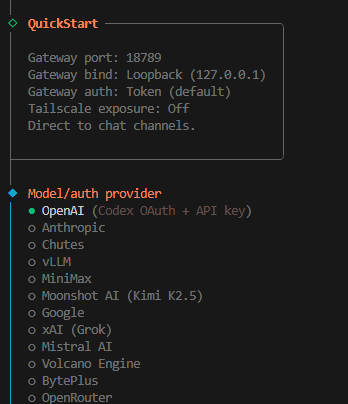
Select Quick Start, and then press Enter.

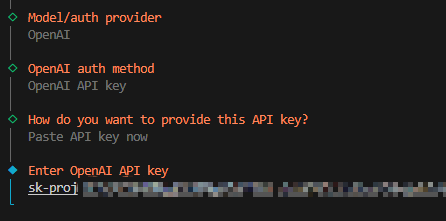
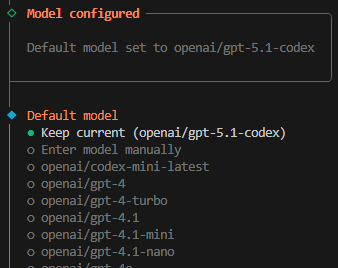
Select your Model, and then press Enter. Here we use OpenAI as an example.
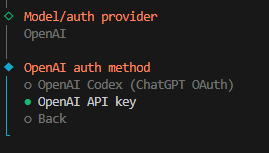
Select OpenAI API Key.
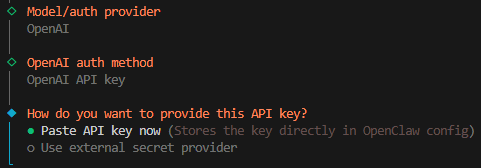
Paste API key now.
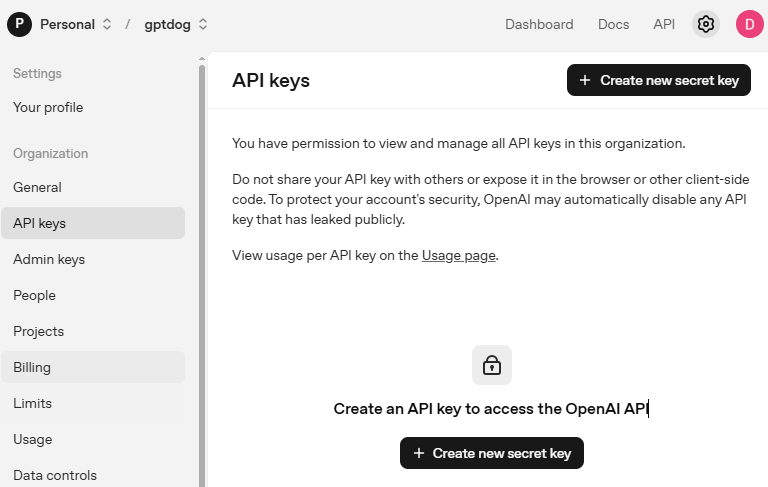
Go to OpenAI Platform and log in. On the API keys page, click Create new secret key.
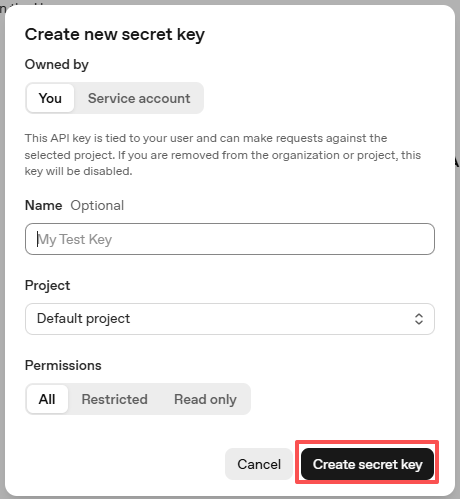
Fill in the details (Owner, Name, Project, and permissions if needed), then click Create secret key.
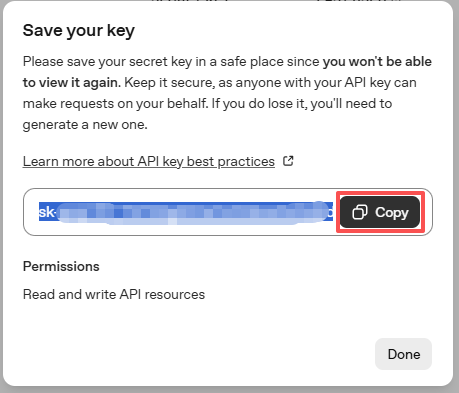
Once the key is created, copy it right away — you won’t be able to see it again. If you lose it, you’ll need to generate a new one.
Paste the key into the OpenCLaw configuration.
Select the Model you want to use. In this example, we will use Keep current.
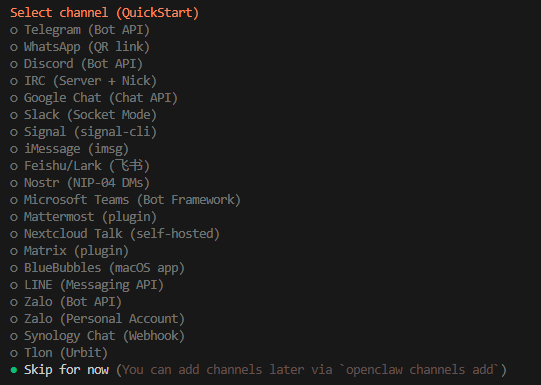
Next is the channel selection. Channels refer to the communication services supported by OpenClaw, such as Telegram, WhatsApp, Discord, and more. Use the down arrow key to select the “Skip for now” option, then press Enter.
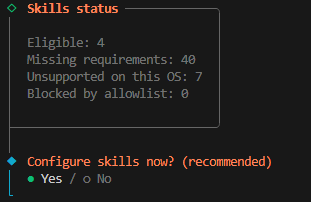
Next, you will be prompted to configure skills immediately. Select “Yes” and press Enter.
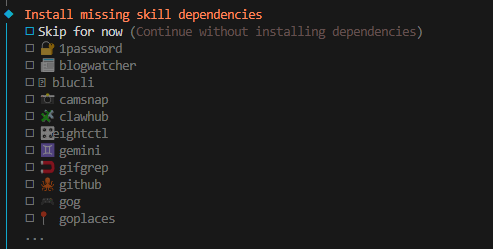
Install the skills you need. In the following example, we select the “Skip for now” option (press the spacebar to select), then press Enter.
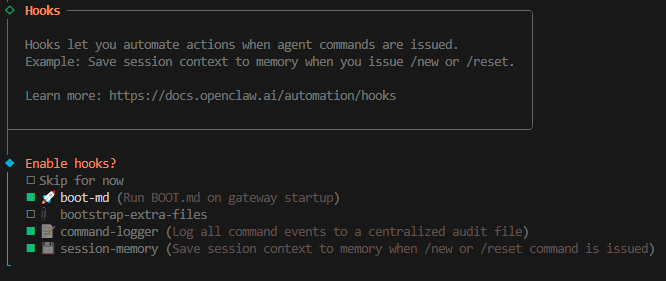
Next are Hooks; we will check “command-logger” and “session-memory”.
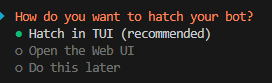
The installation is now complete. You can start OpenClaw by Selecting “Hatch in TUI” and pressing Enter.
Note
You can start OpenClaw by entering the following command:
openclaw tui
And You can press ctrl+c twice to exit the tui interface.
Making OpenClaw Operate the Pironman5 Mini
To enable OpenClaw to operate the Pironman5 Mini, we need to install the Pironman5 Mini skill.
Ensure you have already installed the Pironman5 Mini. If not, please refer to mini_download_pironman5_module.
Run the following command in the terminal:
mkdir -p ~/.openclaw/skills && rsync -av --delete ~/pironman5/skill/pironman5-mini-skill/ ~/.openclaw/skills/pironman5-mini-skill/
You can now operate the Pironman5 Mini in
openclaw tui. Try sending commands in the TUI, such as attempting to turn on the LED lights on the case, change their color, or have the camera take a photo. You can even tell it that you have a DHT11 module connected to GPIO17 and let it tell you the temperature.
Note
If OpenClaw is still unable to recognize the skill you imported, please remind it to rsync.
Operate Your System with Telegram
Overview
Through OpenClaw, you can use popular messaging apps to operate your system (here, we use Telegram as an example). You can even let OpenClaw help you complete this configuration.
Simply ask in openclaw tui: “I want to connect you to Telegram, what should I do?”
It will guide you through the process step by step, and you can follow its instructions to complete the setup.
Prerequisites
Before you begin, make sure you have:
A Telegram account
Network access to Telegram
OpenClaw successfully running (verify with
openclaw status)
Step 1: Create a Telegram Bot
Find @BotFather on Telegram (the official bot creator)
Create a new bot: Send the
/newbotcommandFollow the prompts:
Give your bot a name (e.g.,
My OpenClaw Helper)Set a username for your bot (must end with
_bot, e.g.,my_openclaw_bot)
Upon success, you’ll receive a message containing your Bot Token, similar to:
1234567890:ABCdefGHIjklMNOpqrsTUVwxyz
Warning
Guard this token like a password!
Step 2: Configure Telegram in OpenClaw
In openclaw tui, directly say:
> “I want to connect my Telegram bot to OpenClaw. Here’s my Bot Token: <your-token-here>. Please help me complete the configuration.”
OpenClaw will automatically:
Install necessary dependencies (like
node-telegram-bot-api)Create the Telegram gateway configuration file
Test if the connection is successful
Step 3: Test the Connection
Find your newly created bot on Telegram
Send the
/startcommandThe bot should reply with a pairing code, send this code to the OpenClaw TUI (like
Pairing code: ZAN4XI34)Wait the configured correctly
Try sending simple commands like “hello”
If everything is configured correctly, you should see the response from your bot
Step 4: Enjoy!
After completing this configuration, you’ll be able to:
Control your Raspberry Pi anytime, anywhere via Telegram
Execute commands remotely and check system status
Control physical devices by integrating with GPIO (like turning on LEDs)
Enjoy an intelligent interactive experience with your AI assistant
Security Configuration (Critical!)
To prevent strangers from controlling your system, be sure to implement the following security measures:
Security Measure |
Configuration Method |
Description |
|---|---|---|
Restrict Users |
Set |
Only allow specific Telegram users |
Set Password |
Add |
Require password verification before commands |
Restrict Commands |
Create command whitelist |
Only allow specific predefined commands |
Audit Logs |
Enable |
Log all commands executed via Telegram |
Remember: Security first! Always restrict users and command scope appropriately. If you encounter specific issues during configuration, feel free to ask for help.
OpenClaw Troubleshooting
During installation, I get the error
Error: systemctl is-enabled unavailable: Command failed: systemctl --user is-enabled openclaw-gateway.service. What should I do?You can ignore this for now, but you might encounter issues in the next steps. Please refer to them one by one at that time.
When I run
openclaw tui, I get the error-bash: openclaw: command not found. What should I do?Execute the following command:
echo 'export PATH="$HOME/.npm-global/bin:$PATH"' >> ~/.bashrc
source ~/.bashrc
You should now be able to start the tui interface with
openclaw tui.
In
openclaw tui, I encounternot connected to gateway — message not sentor the messagegateway disconnected: closed.This is because your OpenClaw Gateway service is not started. Open another terminal and execute the following command to start the OpenClaw Gateway:
openclaw gatewayThen restart
openclaw tui, and you can use it directly.
I want to set the OpenClaw Gateway service to run in the background / start automatically on boot. How do I do that?
Normally, your OpenClaw Gateway service should start automatically on boot. If it doesn’t, you can manually start it with the following command.
Create the
~/.config/systemd/userdirectory:
mkdir -p ~/.config/systemd/user
Create the
openclaw-gateway.servicefile:
cat > ~/.config/systemd/user/openclaw-gateway.service << EOF
[Unit]
Description=OpenClaw Gateway
After=network.target

[Service]
Type=simple
ExecStart=$HOME/.npm-global/bin/openclaw gateway run
Restart=on-failure
RestartSec=10
Environment="PATH=$HOME/.npm-global/bin:/usr/local/bin:/usr/bin:/bin:/usr/sbin"
Environment="NODE_ENV=production"

[Install]
WantedBy=default.target
EOF
Then reload the systemd configuration:
systemctl --user daemon-reload
Start the service:
systemctl --user start openclaw-gateway
At this point, restart
openclaw tui, and you can use it directly.Enable it to start on boot:
systemctl --user enable openclaw-gateway
My OpenClaw can not operate the system, what should I do?
A newly installed OpenClaw may not have permission to operate your Raspberry Pi system by default; it can only chat. We need to manually configure the permissions.
Open the OpenClaw configuration file:
nano ~/.openclaw/openclaw.jsonFind the
toolsoption and change theprofileandexecas shown.
"tools": {
    "profile": "coding",
    "exec": {
        "secrity": "full"
    }
},
Save and exit.
Enter the following command in the terminal to restart the OpenClaw Gateway:
openclaw gateway restart
Now, OpenClaw should have read and write permissions and be able to operate your Raspberry Pi system.