Note
Welcome to the SunFounder Raspberry Pi, Arduino & ESP32 Community on Facebook!
Get technical support and troubleshooting help.
Learn and share projects, tips, and tutorials.
Access early product previews and updates.
Enjoy exclusive discounts and giveaways.
👉 Join us here: [here]
FAQ
Quick Troubleshooting
Power button not working → Power Button Not Working?
RGB LEDs not working → RGB LEDs Not Working?
CPU fan not spinning → CPU Fan Not Working?
Dashboard shows no data → The Dashboard Shows No Data
PI5 fails to boot → PI5 Fails to Boot (Red LED)?
1. Hardware
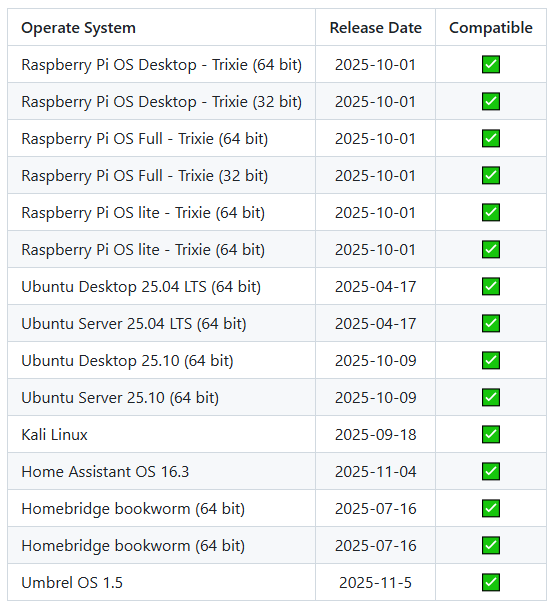
Compatible Systems
Systems that passed testing on the Raspberry Pi 5:
Power Button
The power button brings out the power button of the Raspberry Pi 5, and it functions just like the power button of the Raspberry Pi 5.

Shutdown
If you run Raspberry Pi OS Desktop system, you can press the power button twice in quick succession to shutdown.
If you run Raspberry Pi OS Lite system, press the power button a single time to initiate a shutdown.
To force a hard shutdown, press and hold the power button.
Power on
If the Raspberry Pi board is shut down, but still powered, single-press to power on from a shutdown state.
If you are running a system that does not support a shutdown button, you can hold it for 5 seconds to force a hard shutdown, and single-press to power on from a shutdown state.
Raspberry Pi AI HAT+
The Raspberry Pi AI HAT+ is not compatible with the Pironman 5.
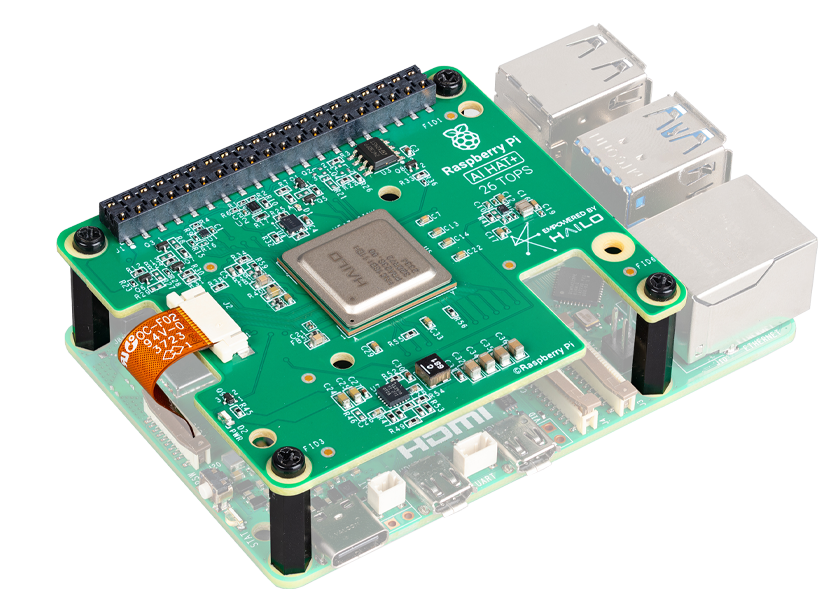
The Raspberry Pi AI Kit combines the Raspberry Pi M.2 HAT+ and the Hailo AI accelerator module.
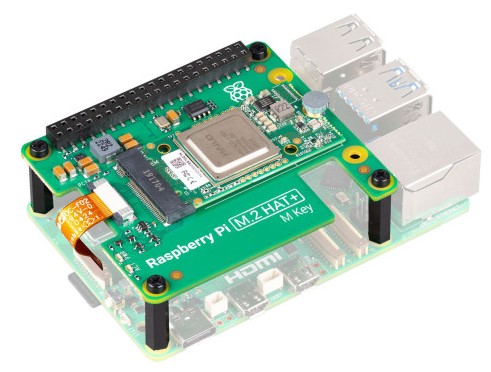
You can detach the Hailo AI accelerator module from the Raspberry Pi AI Kit and directly insert it into the HAT of the Pironman 5 Mini.
Micro HDMI Cable
We recommend using the official Raspberry Pi Micro HDMI cable. Some third-party cables with a connector length shorter than 65 mm may cause poor contact and display issues.

2. Cooling and Fans
CPU Fan Not Working?
The CPU fan on the Pironman 5 is controlled by the Raspberry Pi system. The CPU fan speed depends on the Raspberry Pi 5 CPU temperature.
Default CPU fan curve:
< 50°C: Off (0%)
50°C+: Low speed (30%)
60°C+: Medium speed (50%)
67.5°C+: High speed (70%)
75°C+: Full speed (100%)
Check the current CPU temperature (example output: temp=48.7'C):
vcgencmd measure_temp
You can manually control the CPU fan using the following commands:
pinctrl FAN_PWM op dl   # Enable fan (low active)
pinctrl FAN_PWM op dh   # Disable fan (high active)
pinctrl FAN_PWM a0      # Auto mode
You can also adjust the CPU fan temperature thresholds by editing:
nano /boot/firmware/config.txt
Add:
dtparam=cooling_fan=on
dtparam=fan_temp0=40000
dtparam=fan_temp0_hyst=10000
dtparam=fan_temp0_speed=125
This configuration starts the CPU fan at 40°C with PWM speed level 125.
After saving the file, reboot the Raspberry Pi for the changes to take effect.
3. RGB
RGB LEDs Not Working?
The two pins on the expansion board are used to connect the RGB LEDs to GPIO10. Ensure that the jumper cap on these two pins is properly installed.

Confirm that the Raspberry Pi is running a supported operating system.
See Compatible Systems.
Run the following command to enable SPI:
sudo raspi-configNavigate to:
3 Interfacing Options→I3 SPI→YESThen reboot the Raspberry Pi.
If the issue still persists, please send us the following log file:
cat /var/log/pironman5/pironman5.log
4. Dashboard and Software
The Dashboard Shows No Data
If the Dashboard shows no data, first open the Dashboard Log page and check whether there are any error messages related to influxdb.
Common errors include:
database not foundfailed to connect to influxdbconnection refusedtimeout
You can try the following steps to resolve the issue.
Clear your browser cache, or reopen the Dashboard page using Incognito / Private mode.
Check whether the following services are running properly:
sudo systemctl status pironman5 --no-pager
sudo systemctl status influxdb --no-pager
Both services should display:
active (running)
If either service is not running properly, restart them:
sudo systemctl restart influxdb
sudo systemctl restart pironman5
Then wait about 30 seconds and refresh the Dashboard page.
Check whether the
pironman5database exists:influx
Then run:
SHOW DATABASES;
You should see:
pironman5
_internal
If the database is missing or corrupted, you can try clearing the historical data from the Dashboard using:
Settings → Clear All DataIf the issue still persists after trying all the above steps, we recommend reinstalling the Raspberry Pi OS and Pironman 5 software.
How to Disable the Web Dashboard
Once you have completed the installation of the pironman5 module, you will be able to access the View and Control from Dashboard.
If you do not need this feature and want to reduce CPU and RAM usage, you can disable the dashboard during installation by adding the --disable-dashboard flag.
cd ~/pironman5
sudo python3 install.py --disable-dashboard
If you have already installed pironman5, you can remove the Dashboard module and influxdb:
/opt/pironman5/venv/bin/pip3 uninstall pm-dashboard influxdb
sudo apt purge influxdb
sudo systemctl restart pironman5
How to Uninstall and Reinstall the Pironman 5 Software
Uninstall the current
pironman5software:cd ~/pironman5 sudo python3 install.py --uninstall
Reboot the Raspberry Pi as prompted, then remove the
pironman5directory:cd ~/ sudo rm -rf pironman5
Run the following command to reinstall the software for your Pironman 5 model:
curl -sSL "https://raw.githubusercontent.com/sunfounder/pironman5/v1/install.sh" | sudo bash
How to Control Components Using the pironman5 Command
You can refer to the following tutorial to control the components of the Pironman 5 series using the pironman5 command.
5. Boot and Storage
PI5 Fails to Boot (Red LED)?
This issue may be caused by a system update, changes to the boot order, or a corrupted bootloader. You can try the following steps to resolve the problem:
Reconnect the power supply and check if the PI5 boots successfully.
Test PI5 Outside the Case
Remove the PI5 from the Pironman 5 Mini case.
Power the PI5 directly with the power adapter (without the case).
Check if it can boot normally.
Restore the Bootloader
If the PI5 still cannot boot, the bootloader may be corrupted. You can follow this guide: 2. Update the Bootloader and choose whether to boot from SD card or NVMe/USB.
Insert the prepared SD card into the PI5, power it on, and wait at least 10 seconds. Once the recovery is complete, remove and reformat the SD card.
Then use Raspberry Pi Imager to flash the latest Raspberry Pi OS and try booting again.
How to Change the Raspberry Pi Boot Order Using Commands
If you are already logged into your Raspberry Pi, you can change the boot order using commands.
How to Modify the Boot Order with Raspberry Pi Imager
In addition to modifying the BOOT_ORDER in the EEPROM configuration, you can also use Raspberry Pi Imager to change the boot order.
How to Copy the System from the SD Card to an NVMe SSD
If you do not have an NVMe-to-USB adapter, you can first install the system onto a Micro SD card, then copy the system to the NVMe SSD after booting successfully.
6. Advanced Usage
How to Remove the Protective Film
Two acrylic panels are included in the package, both covered with yellow/transparent protective film on both sides to prevent scratches.
The protective film may be difficult to remove. Use a screwdriver to gently lift one corner, then carefully peel off the entire film.

How to Install OpenSSH via Powershell?
When you use ssh <username>@<hostname>.local (or ssh <username>@<IP address>) to connect to your Raspberry Pi, but the following error message appears.
ssh: The term 'ssh' is not recognized as the name of a cmdlet, function, script file, or operable program. Check the
spelling of the name, or if a path was included, verify that the path is correct and try again.
It means your computer system is too old and does not have OpenSSH pre-installed, you need to follow the tutorial below to install it manually.
Type
powershellin the search box of your Windows desktop, right click on theWindows PowerShell, and selectRun as administratorfrom the menu that appears.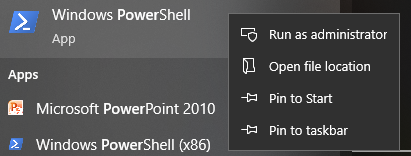
Use the following command to install
OpenSSH.Client.Add-WindowsCapability -Online -Name OpenSSH.Client~~~~0.0.1.0
After installation, the following output will be returned.
Path          :
Online        : True
RestartNeeded : False
Verify the installation by using the following command.
Get-WindowsCapability -Online | Where-Object Name -like 'OpenSSH*'
It now tells you that
OpenSSH.Clienthas been successfully installed.Name : OpenSSH.Client~~~~0.0.1.0 State : Installed Name : OpenSSH.Server~~~~0.0.1.0 State : NotPresent
Warning
If the above prompt does not appear, it means that your Windows system is still too old, and you are advised to install a third-party SSH tool, like PuTTY.
Now restart PowerShell and continue to run it as administrator. At this point you will be able to log in to your Raspberry Pi using the
sshcommand, where you will be prompted to enter the password you set up earlier.