Note
Welcome to the SunFounder Raspberry Pi, Arduino & ESP32 Community on Facebook!
Get technical support and troubleshooting help.
Learn and share projects, tips, and tutorials.
Access early product previews and updates.
Enjoy exclusive discounts and giveaways.
👉 Join us here: [here]
Setting Up on Raspberry Pi OS/Ubuntu/Kali Linux/Homebridge

If you have installed Raspberry Pi OS, Ubuntu, Kali Linux or Homebridge on your Raspberry Pi, you will need to configure the Pironman 5 MAX using the command line.
Note
Before configuring, you need to boot up and log into your Raspberry Pi. If you’re unsure how to log in, you can visit the official Raspberry Pi website: Getting Started with Raspberry Pi.
1. Configuring Shutdown to Deactivate GPIO Power
To prevent the OLED screen and GPIO Fans, powered by the Raspberry Pi GPIO, from remaining active post-shutdown, it’s essential to configure the Raspberry Pi for GPIO power deactivation.
Open the EEPROM configuration tool:
sudo raspi-config
Navigate to Advanced Options → A12 Shutdown Behaviour.
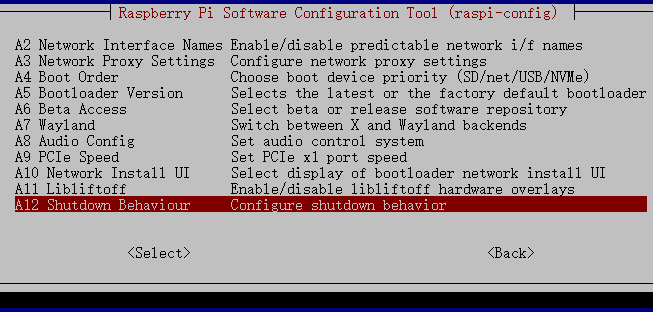
Select B1 Full Power Off….
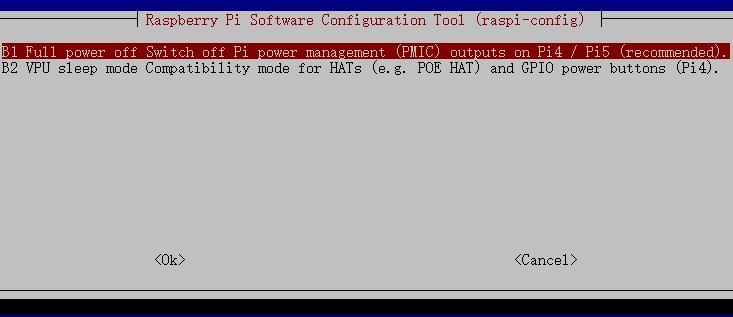
Save the changes. You will be prompted to reboot for the new settings to take effect.
2. Installing the pironman5 Module
Download and install the
pironman5module from GitHub.curl -sSL "https://raw.githubusercontent.com/sunfounder/pironman5/v1/install.sh" | sudo bash
Note
If you are using Ubuntu, install
curlfirst:sudo apt install curl -yIf you are using Pironman 5 series together with PiPower 5, run the following command instead:
curl -sSL "https://raw.githubusercontent.com/sunfounder/pironman5/v1/install.sh" | sudo bash -s -- --pipower5
After running the installer, select your Pironman 5 model (1~4).
Pironman 5 Installer v1.0.1
Supports: 5 | 5 Mini | 5 Max | 5 Pro Max

Please select your product model:
1) Pironman 5
2) Pironman 5 Mini
3) Pironman 5 Max
4) Pironman 5 Pro Max

Enter number [1-4]:
Once the installation is complete, reboot the Raspberry Pi as prompted. The first startup may take up to 30 seconds while the services initialize.
After Pironman 5 MAX starts successfully, check whether the following components are working properly.
OLED Screen
Displays CPU usage, RAM usage, CPU temperature, and IP address.
Turns off automatically after 10 seconds.
Briefly press the power button to wake the screen or switch pages.
Power Button
Briefly press: Power on / wake up OLED / switch OLED page.
Hold for 2 seconds: Safe shutdown (requires 1. Configuring Shutdown to Deactivate GPIO Power).
Hold for 5 seconds: Force shutdown.
WS2812 RGB LEDs
Light up in blue with a breathing effect.
Two GPIO Fans
Set to Always On mode by default.
The working mode can be changed via commands or the Dashboard.
CPU Fan (Tower Cooler Fan)
Automatically adjusts speed based on CPU temperature.
Default fan curve:
< 50°C: Off (0%)
50°C+: Low (30%)
60°C+: Medium (50%)
67.5°C+: High (70%)
75°C+: Full speed (100%)
Use
systemctlto manage thepironman5.service.sudo systemctl restart pironman5.service
Replace
restartwithstart,stop, orstatusas needed to manage the service.
Note
Pironman 5 is now ready to use.
For advanced controls and dashboard features, see 5. Control with Commands or Dashboard.