Note
Hello, welcome to the SunFounder Raspberry Pi & Arduino & ESP32 Enthusiasts Community on Facebook! Dive deeper into Raspberry Pi, Arduino, and ESP32 with fellow enthusiasts.
Why Join?
Expert Support: Solve post-sale issues and technical challenges with help from our community and team.
Learn & Share: Exchange tips and tutorials to enhance your skills.
Exclusive Previews: Get early access to new product announcements and sneak peeks.
Special Discounts: Enjoy exclusive discounts on our newest products.
Festive Promotions and Giveaways: Take part in giveaways and holiday promotions.
👉 Ready to explore and create with us? Click [here] and join today!
While Loops
The while statement is used to execute a program in a loop, that is, to execute a program in a loop under certain conditions to handle the same task that needs to be processed repeatedly.
Its basic form is:
while test expression:
    Body of while
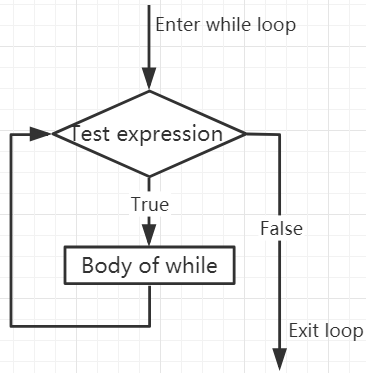
In the while loop, first check the test expression. Only when test expression evaluates to True, enter the body of the while. After one iteration, check the test expression again. This process continues until test expression evaluates to False.
In MicroPython, the body of the while loop is determined by indentation.
The body starts with an indentation and ends with the first unindented line.
Python interprets any non-zero value as True. None and 0 are interpreted as False.
while Loop Flowchart
x = 10

while x > 0:
    print(x)
    x -= 1
>>> %Run -c $EDITOR_CONTENT
10
9
8
7
6
5
4
3
2
1
Break Statement
With the break statement we can stop the loop even if the while condition is true:
x = 10

while x > 0:
    print(x)
    if x == 6:
        break
    x -= 1
>>> %Run -c $EDITOR_CONTENT
10
9
8
7
6
While Loop with Else
Like the if loop, the while loop can also have an optional else block.
If the condition in the while loop is evaluated as False, the else part is executed.
x = 10

while x > 0:
    print(x)
    x -= 1
else:
    print("Game Over")
>>> %Run -c $EDITOR_CONTENT
10
9
8
7
6
5
4
3
2
1
Game Over