4. Cloud Music Player
The goal of this project is to create a music player using Blynk. Music is played in the same way as in 5.7 Tone() or noTone(), by writing the song in the program and playing it with a passive buzzer. however, in this example, we can click the switch to play/pause and slide the slider to change the playback progress.
Required Components
In this project, we need the following components.
It’s definitely convenient to buy a whole kit, here’s the link:
Name |
ITEMS IN THIS KIT |
LINK |
|---|---|---|
3 in 1 Starter Kit |
380+ |
You can also buy them separately from the links below.
COMPONENT INTRODUCTION |
PURCHASE LINK |
|---|---|
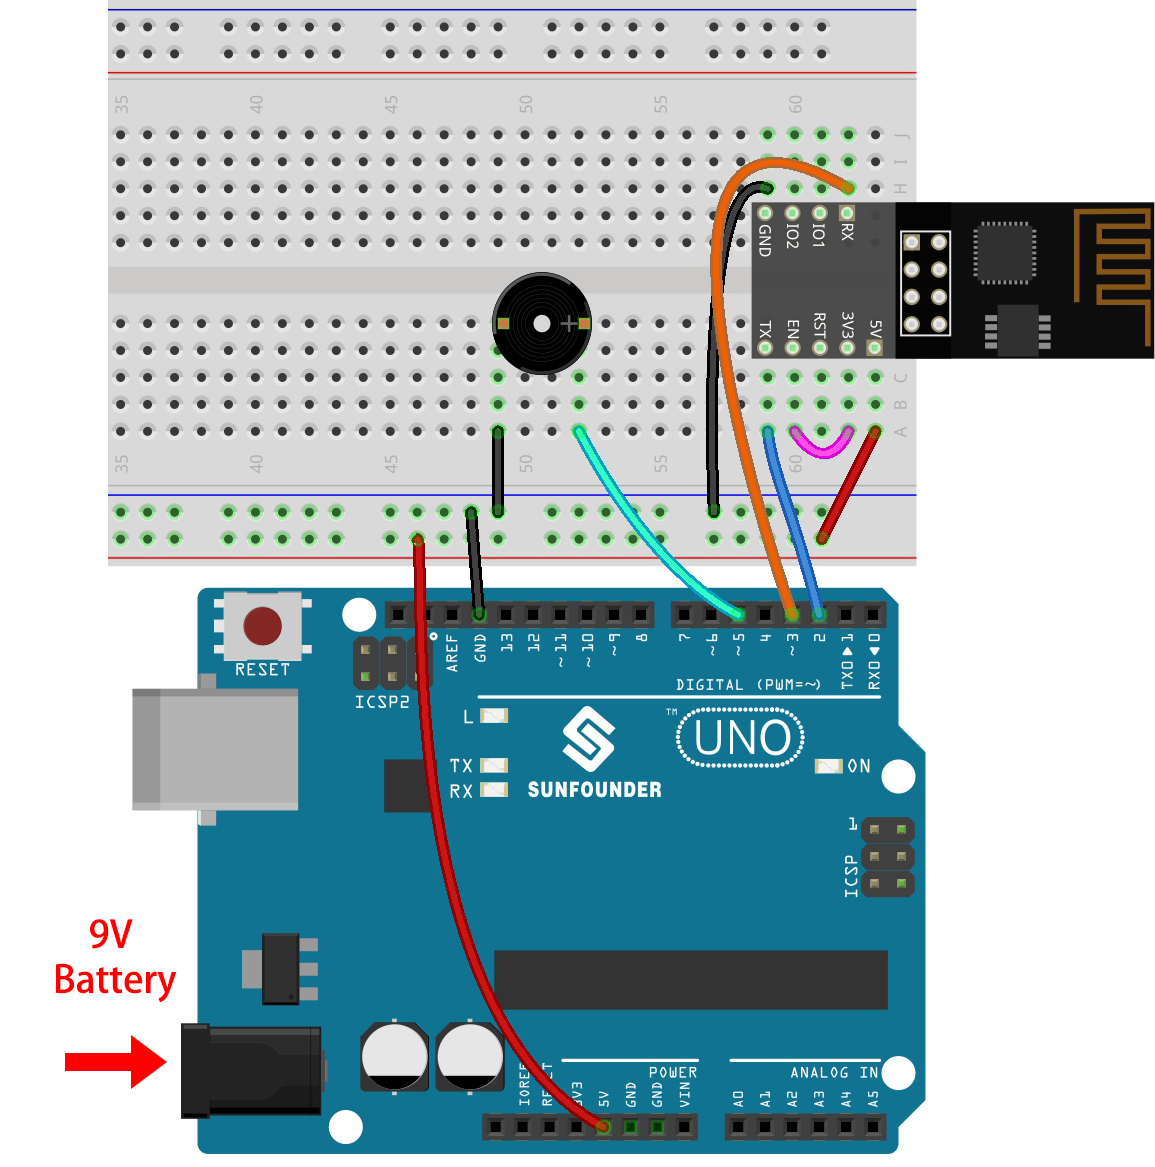
1. Build the Cirduit
Note
The ESP8266 module requires a high current to provide a stable operating environment, so make sure the 9V battery is plugged in.
2. Edit Dashboard
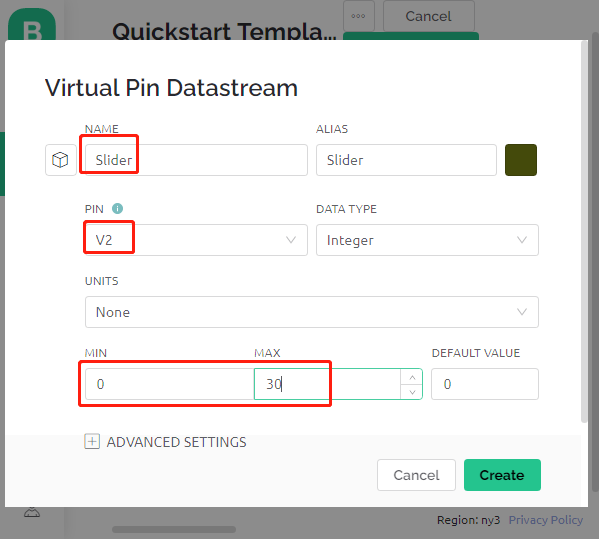
Create a Datastream of type Virtual Pin on the Datastream page as the value modified by the Slider widget added later or code. Set the DATA TYPE to Integer and MIN and MAX to 0 and 30.
Also create another Datastream of type Virtual Pin to display the music name, and set the DATA TYPE to
String.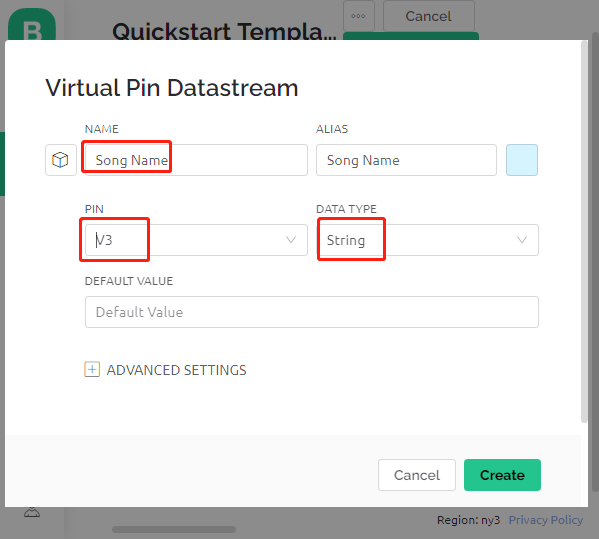
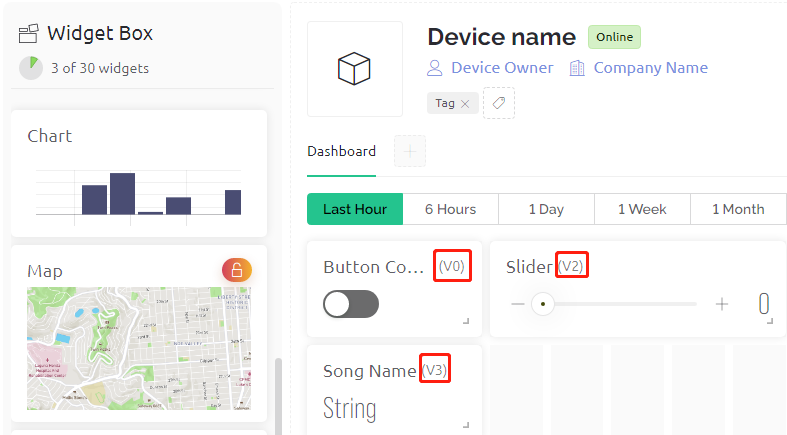
Go to the Wed Dashboard page, drag a Switch widget and set Datastream to V0 (V0 is already set in 2. Get Data from Blynk); drag a Label widget and set it to V3; drag a Slider widget and set it to V2.
Note
Your virtual pins may be different from mine, yours will prevail, but you need to modify the corresponding pin number in the code.
3. Run the Code
Open the
4.cloud_music_player.inofile under the path of3in1-kit\iot_project\4.cloud_music_player.Replace the
Template ID,Device Name, andAuth Tokenwith your own. You also need to enter thessidandpasswordof the WiFi you are using. For detailed tutorials, please refer to 1.4 Connecting the R3 board to Blynk.After selecting the correct board and port, click the Upoad button.
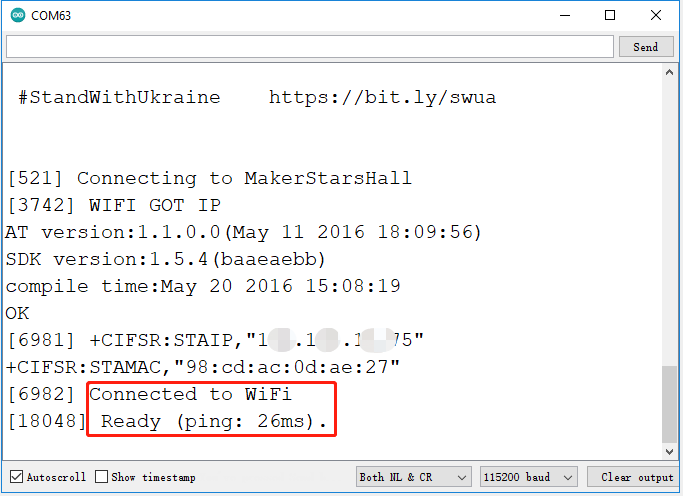
Open the Serial monitor(set baudrate to 115200) and wait for a prompt such as a successful connection to appear.
Note
If the message
ESP is not respondingappears when you connect, please follow these steps.Make sure the 9V battery is plugged in.
Reset the ESP8266 module by connecting the pin RST to GND for 1 second, then unplug it.
Press the reset button on the R3 board.
Sometimes, you may need to repeat the above operation 3-5 times, please be patient.
Now, you can use Blynk’s Button Control widget to start/pause the music and the Slider to adjust the playback progress, and you’ll also see the name of the music.

If you want to use Blynk on mobile devices, please refer to How to use Blynk on mobile device?.
How it works?
The datastream V0 is used to get the status of the Switch widget and assign it to the variable musicPlayFlag, which controls pausing and playing the music.
int musicPlayFlag=0;

BLYNK_WRITE(V0)
{
    musicPlayFlag = param.asInt(); // START/PAUSE MUSIC
}
The data stream V2 is used to get the value of the slider widget and assign it to the variable scrubBar when the slider is moved.
int scrubBar=0;

BLYNK_WRITE(V2)
{
    scrubBar=param.asInt();
}
When the device is connected to the Blynk Cloud, write the music name for the V3 datastream and then display it with the Label widget.
BLYNK_CONNECTED() {
    String songName = "Ode to Joy";
    Blynk.virtualWrite(V3, songName);
}
Blynk Timer will execute every second. Music is played if musicPlayFlag is not 0, i.e. the Switch widget is ON.
As soon as two notes are played, the progress bar variable scrubBar is incremented by 2, and the value is then written to the Blynk Cloud, which synchronizes the value of the Slider widget.
void myTimerEvent()
{
    if(musicPlayFlag!=0)
    {
        tone(buzzerPin,melody[scrubBar],250);
        scrubBar=(scrubBar+1)%(sizeof(melody)/sizeof(int));
        delay(500);
        tone(buzzerPin,melody[scrubBar],250);
        scrubBar=(scrubBar+1)%(sizeof(melody)/sizeof(int));
        Serial.println(scrubBar);
        Blynk.virtualWrite(V2, scrubBar);
    }
}