Note
Hello, welcome to the SunFounder Raspberry Pi & Arduino & ESP32 Enthusiasts Community on Facebook! Dive deeper into Raspberry Pi, Arduino, and ESP32 with fellow enthusiasts.
Why Join?
Expert Support: Solve post-sale issues and technical challenges with help from our community and team.
Learn & Share: Exchange tips and tutorials to enhance your skills.
Exclusive Previews: Get early access to new product announcements and sneak peeks.
Special Discounts: Enjoy exclusive discounts on our newest products.
Festive Promotions and Giveaways: Take part in giveaways and holiday promotions.
👉 Ready to explore and create with us? Click [here] and join today!
1.3 Turn the Wheel
A motor is a typical digital output device, and it is used in the same way as an LED. However, the motor needs to be driven with a large current, and the large current may damage the main control board such as R4 board. Therefore, an motor driver module is used in this occasion, which is a good helper for the R4 board to control the motor safely.
Required Components
In this project, we need the following components.
It’s definitely convenient to buy a whole kit, here’s the link:
Name |
ITEMS IN THIS KIT |
LINK |
|---|---|---|
3 in 1 Starter Kit |
380+ |
You can also buy them separately from the links below.
COMPONENT INTRODUCTION |
PURCHASE LINK |
|---|---|
- |
|
- |
|
- |
Schematic
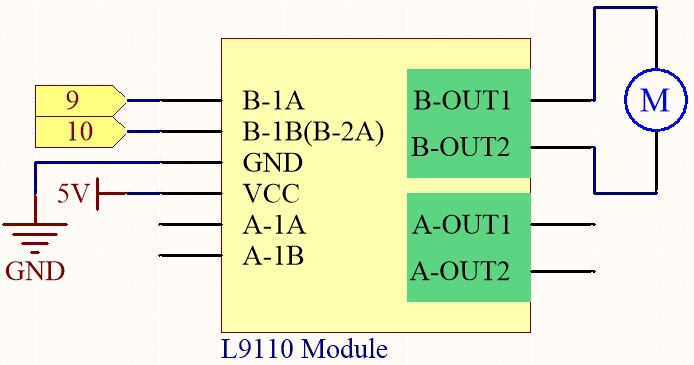
Wiring
L9110S |
R4 Board |
Motor |
|---|---|---|
VCC |
5V |
|
GND |
GND |
|
B-1B(B-2A) |
9 |
|
B-1A |
10 |
|
OA |
one wire of the motor |
|
OB |
one wire of the motor |

Code
Note
You can open the file
1.3.turn_the_wheel.inounder the path of3in1-kit\learning_project\1.3.turn_the_wheel.Or copy this code into Arduino IDE.