Note
Hello, welcome to the SunFounder Raspberry Pi & Arduino & ESP32 Enthusiasts Community on Facebook! Dive deeper into Raspberry Pi, Arduino, and ESP32 with fellow enthusiasts.
Why Join?
Expert Support: Solve post-sale issues and technical challenges with help from our community and team.
Learn & Share: Exchange tips and tutorials to enhance your skills.
Exclusive Previews: Get early access to new product announcements and sneak peeks.
Special Discounts: Enjoy exclusive discounts on our newest products.
Festive Promotions and Giveaways: Take part in giveaways and holiday promotions.
👉 Ready to explore and create with us? Click [here] and join today!
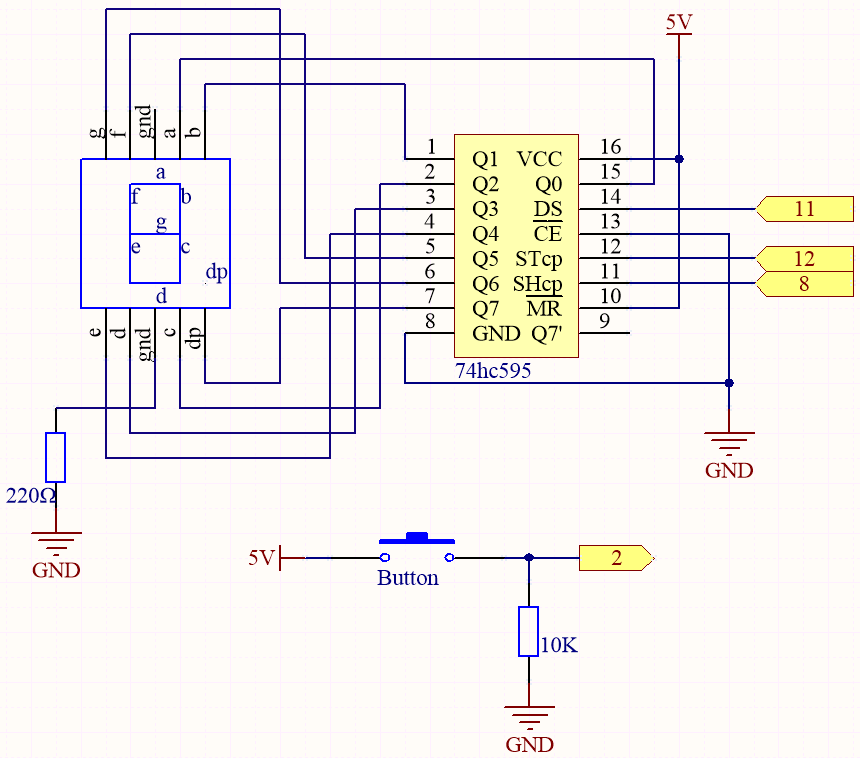
6.2 Digital Dice
Here we use button, 7-segment and 74hc595 to make an electronic dice. Each time the button is pressed, a random number ranging from 1 to 6 is generated and displayed on the 7-segment Display.
Required Components
In this project, we need the following components.
It’s definitely convenient to buy a whole kit, here’s the link:
Name |
ITEMS IN THIS KIT |
LINK |
|---|---|---|
3 in 1 Starter Kit |
380+ |
You can also buy them separately from the links below.
COMPONENT INTRODUCTION |
PURCHASE LINK |
|---|---|
- |
|
Schematic
Wiring

Code
Note
Open the
6.2.electronic_dice.inofile under the path of3in1-kit\learning_project\6.2.electronic_dice.Or copy this code into Arduino IDE.
When the code is uploaded successfully, the 7-segment Display will display 0-7 in a fast scroll, and when you press the button, it will display a random number and stop scrolling. The scrolling display starts again when you press the button again.
How it works?
This project is based on 5.10 ShiftOut(Segment Display) with a button to start/pause the scrolling display on the 7-segment Display.
Initialize each pin and read the value of the button.
void setup ()
{

    ...
    attachInterrupt(digitalPinToInterrupt(buttonPin), rollDice, FALLING);
}
The interrupt is used here to read the state of the button. The default value of
buttonPinis low, which changes from low to high when the button is pressed.rollDicerepresents the function to be called when the interrupt is triggered, it is used to toggle the value of the variablestate.FALLINGmeans the interrupt is triggered when thebuttonPingoes from low to high.
When the variable
stateis 0, the functionshowNumber()is called to make the 7-segment Display randomly display a number between 1 and 7.void loop() { if (state == 0) { showNumber((int)random(1, 7)); delay(50); } }
About
rollDice()function.void rollDice() { state = !state; }
When this function is called, it toggles the value of state, such as 1 last time and 0 this time.
About
showNumber()function.void showNumber(int num) { digitalWrite(STcp, LOW); //ground ST_CP and hold low for as long as you are transmitting shiftOut(DS, SHcp, MSBFIRST, datArray[num]); //return the latch pin high to signal chip that it //no longer needs to listen for information digitalWrite(STcp, HIGH); //pull the ST_CPST_CP to save the data }
This is the code inside
loop()in the project 5.10 ShiftOut(Segment Display) into the functionshowNumber().