Note
Hello, welcome to the SunFounder Raspberry Pi & Arduino & ESP32 Enthusiasts Community on Facebook! Dive deeper into Raspberry Pi, Arduino, and ESP32 with fellow enthusiasts.
Why Join?
Expert Support: Solve post-sale issues and technical challenges with help from our community and team.
Learn & Share: Exchange tips and tutorials to enhance your skills.
Exclusive Previews: Get early access to new product announcements and sneak peeks.
Special Discounts: Enjoy exclusive discounts on our newest products.
Festive Promotions and Giveaways: Take part in giveaways and holiday promotions.
👉 Ready to explore and create with us? Click [here] and join today!
1.2.2 Passive Buzzer
Introduction
In this project, we will learn how to make a passive buzzer play music.
Required Components
In this project, we need the following components.
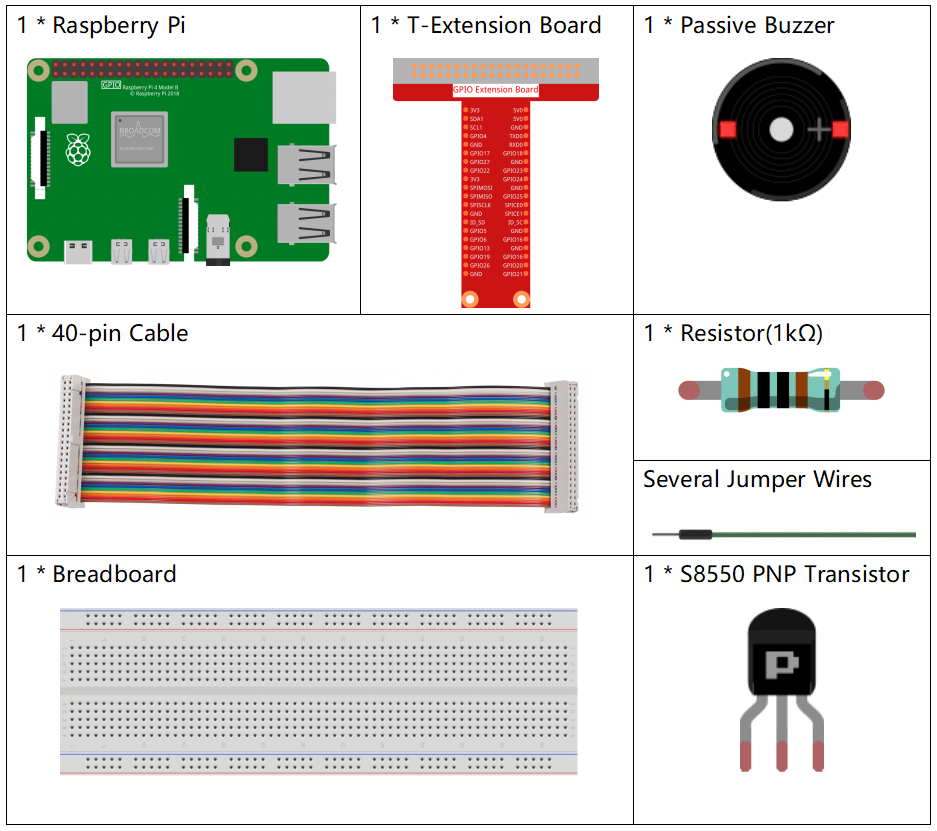
It’s definitely convenient to buy a whole kit, here’s the link:
Name |
ITEMS IN THIS KIT |
LINK |
|---|---|---|
Raphael Kit |
337 |
You can also buy them separately from the links below.
COMPONENT INTRODUCTION |
PURCHASE LINK |
|---|---|
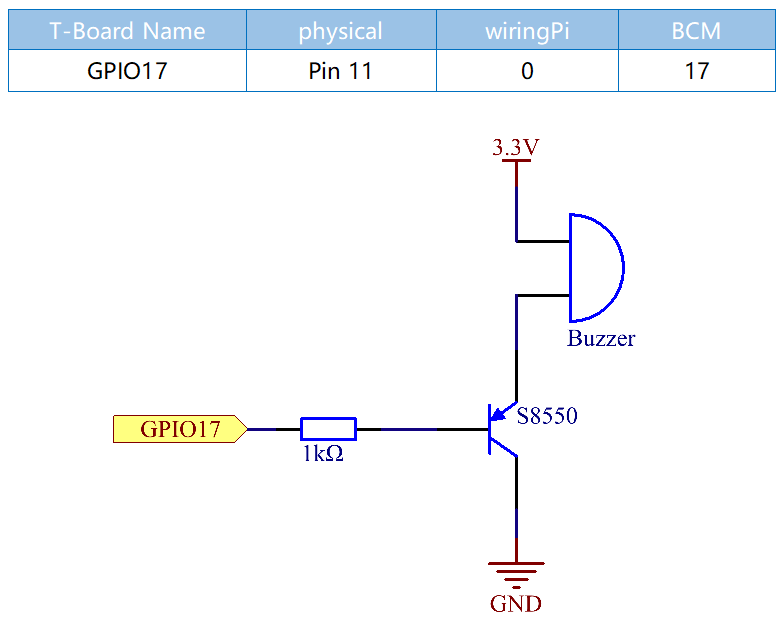
Schematic Diagram
In this experiment, a passive buzzer, a PNP transistor and a 1k resistor are used between the base of the transistor and GPIO to protect the transistor.
When GPIO17 is given different frequencies, the passive buzzer will emit different sounds; in this way, the buzzer plays music.
Experimental Procedures
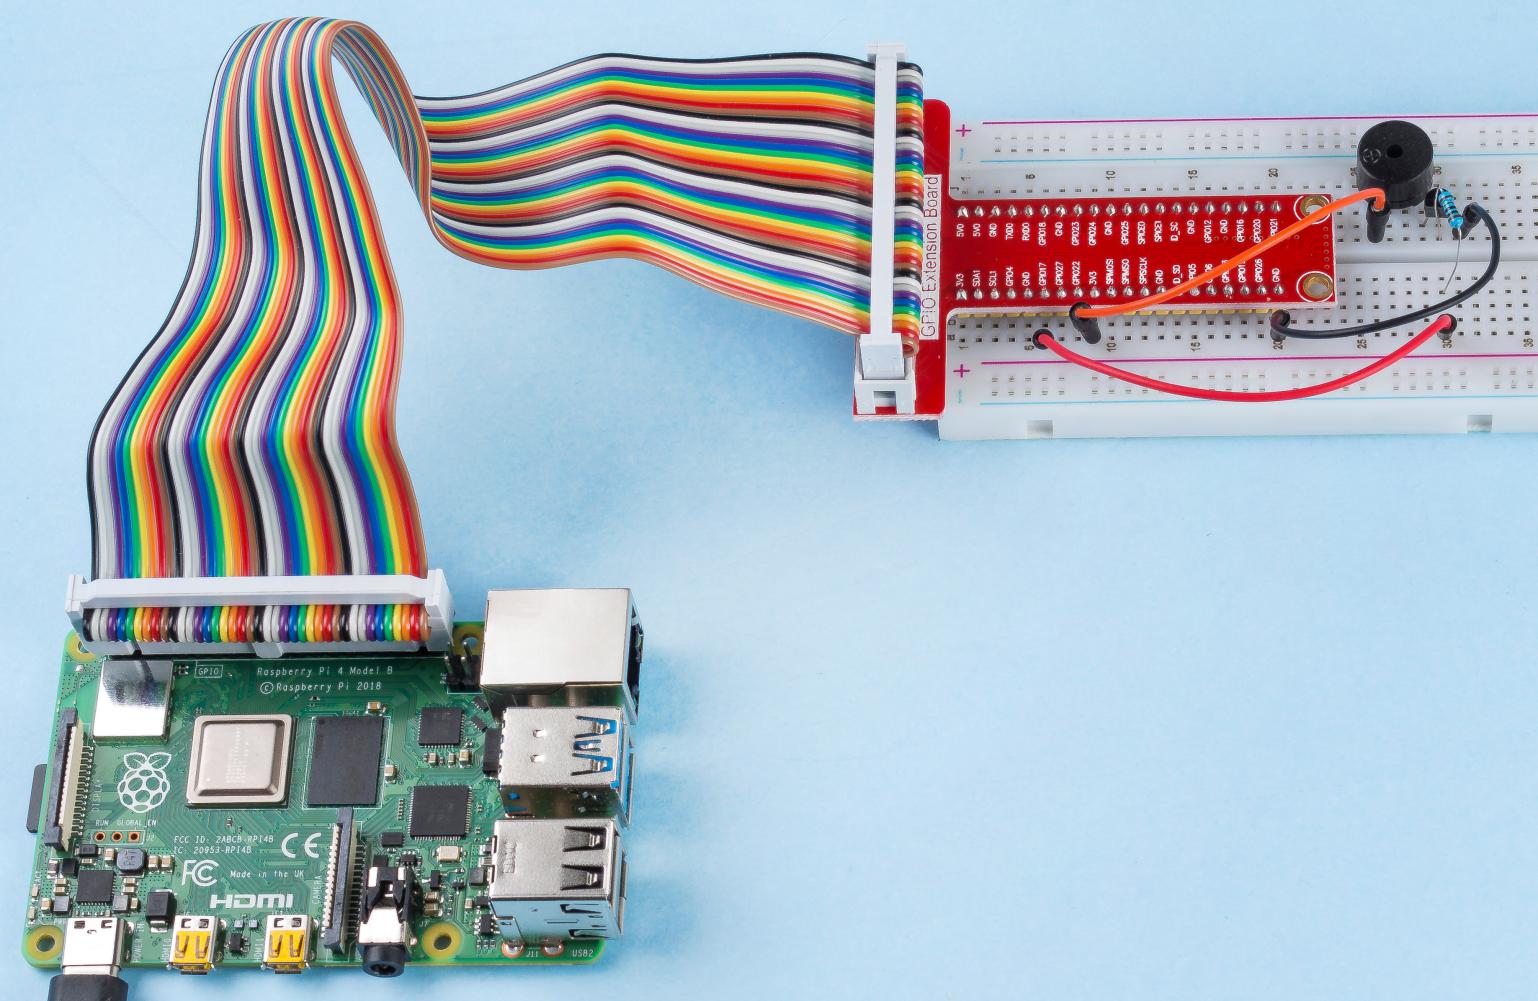
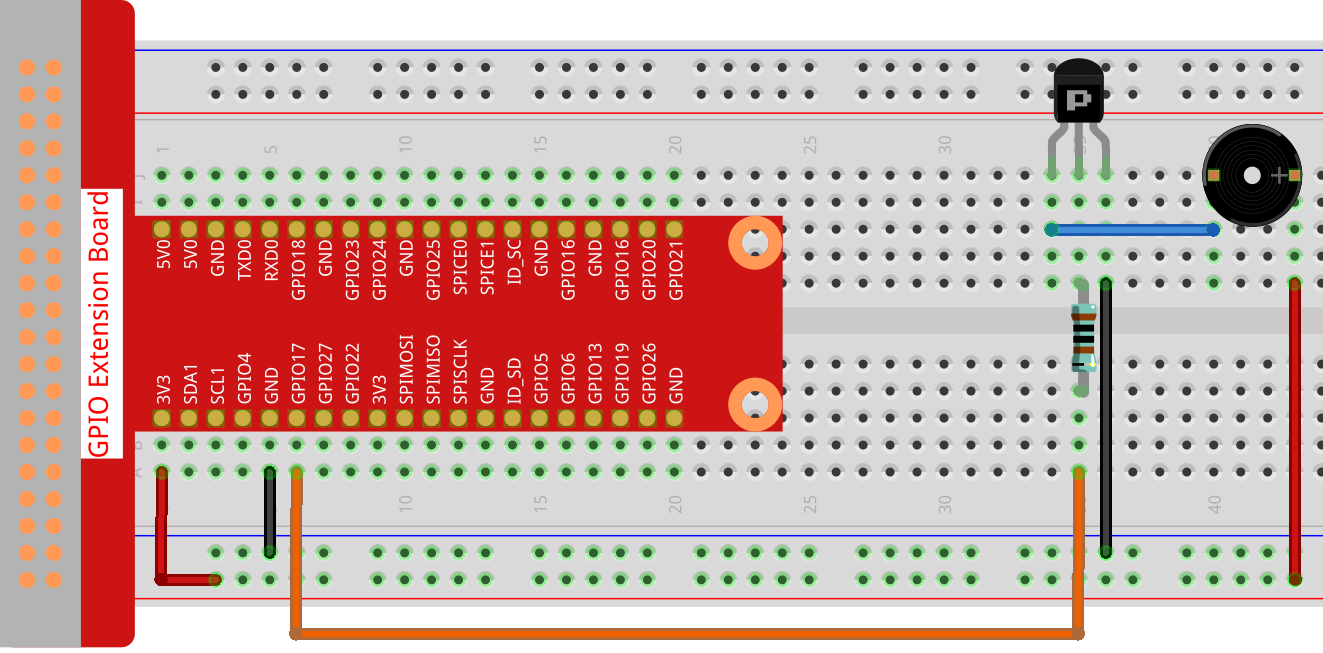
Step 1: Build the circuit. (The Passive buzzer with green circuit board on the back.)
Step 2: Change directory.
cd ~/raphael-kit/python/
Step 3: Run.
sudo python3 1.2.2_PassiveBuzzer.py
The code run, the buzzer plays a piece of music.
Code
Note
You can Modify/Reset/Copy/Run/Stop the code below. But before that, you need to go to source code path like raphael-kit/python. After modifying the code, you can run it directly to see the effect.
import RPi.GPIO as GPIO
import time

Buzzer = 11

CL = [0, 131, 147, 165, 175, 196, 211, 248]     # Frequency of Bass tone in C major
CM = [0, 262, 294, 330, 350, 393, 441, 495]     # Frequency of Midrange tone in C major
CH = [0, 525, 589, 661, 700, 786, 882, 990]     # Frequency of Treble tone in C major

song_1 = [  CM[3], CM[5], CM[6], CM[3], CM[2], CM[3], CM[5], CM[6], # Notes of song1
            CH[1], CM[6], CM[5], CM[1], CM[3], CM[2], CM[2], CM[3],
            CM[5], CM[2], CM[3], CM[3], CL[6], CL[6], CL[6], CM[1],
            CM[2], CM[3], CM[2], CL[7], CL[6], CM[1], CL[5] ]

beat_1 = [  1, 1, 3, 1, 1, 3, 1, 1,             # Beats of song 1, 1 means 1/8 beat
            1, 1, 1, 1, 1, 1, 3, 1,
            1, 3, 1, 1, 1, 1, 1, 1,
            1, 2, 1, 1, 1, 1, 1, 1,
            1, 1, 3 ]

song_2 = [  CM[1], CM[1], CM[1], CL[5], CM[3], CM[3], CM[3], CM[1], # Notes of song2
            CM[1], CM[3], CM[5], CM[5], CM[4], CM[3], CM[2], CM[2],
            CM[3], CM[4], CM[4], CM[3], CM[2], CM[3], CM[1], CM[1],
            CM[3], CM[2], CL[5], CL[7], CM[2], CM[1]    ]

beat_2 = [  1, 1, 2, 2, 1, 1, 2, 2,             # Beats of song 2, 1 means 1/8 beat
            1, 1, 2, 2, 1, 1, 3, 1,
            1, 2, 2, 1, 1, 2, 2, 1,
            1, 2, 2, 1, 1, 3 ]

def setup():
    GPIO.setmode(GPIO.BOARD)        # Numbers GPIOs by physical location
    GPIO.setup(Buzzer, GPIO.OUT)    # Set pins' mode is output
    global Buzz                     # Assign a global variable to replace GPIO.PWM
    Buzz = GPIO.PWM(Buzzer, 440)    # 440 is initial frequency.
    Buzz.start(50)                  # Start Buzzer pin with 50% duty cycle

def loop():
    while True:
        print ('\n    Playing song 1...')
        for i in range(1, len(song_1)):     # Play song 1
            Buzz.ChangeFrequency(song_1[i]) # Change the frequency along the song note
            time.sleep(beat_1[i] * 0.5)     # delay a note for beat * 0.5s
        time.sleep(1)                       # Wait a second for next song.

        print ('\n\n    Playing song 2...')
        for i in range(1, len(song_2)):     # Play song 1
            Buzz.ChangeFrequency(song_2[i]) # Change the frequency along the song note
            time.sleep(beat_2[i] * 0.5)     # delay a note for beat * 0.5s

def destory():
    Buzz.stop()                 # Stop the buzzer
    GPIO.output(Buzzer, 1)      # Set Buzzer pin to High
    GPIO.cleanup()              # Release resource

if __name__ == '__main__':      # Program start from here
    setup()
    try:
        loop()
    except KeyboardInterrupt:   # When 'Ctrl+C' is pressed, the program destroy() will be  executed.
        destory()
Code Explanation
CL = [0, 131, 147, 165, 175, 196, 211, 248]     # Frequency of Bass tone in C major
CM = [0, 262, 294, 330, 350, 393, 441, 495]     # Frequency of Midrange tone in C major
CH = [0, 525, 589, 661, 700, 786, 882, 990]     # Frequency of Treble tone in C major
These are the frequencies of each note. The first 0 is to skip CL[0] so that the number 1-7 corresponds to the CDEFGAB of the tone.
song_1 = [  CM[3], CM[5], CM[6], CM[3], CM[2], CM[3], CM[5], CM[6],
            CH[1], CM[6], CM[5], CM[1], CM[3], CM[2], CM[2], CM[3],
            CM[5], CM[2], CM[3], CM[3], CL[6], CL[6], CL[6], CM[1],
            CM[2], CM[3], CM[2], CL[7], CL[6], CM[1], CL[5] ]
These arrays are the notes of a song.
beat_1 = [  1, 1, 3, 1, 1, 3, 1, 1, 1, 1, 1, 1, 1, 1, 3, 1,
            1, 3, 1, 1, 1, 1, 1, 1, 1, 2, 1, 1, 1, 1, 1, 1,
            1, 1, 3 ]
Every sound beat (each number) represents the ⅛ beat, or 0.5s
Buzz = GPIO.PWM(Buzzer, 440)
Buzz.start(50)
Define pin Buzzer as PWM pin, then set its frequency to 440 and Buzz.start(50) is used to run PWM. What’s more, set the duty cycle to 50%.
for i in range(1, len(song_1)):
            Buzz.ChangeFrequency(song_1[i])
            time.sleep(beat_1[i] * 0.5)
Run a for loop, then the buzzer will play the notes in the array song_1[] with the beats in the beat_1[] array, .
Now you can hear the passive buzzer playing music.
Phenomenon Picture