Quick User Guide
This guide helps you quickly get started with PiPower 5 after hardware assembly.
Charge the Battery
Before first use, fully charge the battery.
Recommendations:
Use a high-quality USB-C power adapter
A 5V 5A power supply is recommended for Raspberry Pi 5
Higher-power adapters are recommended when using SSDs or other high-power peripherals
While Charging:
Use a high-quality USB-C power supply to charge PiPower 5.

During charging, the battery indicator LEDs light up progressively in sequence.

Battery status is indicated by the number of lit LEDs:
4 LEDs lit: Battery >80%
3 LEDs lit: 60%< Battery <80%
2 LEDs lit: 40%< Battery <60%
1 LED lit: 20%< Battery <40%
First LED flashing: Battery <20%
LEDs incrementally light up in a cycle: Charging
Middle two LEDs flashing: Waiting for shutdown signal
All LEDs off: Unpowered or in sleep mode
During charging, the indicator remains lit even in the off state until fully charged.
Power On
For Raspberry Pi devices, no additional power wiring is required. PiPower 5 supplies power directly through the GPIO header.
For other devices, you can power them using:
The USB-A output port
The 5V/GND pins next to the USB-A port

Press the power button once to turn on PiPower 5. When powered on:
The PWR LED lights up
The connected device begins receiving power from PiPower 5

Install pipower5 Tool
Install the PiPower 5 Tool:
Clone the repository:
git clone https://github.com/sunfounder/pipower5
Enter the directory:
cd pipower5
Run the installer:
sudo python3 install.py
Reboot the Raspberry Pi when prompted.
Open the Web Dashboard
After installation, open the dashboard in your browser:
http://<raspberry-pi-ip>:34001
The dashboard allows you to:
View battery percentage
Monitor charging status
Check voltage and current
Configure shutdown percentage
Manage notifications

Safe Shutdown
To allow PiPower 5 to automatically cut power after the Raspberry Pi shuts down, some additional configuration is required.
If you are using a Raspberry Pi 4 or 5:
Ensure the
SDSIGjumper on PiPower 5 is connected toPI3V3.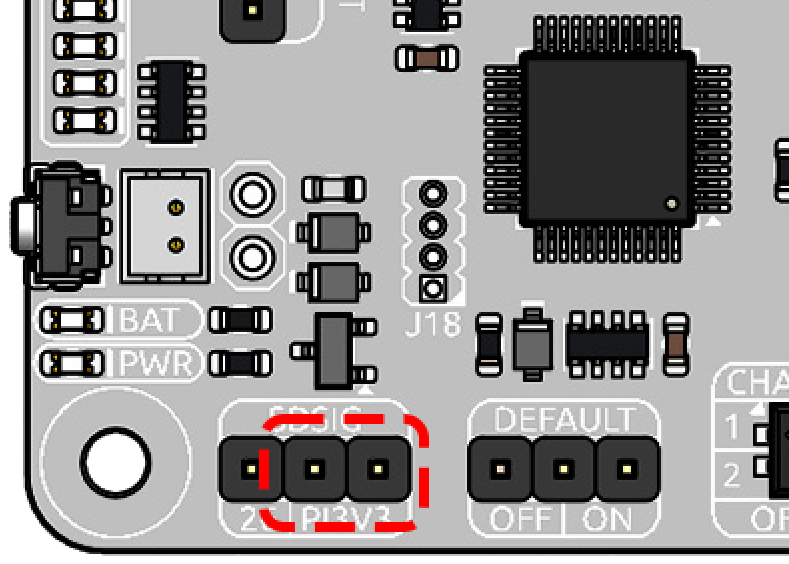
Open Raspberry Pi Configuration:
sudo raspi-configNavigate to:
6 Advanced Options
-> A11 Shutdown Behaviour
-> B1 Full power off Switch off Pi ...
Reboot the Raspberry Pi when prompted.
If you are using a Raspberry Pi 3 or earlier:
Set the
SDSIGjumper on PiPower 5 toGPIO26.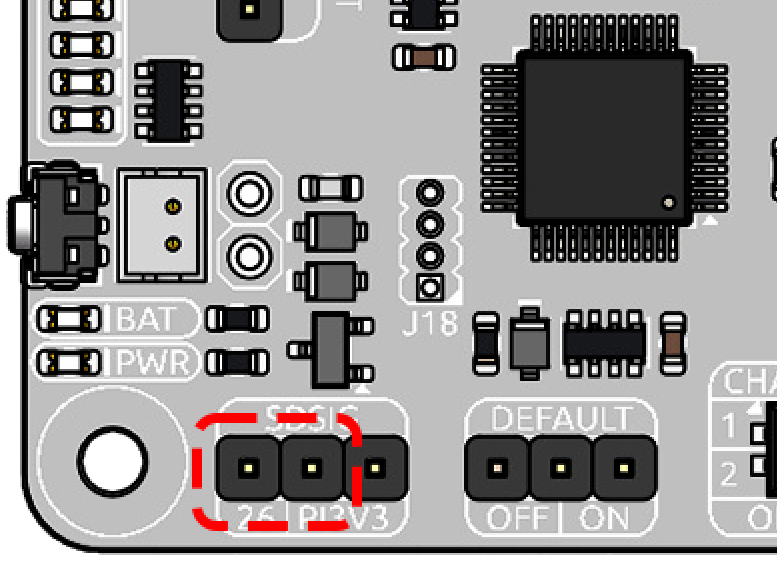
Open
/boot/firmware/config.txt:sudo nano /boot/firmware/config.txt
Add the following lines:
dtoverlay=gpio-poweroff,gpio_pin=26,active_low=1
gpio=26=op,dh
Press
Ctrl+X, thenY, and pressEnterto save the file and exit.Reboot the Raspberry Pi.
sudo reboot
After configuration, PiPower 5 can automatically detect Raspberry Pi shutdown and safely disconnect power.
Supported safe shutdown methods include:
Hold the PiPower button for 2 seconds
Shut down from the Raspberry Pi desktop menu
Run
sudo shutdown nowAutomatic shutdown when battery level falls below the configured shutdown percentage
Note
For advanced features and detailed configuration options, including:
Power monitoring commands
Notification settings
Buzzer alerts
Email alerts
Advanced configuration
Please refer to: