Color Detection
This project will add a color detection algorithm to the previous Computer Vision project.
Note
The printed colors may have a slightly different hue from the Python color models due to printer toner differences, or the printed medium, such as a tan-colored paper. This can cause a less accurate color recognition.
Run the Code
cd /home/pi/picar-x/example
sudo python3 color_detect.py
Code
import cv2
from picamera.array import PiRGBArray
from picamera import PiCamera
import numpy as np
color_dict = {'red':[0,4],'orange':[5,18],'yellow':[22,37],'green':[42,85],'blue':[92,110],'purple':[115,165],'red_2':[165,180]}
kernel_5 = np.ones((5,5),np.uint8)
def color_detect(img,color_name):
resize_img = cv2.resize(img, (160,120), interpolation=cv2.INTER_LINEAR)
hsv = cv2.cvtColor(resize_img, cv2.COLOR_BGR2HSV)
color_type = color_name
mask = cv2.inRange(hsv,np.array([min(color_dict[color_type]), 60, 60]), np.array([max(color_dict[color_type]), 255, 255]) )
if color_type == 'red':
mask_2 = cv2.inRange(hsv, (color_dict['red_2'][0],0,0), (color_dict['red_2'][1],255,255))
mask = cv2.bitwise_or(mask, mask_2)
morphologyEx_img = cv2.morphologyEx(mask, cv2.MORPH_OPEN, kernel_5,iterations=1)
contours, hierarchy = cv2.findContours(morphologyEx_img,cv2.RETR_EXTERNAL,cv2.CHAIN_APPROX_SIMPLE)
color_area_num = len(contours)
if color_area_num > 0:
for i in contours:
x,y,w,h = cv2.boundingRect(i)
if w >= 8 and h >= 8:
x = x * 4
y = y * 4
w = w * 4
h = h * 4
cv2.rectangle(img,(x,y),(x+w,y+h),(0,255,0),2)
cv2.putText(img,color_type,(x,y), cv2.FONT_HERSHEY_SIMPLEX, 1,(0,0,255),2)
return img,mask,morphologyEx_img
#init camera
print("start color detect")
camera = PiCamera()
camera.resolution = (640,480)
camera.framerate = 24
rawCapture = PiRGBArray(camera, size=camera.resolution)
for frame in camera.capture_continuous(rawCapture, format="bgr",use_video_port=True):
img = frame.array
img,img_2,img_3 = color_detect(img,'red')
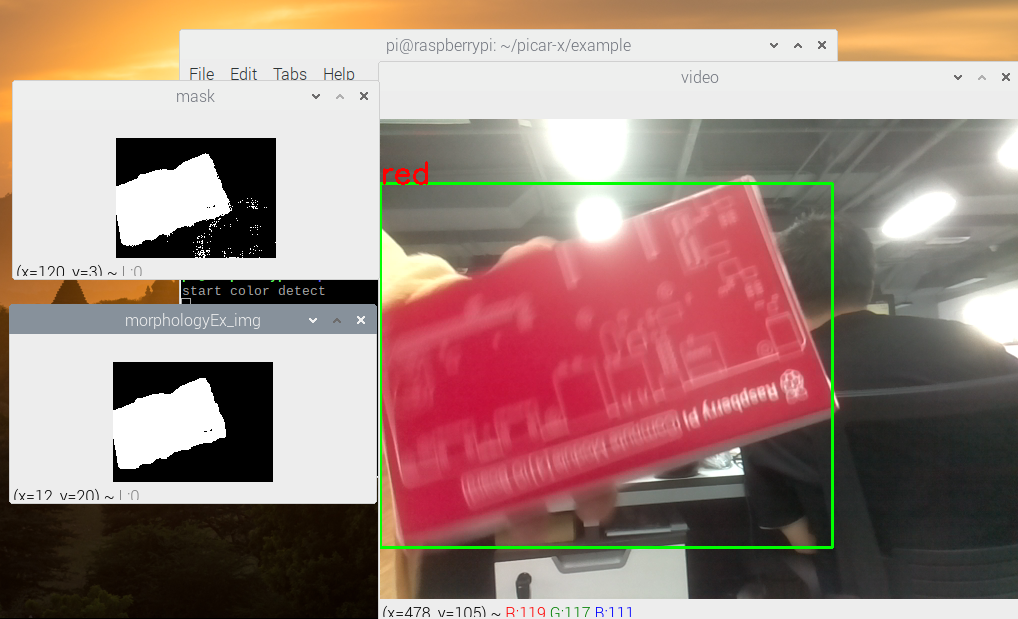
cv2.imshow("video", img)
cv2.imshow("mask", img_2)
cv2.imshow("morphologyEx_img", img_3)
rawCapture.truncate(0)
k = cv2.waitKey(1) & 0xFF
if k == 27:
camera.close()
break
How it works?
First, the range of H in the HSV color space is defined as a dictionary, which is convenient for the following color judgment algorithm:
color_dict = {'red':[0,4],'orange':[5,18],'yellow':[22,37],'green':[42,85],'blue':[92,110],'purple':[115,165],'red_2':[165,180]}
Then, a convolution kernel of size 5x5 is defined, which will be used for morphological operations, like filtering.
kernel_5 = np.ones((5,5),np.uint8)
Next, the color_detect() function will processes pictures in four steps:
Extract the data of the target color as a new binary image (array).
Performs advanced morphological transformations.
Finds contours in a binary image.
Draws a frame for the recognized object on the image.
def color_detect(img,color_name):

    resize_img = cv2.resize(img, (160,120), interpolation=cv2.INTER_LINEAR)  # To reduce the amount of calculation, the image size is reduced.
    hsv = cv2.cvtColor(resize_img, cv2.COLOR_BGR2HSV)  # Convert color from BGR to HSV

    color_type = color_name

    ### Extract the data of the target color as a new binary image (array).
    mask = cv2.inRange(hsv,np.array([min(color_dict[color_type]), 60, 60]), np.array([max(color_dict[color_type]), 255, 255]) )
    if color_type == 'red':
            mask_2 = cv2.inRange(hsv, (color_dict['red_2'][0],0,0), (color_dict['red_2'][1],255,255))
            mask = cv2.bitwise_or(mask, mask_2)   # In HSV, red is divided into two sections, which need to be combined.

    ### Performs advanced morphological transformations
    morphologyEx_img = cv2.morphologyEx(mask, cv2.MORPH_OPEN, kernel_5,iterations=1)   # Perform open operation

    ### Finds contours in a binary image.
    contours, hierarchy = cv2.findContours(morphologyEx_img,cv2.RETR_EXTERNAL,cv2.CHAIN_APPROX_SIMPLE)
    color_area_num = len(contours) # Count the number of contours

    if color_area_num > 0:
        for i in contours:
            x,y,w,h = cv2.boundingRect(i) # Let (x,y) be the top-left coordinate of the rectangle and (w,h) be its width and height.

            ### Draw a frame for the recognized object on the image
            if w >= 8 and h >= 8: # Because the picture is reduced during operation, the increase now go back
                x = x * 4
                y = y * 4
                w = w * 4
                h = h * 4
                cv2.rectangle(img,(x,y),(x+w,y+h),(0,255,0),2)  # Draw a frame
                cv2.putText(img,color_type,(x,y), cv2.FONT_HERSHEY_SIMPLEX, 1,(0,0,255),2) # Add description

    return img,mask,morphologyEx_img
The img , mask , and morphologyEx_img are displayed in three windows to directly observe the processing results of each step.
For more information on morphology and contouring, please reference the following resources: