注釈
こんにちは、SunFounderのRaspberry Pi & Arduino & ESP32愛好家コミュニティへようこそ!Facebook上でRaspberry Pi、Arduino、ESP32についてもっと深く掘り下げ、他の愛好家と交流しましょう。
参加する理由は?
エキスパートサポート:コミュニティやチームの助けを借りて、販売後の問題や技術的な課題を解決します。
学び&共有:ヒントやチュートリアルを交換してスキルを向上させましょう。
独占的なプレビュー:新製品の発表や先行プレビューに早期アクセスしましょう。
特別割引:最新製品の独占割引をお楽しみください。
祭りのプロモーションとギフト:ギフトや祝日のプロモーションに参加しましょう。
👉 私たちと一緒に探索し、創造する準備はできていますか?[ ここ]をクリックして今すぐ参加しましょう!
Wi-Fiに接続する
このチュートリアルでは、ArduinoボードをWi-Fiネットワークに接続するための基本的なステップを案内します。Wi-Fiモジュールの初期化、ファームウェアの確認、SSIDとパスワードを使用した安全なネットワークへの参加方法を学びます。接続後、シリアルコンソールからデバイスのIPやMACアドレス、ネットワークの信号強度などの重要なネットワーク情報をモニタリングする方法を発見します。このチュートリアルは、Wi-Fi接続の実用的なガイドであり、Arduinoを使用したネットワークモニタリングの導入としても役立ちます。これにより、信頼性のあるWi-Fi接続を確立し維持することができます。
1. コードをアップロードする
elite-explorer-kit-main\r4_new_feature\01-wifi_connect のパスの下にある 01-wifi_connect.ino ファイルを開くか、このコードを Arduino IDE にコピーします。
注釈
Wi-Fi®サポートは、Arduino UNO R4 Coreに付属する内蔵の WiFiS3 ライブラリを介して有効にされます。コアのインストール時に自動的に WiFiS3 ライブラリもインストールされます。
arduino_secrets.h を作成または変更し、 SECRET_SSID と SECRET_PASS を接続したいWi-Fiの名前とパスワードに置き換える必要があります。 ファイルには以下が含まれている必要があります:
//arduino_secrets.h header file
#define SECRET_SSID "yournetwork"
#define SECRET_PASS "yourpassword"
//arduino_secrets.h header file
#define SECRET_SSID "your_ssid"
#define SECRET_PASS "your_password"
  1/*
  2  This code is designed to establish a WiFi connection using a WiFi module
  3  on an Arduino Uno R4 board. It initializes serial communication, verifies
  4  the presence and firmware version of the WiFi module, attempts to connect
  5  to a specified WiFi network, and once connected, prints network information
  6  to the serial monitor. It continuously checks the network connection every
  7  10 seconds in the loop.
  8
  9  Board: Arduino Uno R4
 10*/
 11
 12
 13#include <WiFiS3.h>
 14
 15#include "arduino_secrets.h"
 16///////please enter your sensitive data in the Secret tab/arduino_secrets.h
 17char ssid[] = SECRET_SSID;        // your network SSID (name)
 18char pass[] = SECRET_PASS;    // your network password (use for WPA, or use as key for WEP)
 19int status = WL_IDLE_STATUS;     // the WiFi radio's status
 20
 21void setup() {
 22  //Initialize serial and wait for port to open:
 23  Serial.begin(9600);
 24
 25  while (!Serial) {
 26    ; // wait for serial port to connect. Needed for native USB port only
 27  }
 28
 29  // check for the WiFi module:
 30  if (WiFi.status() == WL_NO_MODULE) {
 31    Serial.println("Communication with WiFi module failed!");
 32    // don't continue
 33    while (true);
 34  }
 35
 36  String fv = WiFi.firmwareVersion();
 37  if (fv < WIFI_FIRMWARE_LATEST_VERSION) {
 38    Serial.println("Please upgrade the firmware");
 39  }
 40
 41  // attempt to connect to WiFi network:
 42  while (status != WL_CONNECTED) {
 43    Serial.print("Attempting to connect to WPA SSID: ");
 44    Serial.println(ssid);
 45    // Connect to WPA/WPA2 network:
 46    status = WiFi.begin(ssid, pass);
 47
 48    // wait 10 seconds for connection:
 49    delay(10000);
 50  }
 51
 52  // you're connected now, so print out the data:
 53  Serial.print("You're connected to the network");
 54  printCurrentNet();
 55  printWifiData();
 56
 57}
 58
 59void loop() {
 60  // check the network connection once every 10 seconds:
 61  delay(10000);
 62  printCurrentNet();
 63}
 64
 65void printWifiData() {
 66  // print your board's IP address:
 67  IPAddress ip = WiFi.localIP();
 68  Serial.print("IP Address: ");
 69
 70  Serial.println(ip);
 71
 72  // print your MAC address:
 73  byte mac[6];
 74  WiFi.macAddress(mac);
 75  Serial.print("MAC address: ");
 76  printMacAddress(mac);
 77}
 78
 79void printCurrentNet() {
 80  // print the SSID of the network you're attached to:
 81  Serial.print("SSID: ");
 82  Serial.println(WiFi.SSID());
 83
 84  // print the MAC address of the router you're attached to:
 85  byte bssid[6];
 86  WiFi.BSSID(bssid);
 87  Serial.print("BSSID: ");
 88  printMacAddress(bssid);
 89
 90  // print the received signal strength:
 91  long rssi = WiFi.RSSI();
 92  Serial.print("signal strength (RSSI):");
 93  Serial.println(rssi);
 94
 95  // print the encryption type:
 96  byte encryption = WiFi.encryptionType();
 97  Serial.print("Encryption Type:");
 98  Serial.println(encryption, HEX);
 99  Serial.println();
100}
101
102void printMacAddress(byte mac[]) {
103  for (int i = 5; i >= 0; i--) {
104    if (mac[i] < 16) {
105      Serial.print("0");
106    }
107    Serial.print(mac[i], HEX);
108    if (i > 0) {
109      Serial.print(":");
110    }
111  }
112  Serial.println();
113}
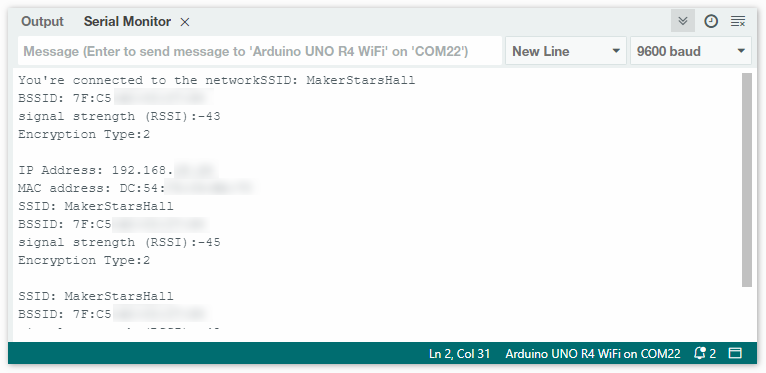
シリアルモニタを開くと、以下のような内容が表示されます。ArduinoはデバイスのIPとMACアドレス、ネットワークの信号強度を出力します。
2. コードの説明
ライブラリと秘密データを含める
#include <WiFiS3.h>
#include "arduino_secrets.h"
WiFiS3はWi-Fi接続のための関数を提供するライブラリです。R4コアをインストールすると自動的にWiFiS3ライブラリがインストールされます。arduino_secrets.hはメインコードにSSIDやパスワードが露出しないようにするための別のファイルです。ネットワークとパスワードを別々に保管することで、Wi-Fi資格情報の偶発的な共有を減らします。
グローバル変数の宣言
char ssid[] = SECRET_SSID;
char pass[] = SECRET_PASS;
int status = WL_IDLE_STATUS;
ssidとpassにはネットワーク名とパスワードが含まれます。statusはWi-Fi接続の現在のステータスを格納します。
setup()関数シリアルインターフェースは9600のボーレートで初期化されます。
while (!Serial);行は、シリアル接続が確立されるまでプログラムが待機することを保証します。void setup() { //Initialize serial and wait for port to open: Serial.begin(9600); while (!Serial) { ; // wait for serial port to connect. Needed for native USB port only } ... }
そして、コードはWi-Fiモジュールが利用可能かどうかをチェックします。利用不可の場合、プログラムは停止し、それ以上の実行を防ぎます。
...
// check for the WiFi module:
if (WiFi.status() == WL_NO_MODULE) {
    Serial.println("Communication with WiFi module failed!");
    // don't continue
    while (true);
}
...
このコードの部分では、uno R4 wifiのファームウェアバージョンが最新かどうかを確認します。最新バージョンでない場合、アップグレードの促し表示がされます。ファームウェアのアップグレードについては、 UNO R4 WiFiボードのラジオモジュールファームウェアの更新 を参照してください。
...
String fv = WiFi.firmwareVersion();
if (fv < WIFI_FIRMWARE_LATEST_VERSION) {
    Serial.println("Please upgrade the firmware");
}
...
loop()関数void loop() { // check the network connection once every 10 seconds: delay(10000); printCurrentNet(); }
10秒ごとに
printCurrentNet()関数が呼び出され、現在のネットワークの詳細を印刷します。
参照