Bemerkung
Hallo und willkommen in der SunFounder Raspberry Pi & Arduino & ESP32 Enthusiasten-Gemeinschaft auf Facebook! Tauchen Sie tiefer ein in die Welt von Raspberry Pi, Arduino und ESP32 mit anderen Enthusiasten.
Warum beitreten?
Expertenunterstützung: Lösen Sie Nachverkaufsprobleme und technische Herausforderungen mit Hilfe unserer Gemeinschaft und unseres Teams.
Lernen & Teilen: Tauschen Sie Tipps und Anleitungen aus, um Ihre Fähigkeiten zu verbessern.
Exklusive Vorschauen: Erhalten Sie frühzeitigen Zugang zu neuen Produktankündigungen und exklusiven Einblicken.
Spezialrabatte: Genießen Sie exklusive Rabatte auf unsere neuesten Produkte.
Festliche Aktionen und Gewinnspiele: Nehmen Sie an Gewinnspielen und Feiertagsaktionen teil.
👉 Sind Sie bereit, mit uns zu erkunden und zu erschaffen? Klicken Sie auf [ hier ] und treten Sie heute bei!
Einfacher Webserver
Dieses einfache Arduino-Programm dient dazu, einen grundlegenden WiFi-Webserver zu erstellen. Benutzer können damit den Ein- und Ausschaltzustand einer LED auf dem Arduino-Board über einen Webbrowser steuern.
Ausführen des Codes
Bemerkung
Die Datei
01_simple_webserver.inokönnen Sie direkt unter dem Pfadelite-explorer-kit-main\iot_project\01_simple_webserveröffnen.Oder kopieren Sie diesen Code in die Arduino IDE.
Bemerkung
Im Code werden SSID und Passwort in arduino_secrets.h gespeichert. Bevor Sie dieses Beispiel hochladen, müssen Sie diese mit Ihren eigenen WiFi-Anmeldedaten ändern. Zusätzlich sollten Sie diese Informationen geheim halten, wenn Sie den Code teilen oder speichern, um Sicherheitsgründe zu gewährleisten.
#define SECRET_SSID "your_ssid"        // your network SSID (name)
#define SECRET_PASS "your_password"        // your network password (use for WPA, or use as key for WEP)
  1/*
  2  WiFi Web Server LED Blink
  3
  4  A simple web server that lets you blink an LED via the web.
  5  This sketch will print the IP address of your WiFi module (once connected)
  6  to the Serial Monitor. From there, you can open that address in a web browser
  7  to turn on and off the LED_BUILTIN.
  8
  9  If the IP address of your board is yourAddress:
 10  http://yourAddress/H turns the LED on
 11  http://yourAddress/L turns it off
 12
 13  This example is written for a network using WPA encryption. For
 14  WEP or WPA, change the WiFi.begin() call accordingly.
 15
 16  Circuit:
 17  * Board with NINA module (Arduino MKR WiFi 1010, MKR VIDOR 4000 and Uno WiFi Rev.2)
 18  * LED attached to pin 9
 19
 20  created 25 Nov 2012
 21  by Tom Igoe
 22
 23  Find the full UNO R4 WiFi Network documentation here:
 24  https://docs.arduino.cc/tutorials/uno-r4-wifi/wifi-examples#simple-webserver
 25 */
 26
 27#include "WiFiS3.h"
 28
 29#include "arduino_secrets.h"
 30///////please enter your sensitive data in the Secret tab/arduino_secrets.h
 31char ssid[] = SECRET_SSID;        // your network SSID (name)
 32char pass[] = SECRET_PASS;    // your network password (use for WPA, or use as key for WEP)
 33int keyIndex = 0;                 // your network key index number (needed only for WEP)
 34
 35int led =  LED_BUILTIN;
 36int status = WL_IDLE_STATUS;
 37WiFiServer server(80);
 38
 39void setup() {
 40  Serial.begin(9600);      // initialize serial communication
 41  pinMode(led, OUTPUT);      // set the LED pin mode
 42
 43  // check for the WiFi module:
 44  if (WiFi.status() == WL_NO_MODULE) {
 45    Serial.println("Communication with WiFi module failed!");
 46    // don't continue
 47    while (true);
 48  }
 49
 50  String fv = WiFi.firmwareVersion();
 51  if (fv < WIFI_FIRMWARE_LATEST_VERSION) {
 52    Serial.println("Please upgrade the firmware");
 53  }
 54
 55  // attempt to connect to WiFi network:
 56  while (status != WL_CONNECTED) {
 57    Serial.print("Attempting to connect to Network named: ");
 58    Serial.println(ssid);                   // print the network name (SSID);
 59
 60    // Connect to WPA/WPA2 network. Change this line if using open or WEP network:
 61    status = WiFi.begin(ssid, pass);
 62    // wait 10 seconds for connection:
 63    delay(10000);
 64  }
 65  server.begin();                           // start the web server on port 80
 66  printWifiStatus();                        // you're connected now, so print out the status
 67}
 68
 69
 70void loop() {
 71  WiFiClient client = server.available();   // listen for incoming clients
 72
 73  if (client) {                             // if you get a client,
 74    Serial.println("new client");           // print a message out the serial port
 75    String currentLine = "";                // make a String to hold incoming data from the client
 76    while (client.connected()) {            // loop while the client's connected
 77      if (client.available()) {             // if there's bytes to read from the client,
 78        char c = client.read();             // read a byte, then
 79        Serial.write(c);                    // print it out to the serial monitor
 80        if (c == '\n') {                    // if the byte is a newline character
 81
 82          // if the current line is blank, you got two newline characters in a row.
 83          // that's the end of the client HTTP request, so send a response:
 84          if (currentLine.length() == 0) {
 85            // HTTP headers always start with a response code (e.g. HTTP/1.1 200 OK)
 86            // and a content-type so the client knows what's coming, then a blank line:
 87            client.println("HTTP/1.1 200 OK");
 88            client.println("Content-type:text/html");
 89            client.println();
 90
 91            // the content of the HTTP response follows the header:
 92            client.print("<p style=\"font-size:7vw;\">Click <a href=\"/H\">here</a> turn the LED on<br></p>");
 93            client.print("<p style=\"font-size:7vw;\">Click <a href=\"/L\">here</a> turn the LED off<br></p>");
 94
 95            // The HTTP response ends with another blank line:
 96            client.println();
 97            // break out of the while loop:
 98            break;
 99          } else {    // if you got a newline, then clear currentLine:
100            currentLine = "";
101          }
102        } else if (c != '\r') {  // if you got anything else but a carriage return character,
103          currentLine += c;      // add it to the end of the currentLine
104        }
105
106        // Check to see if the client request was "GET /H" or "GET /L":
107        if (currentLine.endsWith("GET /H")) {
108          digitalWrite(LED_BUILTIN, HIGH);               // GET /H turns the LED on
109        }
110        if (currentLine.endsWith("GET /L")) {
111          digitalWrite(LED_BUILTIN, LOW);                // GET /L turns the LED off
112        }
113      }
114
115    }
116    // close the connection:
117    client.stop();
118    Serial.println("client disconnected");
119  }
120}
121
122void printWifiStatus() {
123  // print the SSID of the network you're attached to:
124  Serial.print("SSID: ");
125  Serial.println(WiFi.SSID());
126
127  // print your board's IP address:
128  IPAddress ip = WiFi.localIP();
129  Serial.print("IP Address: ");
130  Serial.println(ip);
131
132  // print the received signal strength:
133  long rssi = WiFi.RSSI();
134  Serial.print("signal strength (RSSI):");
135  Serial.print(rssi);
136  Serial.println(" dBm");
137  // print where to go in a browser:
138  Serial.print("To see this page in action, open a browser to http://");
139  Serial.println(ip);
140}
Nach dem Hochladen des Codes können Sie die IP-Adresse im seriellen Monitor sehen. Geben Sie diese IP-Adresse in Ihren Webbrowser ein, um die LED an Bord ein-/auszuschalten.
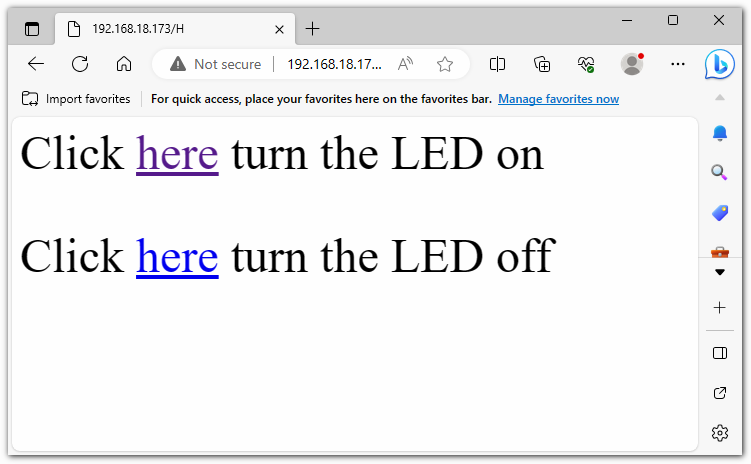
Wie funktioniert des?
Hier ist eine Erklärung des Codes:
Header-Dateien und globale Variablen:
#include "WiFiS3.h": Diese beinhaltet die WiFi-Bibliothek für das Verbinden und Verwalten von WiFi. Diese Bibliothek ist im Arduino UNO R4 Core enthalten, eine zusätzliche Installation ist nicht erforderlich.#include "arduino_secrets.h": Diese beinhaltet sensible WiFi-Verbindungsdaten wie SSID und Passwort.ssid,pass,keyIndex: Dies sind die Netzwerkanmeldeinformationen für die WiFi-Verbindung.led,status,server: Diese definieren den LED-Pin, den WiFi-Status und das Webserver-Objekt.
setup():Beginnen Sie mit der seriellen Kommunikation.
Überprüfen Sie das Vorhandensein des WiFi-Moduls.
Überprüfen Sie, ob die Firmware-Version des WiFi-Moduls aktuell ist.
Versuchen Sie, sich mit dem WiFi-Netzwerk zu verbinden.
Starten Sie den Webserver.
Drucken Sie den WiFi-Status aus.
loop():Überprüfen Sie auf neue Webclient-Verbindungen.
Wenn es Client-Verbindungen gibt, lesen Sie deren eingehende HTTP-Anfragen.
Basierend auf den Anfragen können Sie den Ein-/Ausschaltzustand der LED steuern. Wenn beispielsweise die Anfrage „GET /H“ lautet, wird die LED eingeschaltet; bei „GET /L“ wird sie ausgeschaltet.
Senden Sie eine HTTP-Antwort, um den Benutzer anzuleiten, wie er die LED steuern kann.
Trennen Sie die Verbindung zum Client.
printWifiStatus():Drucken Sie die verbundene WiFi-SSID aus.
Drucken Sie die IP-Adresse des Arduino-Boards aus.
Drucken Sie die empfangene Signalstärke aus.
Erklären Sie, wie man diese Seite in einem Webbrowser ansehen kann.