Note
Hello, welcome to the SunFounder Raspberry Pi & Arduino & ESP32 Enthusiasts Community on Facebook! Dive deeper into Raspberry Pi, Arduino, and ESP32 with fellow enthusiasts.
Why Join?
Expert Support: Solve post-sale issues and technical challenges with help from our community and team.
Learn & Share: Exchange tips and tutorials to enhance your skills.
Exclusive Previews: Get early access to new product announcements and sneak peeks.
Special Discounts: Enjoy exclusive discounts on our newest products.
Festive Promotions and Giveaways: Take part in giveaways and holiday promotions.
👉 Ready to explore and create with us? Click [here] and join today!
4. Track Objects with Pan-Tilt
In previous tutorials, we learned how to use YOLO for object detection on Raspberry Pi. However, detection is just the first step—if you want the camera to truly “follow” the target, you need to combine detection with mechanical control.
This tutorial will guide you through building a YOLO Object Tracking System that achieves the following:
Real-time detection of specific objects using YOLO
Automatic calculation of the target’s position deviation in the frame
Servo-controlled camera pan-tilt to keep the target centered in the frame
Support for saving current frames with SPACE key for dataset collection
Here we track the target from our custom model trained in the previous tutorial—mine is a snowman. You can also choose other models (such as yolov8n) to track other targets (like people, cars, etc.).
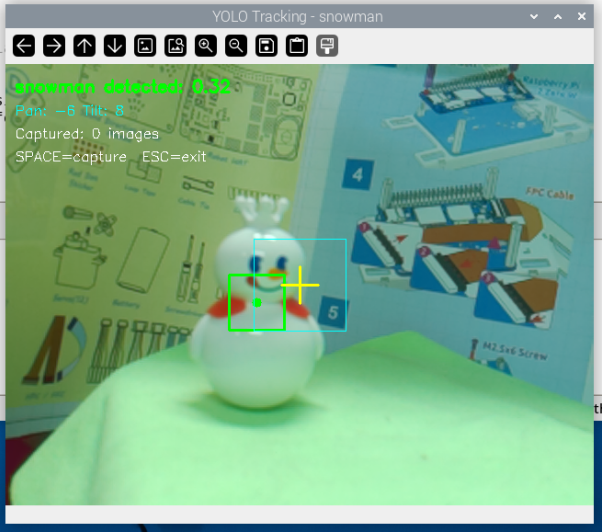
Figure: YOLO object tracking system in action. When the target moves, the camera pan-tilt automatically follows, keeping the target near the yellow crosshair in the center of the frame. The green bounding box marks the detected target.
Application Scenarios:
Smart surveillance: Automatically track suspicious targets
Pet companion: Let the camera follow your pet’s movements
Video conferencing: Automatically keep speakers centered in the frame
Data collection: Automatically capture multi-angle images of targets
Hardware Setup
To use this project, you need to assemble the pan-tilt following the instructions in Assemble the Pan-tilt (For Camera).

Running the Code
Modify configuration parameters
cd ~/ai-lab-kit/yolo
nano yolo_tracking.py
Change the
TARGETvariable at the beginning of the code to the object you want to track:TARGET = "person" # Track a person # or TARGET = "snowman" # Track a snowman
Prepare the model file
Use a pre-trained model:
model = YOLO("yolov8n.pt")Use a custom model:
model = YOLO("snowman.pt")
Save and run the code
python3 yolo_tracking.pyOperation instructions
After starting the program, the camera begins working automatically
When a target is detected, the servos automatically rotate to keep the target centered in the frame
Press
SPACEto save the current frame (for collecting training data)Press
ESCto exit the program
Code
#!/usr/bin/env python3
"""
YOLO-based Object Tracking for Raspberry Pi
Tracks a specific object (e.g., person) using YOLO and controls servos
Press SPACE to capture images for dataset, ESC to exit
"""

from picamera2 import Picamera2
from ultralytics import YOLO
from fusion_hat.servo import Servo
import cv2
import time
import os

# -------------------- Configuration --------------------
TARGET = "your_object"      # Object to track (class name)
W, H = 640, 480         # Camera resolution
CX, CY = W // 2, H // 2 # Center coordinates
CONFIDENCE = 0.3        # Detection confidence threshold
DEADZONE = 50           # Pixels from center before moving
SAVE_DIR = "captured_images"  # Dataset save directory

# Create save directory
os.makedirs(SAVE_DIR, exist_ok=True)

print(f"=== YOLO Tracking System ===")
print(f"Target: {TARGET}")
print(f"Confidence threshold: {CONFIDENCE}")
print(f"Deadzone: {DEADZONE} pixels")

# -------------------- Servo Initialization --------------------
print("Initializing servos...")
pan = Servo(2)    # Channel 2 for pan (horizontal)
tilt = Servo(3)   # Channel 3 for tilt (vertical)
pan.angle(0)      # Center position
tilt.angle(0)     # Center position
time.sleep(1)

# -------------------- YOLO Model Loading --------------------
print("Loading YOLO model...")
# Use YOLOv8n for best performance on Raspberry Pi
model = YOLO("your_model.pt")
print("Model loaded successfully")

# -------------------- Camera Initialization --------------------
print("Initializing camera...")
picam2 = Picamera2()
picam2.preview_configuration.main.size = (W, H)
picam2.preview_configuration.main.format = "RGB888"
picam2.configure("preview")
picam2.start()
time.sleep(2)

print("\n=== System Ready ===")
print("Controls:")
print("  SPACE - Capture image (for dataset)")
print("  ESC   - Exit")
print("  (Auto-tracks object when detected)")
print("==========================\n")

# -------------------- Tracking Variables --------------------
pan_pos = 0    # Current pan angle (-90 to 90)
tilt_pos = 0   # Current tilt angle (-45 to 45)
capture_count = 0

def simple_track(x, y):
   """
   Simple 4-direction tracking with deadzone
   Returns: (pan_move, tilt_move) where:
      pan_move: -1 (left), 0 (stop), 1 (right)
      tilt_move: -1 (down), 0 (stop), 1 (up)
   """
   if x is None or y is None:
      return 0, 0

   pan_move = 0
   tilt_move = 0

   # Horizontal movement (pan)
   if x < CX - DEADZONE:
      pan_move = 1           # Move right
   elif x > CX + DEADZONE:
      pan_move = -1          # Move left

   # Vertical movement (tilt)
   if y < CY - DEADZONE:
      tilt_move = -1         # Move down
   elif y > CY + DEADZONE:
      tilt_move = 1          # Move up

   return pan_move, tilt_move

def find_target_detection(results, target_name):
   """
   Search YOLO detection results for target object
   Returns: (x_center, y_center, confidence) or (None, None, None)
   """
   if len(results[0].boxes) == 0:
      return None, None, None

   for box in results[0].boxes:
      class_id = int(box.cls[0])
      class_name = model.names[class_id]
      confidence = float(box.conf[0])

      # Case-insensitive partial match
      if target_name.lower() in class_name.lower():
            x1, y1, x2, y2 = box.xyxy[0].cpu().numpy()
            x_center = int((x1 + x2) / 2)
            y_center = int((y1 + y2) / 2)
            return x_center, y_center, confidence

   return None, None, None

# -------------------- Main Tracking Loop --------------------
try:
   while True:
      # Capture frame
      frame = picam2.capture_array()

      # Run YOLO detection
      results = model.predict(frame, imgsz=320, conf=CONFIDENCE, verbose=False)

      # Find target object
      obj_x, obj_y, obj_conf = find_target_detection(results, TARGET)

      # Process tracking if object found
      if obj_x is not None:
            pan_move, tilt_move = simple_track(obj_x, obj_y)
            pan_pos += pan_move
            tilt_pos += tilt_move

            # Limit servo angles to safe ranges
            pan_pos = max(-90, min(90, pan_pos))
            tilt_pos = max(-45, min(45, tilt_pos))

            # Send commands to servos
            pan.angle(pan_pos)
            tilt.angle(tilt_pos)

            # Draw detection box
            cv2.rectangle(frame, (obj_x - 30, obj_y - 30),
                        (obj_x + 30, obj_y + 30), (0, 255, 0), 2)
            cv2.circle(frame, (obj_x, obj_y), 5, (0, 255, 0), -1)

            status = f"{TARGET} detected: {obj_conf:.2f}"
            color = (0, 255, 0)
      else:
            status = f"No {TARGET} detected"
            color = (0, 0, 255)

      # Draw center crosshair
      cv2.line(frame, (CX - 20, CY), (CX + 20, CY), (0, 255, 255), 2)
      cv2.line(frame, (CX, CY - 20), (CX, CY + 20), (0, 255, 255), 2)

      # Draw deadzone rectangle (visual reference)
      cv2.rectangle(frame, (CX - DEADZONE, CY - DEADZONE),
                     (CX + DEADZONE, CY + DEADZONE), (255, 255, 0), 1)

      # Display status information
      cv2.putText(frame, status, (10, 30),
                  cv2.FONT_HERSHEY_SIMPLEX, 0.6, color, 2)
      cv2.putText(frame, f"Pan: {pan_pos:.0f} Tilt: {tilt_pos:.0f}",
                  (10, 55), cv2.FONT_HERSHEY_SIMPLEX, 0.5, (255, 255, 0), 1)
      cv2.putText(frame, f"Captured: {capture_count} images", (10, 80),
                  cv2.FONT_HERSHEY_SIMPLEX, 0.5, (255, 255, 255), 1)
      cv2.putText(frame, "SPACE=capture  ESC=exit", (10, 105),
                  cv2.FONT_HERSHEY_SIMPLEX, 0.5, (255, 255, 255), 1)

      # Show video window
      cv2.imshow(f"YOLO Tracking - {TARGET}", frame)

      # Handle key presses
      key = cv2.waitKey(1) & 0xFF

      if key == 32:  # SPACE key - capture image
            filename = f"{SAVE_DIR}/img_{capture_count:04d}.jpg"
            cv2.imwrite(filename, frame)
            print(f"Captured: {filename}")
            capture_count += 1

            # Flash effect
            flash = frame.copy()
            flash[:] = (255, 255, 255)
            cv2.imshow(f"YOLO Tracking - {TARGET}", flash)
            cv2.waitKey(50)

      elif key == 27:  # ESC key - exit
            print(f"\nExiting. Total captured: {capture_count} images")
            break

finally:
   # -------------------- Cleanup --------------------
   print("Cleaning up...")
   pan.angle(0)      # Return to center
   tilt.angle(0)     # Return to center
   time.sleep(0.5)
   cv2.destroyAllWindows()
   picam2.stop()
   print("Tracking stopped. Servos centered.")
Code Explanation
Here is the complete YOLO object tracking code. We’ll analyze its working principle section by section.
1. Import Libraries and Configuration Parameters
#!/usr/bin/env python3
"""
YOLO-based Object Tracking for Raspberry Pi
Tracks a specific object (e.g., person) using YOLO and controls servos
Press SPACE to capture images for dataset, ESC to exit
"""

from picamera2 import Picamera2
from ultralytics import YOLO
from fusion_hat.servo import Servo
import cv2
import time
import os

# -------------------- Configuration --------------------
TARGET = "your_object"      # Object to track (class name)
W, H = 640, 480             # Camera resolution
CX, CY = W // 2, H // 2     # Center coordinates
CONFIDENCE = 0.3            # Detection confidence threshold
DEADZONE = 50               # Pixels from center before moving
SAVE_DIR = "captured_images"  # Dataset save directory

# Create save directory
os.makedirs(SAVE_DIR, exist_ok=True)
Configuration parameters:
Parameter |
Description |
Recommended Value |
|---|---|---|
|
Name of the object to track |
“person”, “snowman”, “cup” |
|
Camera resolution |
640x480 (balanced performance) |
|
Deadzone range (pixels) |
50-100, prevents frequent jitter |
|
Detection confidence threshold |
0.3-0.5 |
|
Image save directory |
captured_images |
2. Initialize Servos
# -------------------- Servo Initialization --------------------
print("Initializing servos...")
pan = Servo(2)    # Channel 2 for pan (horizontal)
tilt = Servo(3)   # Channel 3 for tilt (vertical)
pan.angle(0)      # Center position
tilt.angle(0)     # Center position
time.sleep(1)
Servo angle ranges:
Pan servo (horizontal): -90° to 90°, 0° is center
Tilt servo (vertical): -45° to 45°, 0° is center
3. Load YOLO Model
# -------------------- YOLO Model Loading --------------------
print("Loading YOLO model...")
# Use YOLOv8n for best performance on Raspberry Pi
model = YOLO("your_model.pt")
print("Model loaded successfully")
Model selection recommendations:
Use your own trained model:
"snowman.pt","my_pet.pt"Use pre-trained model:
"yolov8n.pt"(can detect 80 common objects)
4. Object Detection and Tracking Logic
def simple_track(x, y):
   """
   Simple 4-direction tracking with deadzone
   Returns: (pan_move, tilt_move) where:
      pan_move: -1 (left), 0 (stop), 1 (right)
      tilt_move: -1 (down), 0 (stop), 1 (up)
   """
   if x is None or y is None:
      return 0, 0

   pan_move = 0
   tilt_move = 0

   # Horizontal movement (pan)
   if x < CX - DEADZONE:
      pan_move = 1           # Move right
   elif x > CX + DEADZONE:
      pan_move = -1          # Move left

   # Vertical movement (tilt)
   if y < CY - DEADZONE:
      tilt_move = -1         # Move down
   elif y > CY + DEADZONE:
      tilt_move = 1          # Move up

   return pan_move, tilt_move

def find_target_detection(results, target_name):
   """
   Search YOLO detection results for target object
   Returns: (x_center, y_center, confidence) or (None, None, None)
   """
   if len(results[0].boxes) == 0:
      return None, None, None

   for box in results[0].boxes:
      class_id = int(box.cls[0])
      class_name = model.names[class_id]
      confidence = float(box.conf[0])

      # Case-insensitive partial match
      if target_name.lower() in class_name.lower():
            x1, y1, x2, y2 = box.xyxy[0].cpu().numpy()
            x_center = int((x1 + x2) / 2)
            y_center = int((y1 + y2) / 2)
            return x_center, y_center, confidence

   return None, None, None
Tracking logic explanation:
Deadzone mechanism: When the target is within the deadzone near the center of the frame, the servos don’t move, preventing frequent jitter
Direction determination: If the target is left of center, rotate right; if right of center, rotate left
Target identification: Find the object to track by matching class names
5. Main Loop
# -------------------- Main Tracking Loop --------------------
try:
   while True:
      # Capture frame
      frame = picam2.capture_array()

      # Run YOLO detection
      results = model.predict(frame, imgsz=320, conf=CONFIDENCE, verbose=False)

      # Find target object
      obj_x, obj_y, obj_conf = find_target_detection(results, TARGET)

      # Process tracking if object found
      if obj_x is not None:
            pan_move, tilt_move = simple_track(obj_x, obj_y)
            pan_pos += pan_move
            tilt_pos += tilt_move

            # Limit servo angles to safe ranges
            pan_pos = max(-90, min(90, pan_pos))
            tilt_pos = max(-45, min(45, tilt_pos))

            # Send commands to servos
            pan.angle(pan_pos)
            tilt.angle(tilt_pos)

            # Draw detection box
            cv2.rectangle(frame, (obj_x - 30, obj_y - 30),
                        (obj_x + 30, obj_y + 30), (0, 255, 0), 2)
            cv2.circle(frame, (obj_x, obj_y), 5, (0, 255, 0), -1)

            status = f"{TARGET} detected: {obj_conf:.2f}"
            color = (0, 255, 0)
      else:
            status = f"No {TARGET} detected"
            color = (0, 0, 255)

      # Draw center crosshair and deadzone
      cv2.line(frame, (CX - 20, CY), (CX + 20, CY), (0, 255, 255), 2)
      cv2.line(frame, (CX, CY - 20), (CX, CY + 20), (0, 255, 255), 2)
      cv2.rectangle(frame, (CX - DEADZONE, CY - DEADZONE),
                     (CX + DEADZONE, CY + DEADZONE), (255, 255, 0), 1)

      # Display status information
      cv2.putText(frame, status, (10, 30),
                  cv2.FONT_HERSHEY_SIMPLEX, 0.6, color, 2)
      cv2.putText(frame, f"Pan: {pan_pos:.0f} Tilt: {tilt_pos:.0f}",
                  (10, 55), cv2.FONT_HERSHEY_SIMPLEX, 0.5, (255, 255, 0), 1)
      cv2.putText(frame, f"Captured: {capture_count} images", (10, 80),
                  cv2.FONT_HERSHEY_SIMPLEX, 0.5, (255, 255, 255), 1)
      cv2.putText(frame, "SPACE=capture  ESC=exit", (10, 105),
                  cv2.FONT_HERSHEY_SIMPLEX, 0.5, (255, 255, 255), 1)

      # Show video window
      cv2.imshow(f"YOLO Tracking - {TARGET}", frame)

      # Handle key presses
      key = cv2.waitKey(1) & 0xFF

      if key == 32:  # SPACE key - capture image
            filename = f"{SAVE_DIR}/img_{capture_count:04d}.jpg"
            cv2.imwrite(filename, frame)
            print(f"Captured: {filename}")
            capture_count += 1

            # Flash effect
            flash = frame.copy()
            flash[:] = (255, 255, 255)
            cv2.imshow(f"YOLO Tracking - {TARGET}", flash)
            cv2.waitKey(50)

      elif key == 27:  # ESC key - exit
            print(f"\nExiting. Total captured: {capture_count} images")
            break

finally:
   # -------------------- Cleanup --------------------
   print("Cleaning up...")
   pan.angle(0)      # Return to center
   tilt.angle(0)     # Return to center
   time.sleep(0.5)
   cv2.destroyAllWindows()
   picam2.stop()
   print("Tracking stopped. Servos centered.")
Performance Optimization
When running the tracking system on Raspberry Pi, the following optimizations can help:
Reduce detection frequency: Detect every 2-3 frames, reuse detection results for other frames
frame_count = 0
while True:
    frame = picam2.capture_array()
    if frame_count % 3 == 0:
        results = model.predict(frame, imgsz=320)
    frame_count += 1
Narrow detection region: Only detect in areas where the target is likely to appear
Use smaller models:
yolov8n.ptis the best choiceAdjust deadzone range: Increasing
DEADZONEreduces frequent servo movement
Common Questions
Q: What if the servos don’t move?
Check if the servos are properly connected
Verify that the fusion_hat library is correctly installed
Q: What if tracking response is too slow?
Lower camera resolution (e.g., 320x240)
Reduce detection resolution
imgszIncrease deadzone range to reduce servo movement
Q: What if target detection is unstable?
Adjust the
CONFIDENCEthreshold (lower values detect more but increase false positives)Ensure adequate lighting
Use a custom-trained model for better specificity
Q: How to adjust servo sensitivity?
Modify the step value in the simple_track function:
# Increase step size for faster servo movement
pan_move = 2  # Originally 1
tilt_move = 2
Q: Can I track multiple targets?
Modify the find_target_detection function to return the nearest or highest confidence target, or implement multi-target switching functionality.
Extended Features
1. Add PID Control (smoother tracking)
# Simplified PID controller example
pan_error = CX - obj_x
pan_output = pan_error * 0.05  # Proportional control
pan_pos += int(pan_output)
2. Automatically Record Tracking Trajectory
# Record target position history
trajectory = []
trajectory.append((obj_x, obj_y))
3. Send Notifications When Target is Detected
if obj_x is not None:
    # Send email or push notification
    pass
4. Face Recognition Integration
Combine with face recognition libraries to track only specific individuals.
Summary
Through this tutorial, you have learned:
How to combine YOLO object detection with servo control
How to implement a vision-based automatic tracking system
How to use deadzone mechanisms to avoid jitter
How to collect training data during tracking
This system can be widely applied in scenarios such as smart surveillance, automated photography, and robotic vision. As YOLO models continue to evolve, you can build even more intelligent tracking systems—such as automatically adjusting zoom based on target size, or predicting target movement based on motion trajectories.