Note
Hello, welcome to the SunFounder Raspberry Pi & Arduino & ESP32 Enthusiasts Community on Facebook! Dive deeper into Raspberry Pi, Arduino, and ESP32 with fellow enthusiasts.
Why Join?
Expert Support: Solve post-sale issues and technical challenges with help from our community and team.
Learn & Share: Exchange tips and tutorials to enhance your skills.
Exclusive Previews: Get early access to new product announcements and sneak peeks.
Special Discounts: Enjoy exclusive discounts on our newest products.
Festive Promotions and Giveaways: Take part in giveaways and holiday promotions.
👉 Ready to explore and create with us? Click [here] and join today!
1. Run YOLO on Raspberry Pi
YOLO (You Only Look Once) is a revolutionary object detection algorithm characterized by its speed and accuracy. It transforms object detection into a regression problem, predicting all object categories and locations in an image through a single neural network forward pass.
Think of it as a vision system that can “see everything at a glance.” Whether it’s video surveillance, autonomous driving, or industrial quality inspection, YOLO can be found wherever real-time object detection is needed.
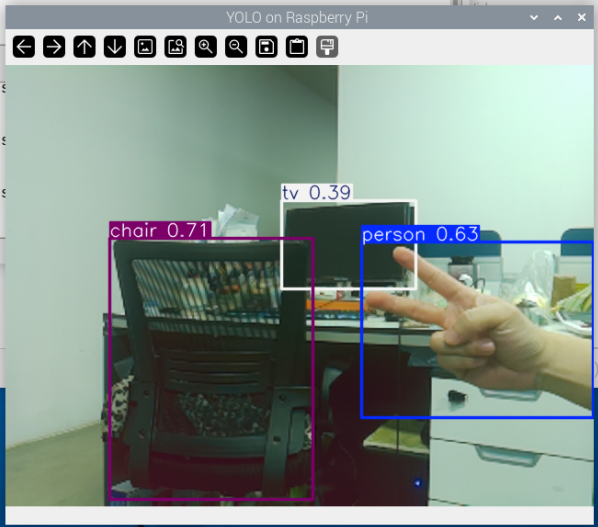
Figure: YOLOv8n running in real-time on Raspberry Pi. Objects in the camera feed are accurately detected and annotated, with detected classes and confidence scores displayed on the left. This image shows the model successfully identifying objects such as a person, chair, and TV.
Core Principles
Unlike earlier two-stage methods (such as R-CNN) that “first find candidate regions and then identify them,” YOLO adopts a fundamentally different approach:
Unified Framework: Divides the image into a grid (e.g., the original 7x7 grid).
Grid Prediction: Each grid cell is responsible for predicting objects whose center falls within that cell. Each grid predicts multiple bounding boxes (including position and size) along with their confidence scores, while also predicting object class probabilities.
One-Stage Completion: Classification and localization are accomplished simultaneously within the same neural network, truly achieving “you only look once,” thus significantly outperforming previous methods in speed.
Running the Code
cd ~/ai-lab-kit/yolo
python3 yolo_test.py
The code will automatically download a model (approximately 6MB) and run it on the camera. The results will be displayed in a window with a title of “YOLOv8”.
(the first run will automatically download an approximately 6MB model):
#!/usr/bin/env python3
import cv2
from picamera2 import Picamera2
from ultralytics import YOLO

model = YOLO("yolov8n.pt")  # nano model

# initialize camera
picam2 = Picamera2()
picam2.preview_configuration.main.size = (640, 480)
picam2.preview_configuration.main.format = "RGB888"
picam2.configure("preview")
picam2.start()

print("YOLO start, Press 'q' to exit...")

try:
   while True:
      # capture frame
      frame = picam2.capture_array()

      # run YOLO and set imgsz=320
      results = model(frame, imgsz=320)

      # draw results
      annotated = results[0].plot()

      # show results
      cv2.imshow("YOLO on Raspberry Pi", annotated)

      # press 'q' to exit
      if cv2.waitKey(1) & 0xFF == ord('q'):
            break
finally:
   cv2.destroyAllWindows()
   picam2.stop()
   print("exit")
Troubleshooting
Q: If encountering Numpy.dtype size changed error
Downgrade the Numpy version:
# If version is 2.x, downgrade to 1.x
pip3 install "numpy<2.0" --break-system-packages --force-reinstall
Q: If encountering libopenblas.so.0 missing error
Install the OpenBLAS library:
sudo apt install libopenblas-dev
Q: If the camera cannot be opened
Check the camera connection and ensure it is enabled:
sudo raspi-config
# Select Interface Options -> Camera -> Enable
Q: If encountering out-of-memory errors
Increase swap space:
sudo dphys-swapfile swapoff
sudo nano /etc/dphys-swapfile
# Modify CONF_SWAPSIZE=2048
sudo dphys-swapfile setup
sudo dphys-swapfile swapon
Performance Optimization Methods
Running YOLO on a Raspberry Pi (even 4B/5) can be demanding. Here are several proven optimization methods:
Adjust YOLO Inference Resolution: The code above already uses imgsz=320, which is a balanced setting. Adjustable values:
imgsz=224- Lowest resolution, fastest speedimgsz=320- Standard choiceimgsz=416- Higher accuracy, slower speedimgsz=640- Highest accuracy, very slow on Raspberry Pi
Choose the Right Model:
yolov8n.pt(6MB) - Fastest, suitable for real-time detectionyolov8s.pt(22MB) - Slightly slower but more accurateyolov8m.pt(49MB) - Slower, higher accuracyyolov8l/x.pt- Generally unusable on Raspberry PiYou can also use your own trained model, e.g.,
"/home/pi/my_model.pt". We’ll cover how to train custom models in later chapters.
Limit Detection Classes: If only detecting specific objects (e.g., only people), modify the code:
results = model(frame, classes=[0], imgsz=320) # 0 is the class ID for person
Common class IDs:
0 - person
1 - bicycle
2 - car
3 - motorcycle
5 - bus
7 - truck
Use Lightweight Model Variants:
# Use pruned version of YOLOv8n (if available)
model = YOLO("yolov8n.pt")

# Or use TensorRT acceleration (requires additional configuration)
# model = YOLO("yolov8n.pt")
# model.export(format="engine")  # Export as TensorRT engine
Reduce Frame Processing: If real-time display of all frames isn’t needed, process frames intermittently:
frame_count = 0
while True:
    frame = picam2.capture_array()

    # Process every 3rd frame
    if frame_count % 3 == 0:
        results = model(frame, imgsz=320)
        annotated = results[0].plot()
        cv2.imshow("YOLO on Raspberry Pi", annotated)

    frame_count += 1

    if cv2.waitKey(1) & 0xFF == ord('q'):
        break
Use Multi-threading: Separate camera capture and YOLO inference into different threads:
import threading
import queue

frame_queue = queue.Queue(maxsize=2)
result_queue = queue.Queue(maxsize=2)

def capture_frames():
    while True:
        frame = picam2.capture_array()
        if frame_queue.full():
            frame_queue.get()
        frame_queue.put(frame)

def process_frames():
    while True:
        frame = frame_queue.get()
        results = model(frame, imgsz=320)
        annotated = results[0].plot()
        if result_queue.full():
            result_queue.get()
        result_queue.put(annotated)

# Start threads
threading.Thread(target=capture_frames, daemon=True).start()
threading.Thread(target=process_frames, daemon=True).start()

while True:
    if not result_queue.empty():
        cv2.imshow("YOLO on Raspberry Pi", result_queue.get())
    if cv2.waitKey(1) & 0xFF == ord('q'):
        break
Advanced Usage
Using Video Files as Input
import cv2
from ultralytics import YOLO

model = YOLO("yolov8n.pt")
cap = cv2.VideoCapture("input_video.mp4")

while cap.isOpened():
    ret, frame = cap.read()
    if not ret:
        break

    results = model(frame, imgsz=320)
    annotated = results[0].plot()
    cv2.imshow("YOLO Detection", annotated)

    if cv2.waitKey(1) & 0xFF == ord('q'):
        break

cap.release()
cv2.destroyAllWindows()
Summary
Through this tutorial, you have learned:
How to set up the YOLO environment on Raspberry Pi
How to perform real-time object detection using the camera
How to resolve common installation and runtime issues
Various methods to optimize detection performance
The power of YOLO lies in its simplicity and efficiency, enabling respectable object detection performance even on embedded devices like the Raspberry Pi. Continue exploring, and you can build various interesting applications such as smart surveillance, object tracking, and people counting.