ADXL345 Module
The purpose of this project is to introduce you to the ADXL345 module and show you how to use it with Arduino and Raspberry Pi.
About ADXL345 Module
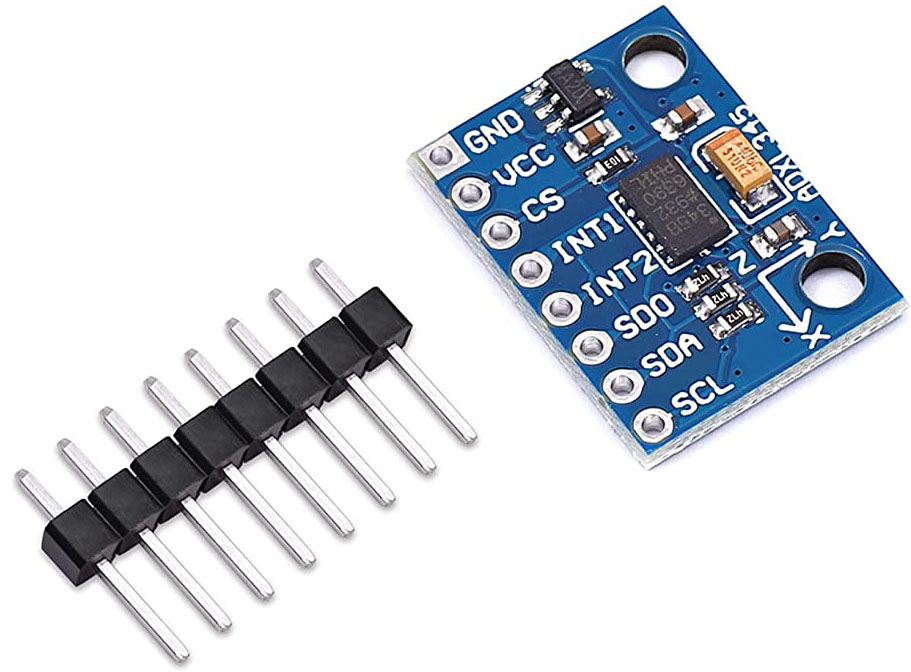
GND: Cathode of the power supply.
VCC: The power supply is connected to 3-5V.
CS: Chip select.
INT1: Interrupt the output 1.
INT2: Interrupt the output 2.
SD0: Serial data output (SPI 4 wire), spare I2C address choose(I2C).
SDA: Serial data (I2C), Serial data input (SPI line 4), Serial data input, output(SPI Line 3)
SCL: Serial data (I2C), Serial data input (SPI line 4), Serial data input, output(SPI Line 3)
The ADXL345 is a small, thin, ultralow power, 3-axis accelerometer with high resolution (13-bit) measurement at up to ±16 g. Digital output data is formatted as 16-bit twos complement and is accessible through either a SPI (3- or 4-wire) or I2C digital interface.
The ADXL345 is well suited for mobile device applications. It measures the static acceleration of gravity in tilt-sensing applications, as well as dynamic acceleration resulting from motion or shock. Its high resolution (3.9 mg/LSB) enables measurement of inclination changes less than 1.0°.
Main Features
Type: GY-291
Chip: ADXL345
Power Supply: 3~5V
Communication Mode: Standard IIC/SPI communicating protocol
Measuring Range: ±2g±16g
3 axis, ± 2g/ ± 4g/ ± 8g/ ± 16g
Application
Mobile Phone
Medical instrument
Game and pointing device
Industrial instrument
Personal navigation device
HDD Protection from falling
Screen flip on tablet computer
Principle
ADXL345 works like this:
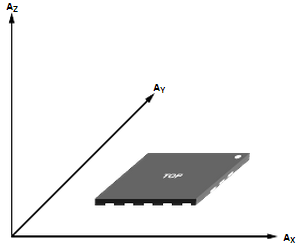
Axes of detection by ADXL345
When you place the module face up, Z_OUT is at the maximum which is +1g; face down, Z_OUT is at the minimum. No matter of face, as long as it’s placed on a level surface, X_OUT increases along the Ax axis direction, so does Y_OUT along the Ay axis. See the picture below. Thus, when you rotate the module, you can see the changes of X_OUT, Y_OUT, and Z_OUT.

Relationship between output and gravity direction
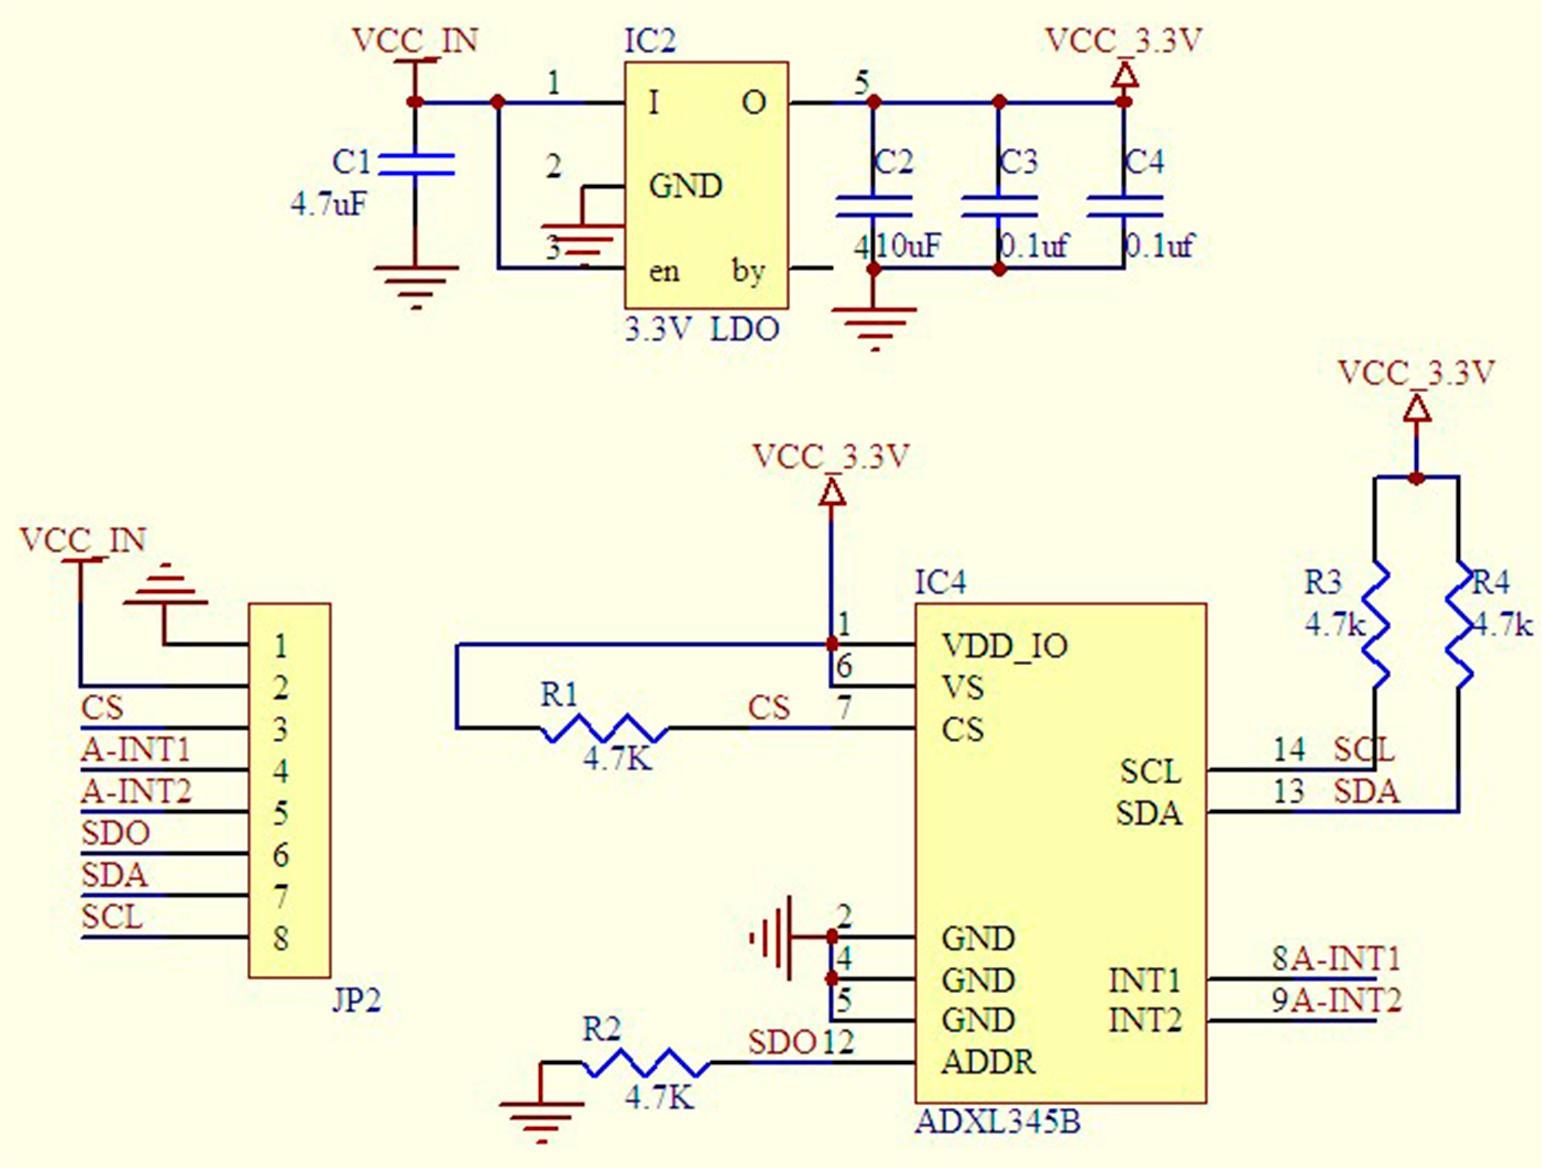
Schematic
How to use?
Use with Arduino
If you are Arduino user, you can follow the steps to use the module.
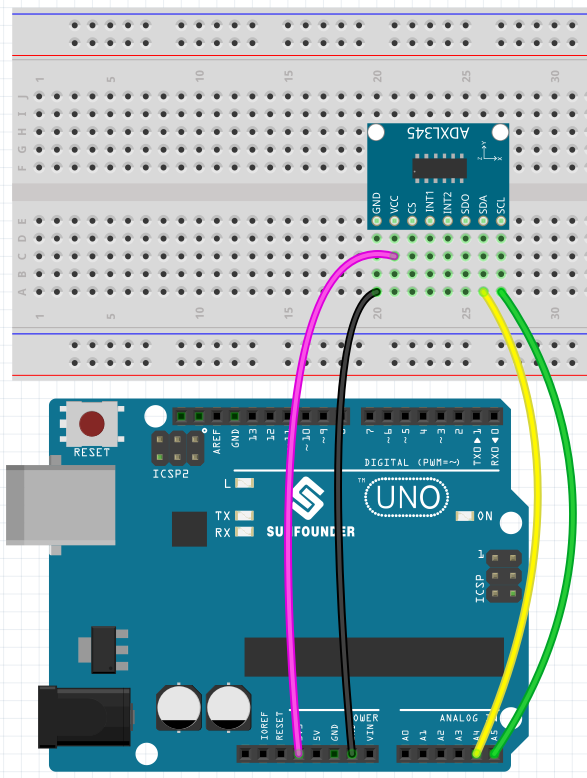
Build the circuit.
In the Library Manager, type
adxl345and choose a library to install. Adafruit ADXL345 is installed here, and choosing INSTALL ALL in the pop-up window is recommended.
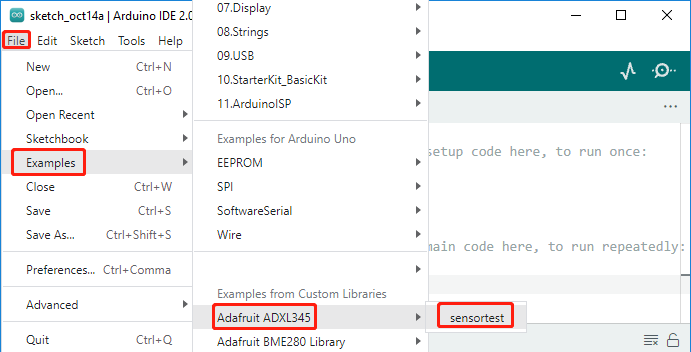
Open the sample code.
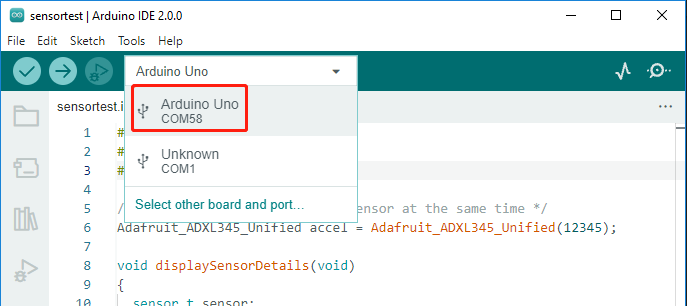
Select the board and port, here it is Arduino Uno, you can select other boards if you are using other boards.
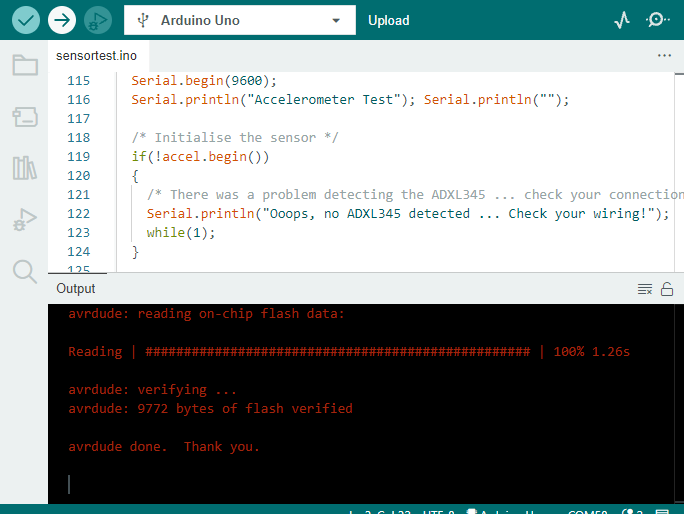
Upload the code to your Arduino board.
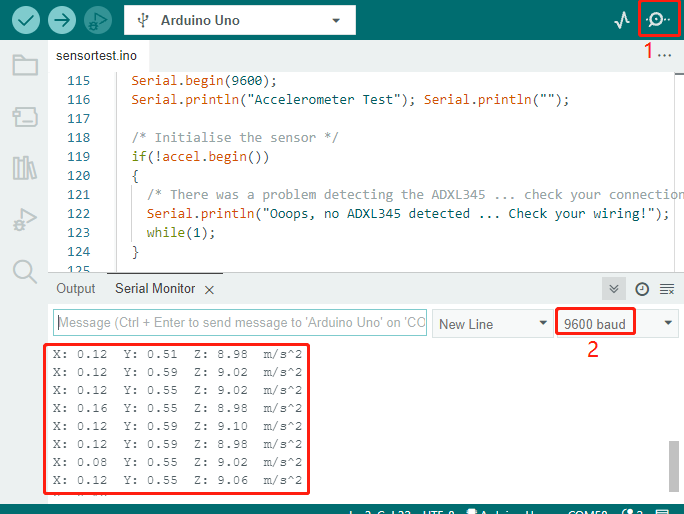
Set the baud rate to 9600 in the serial monitor to see acceleration on the X, Y, and Z axes. You can turn the module in all directions and see how the values printed change.
Use with Raspberry Pi
Refer to the following tutorial if you intend to use the ADXL345 module on Raspberry Pi.
1. Connecting Raspberry Pi and ADXL345 module
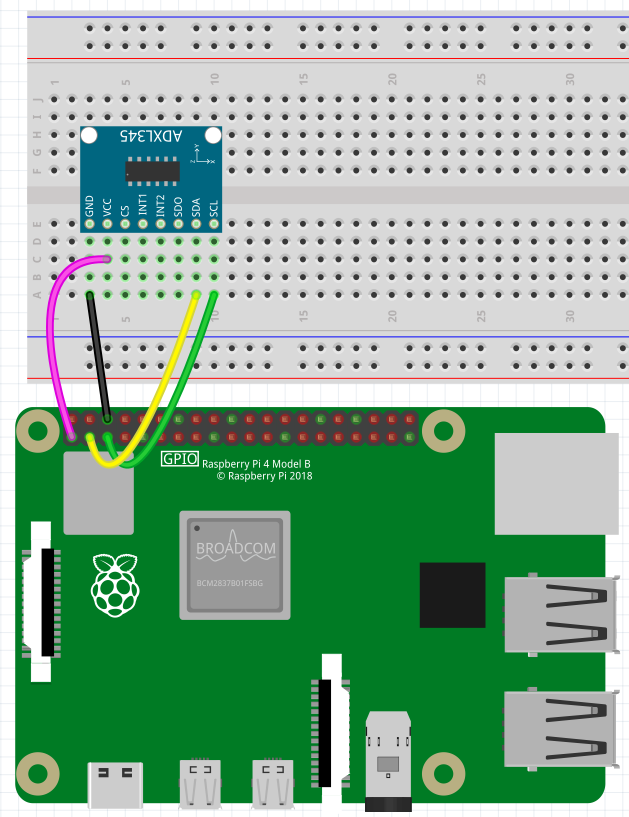
Follow the diagram below to plug the ADXL345 module into the breadboard first, then go to connect the Raspberry Pi. With the male - female cable, you can also connect this module directly to the Raspberry Pi if you don’t have a breadboard.
Wire the GND pin of the module to Physical Pin 6 (GND) on the Raspberry Pi. Wire the VCC pin of the module to Physical Pin 1 (3v3) on the Raspberry Pi. Wire the SDA pin of the module to Physical Pin 3 (SDA) on the Raspberry Pi. Wire the SCL pin of the module to Physical Pin 5 (SCL) on the Raspberry Pi.
2. Configuring the Raspberry Pi
The Raspberry Pi’s configuration must be altered before it can retrieve data from the ADXL345 module.
Let’s first make sure everything is up to date by running the following two commands.
sudo apt-get update
sudo apt-get upgrade
In order to enable I2C on the Raspberry Pi, we will need to launch the Raspberry configuration tool once the Raspberry Pi has been updated.
sudo raspi-config
On this screen, you need to go to the 3 Interface Options menu.
The ARROW keys can be used to navigate through the raspi-config tools menu. Select an option by pressing ENTER.
Now in the interface options menu, go ahead and select I5 I2C.
When asked if you would like to enable the ARM I2C interface, select <YES>.
I2C is now enabled, so we can go ahead and install the packages we will use to talk to the ADXL345 module. In the latest Raspberry Pi OS(Bullseye), these tools are already installed by default, you can skip this step.
sudo apt-get install python3-dev python3-pip python3-smbus i2c-tools -y
Now let’s check if the Raspberry Pi can see the ADXL345 module.
sudo i2cdetect -y 1
From this command, you should see quite a bit displayed on the command line. In this result, you should see at least one number, for example 53.
pi@raspberrypi:~ $ sudo i2cdetect -y 1
    0  1  2  3  4  5  6  7  8  9  a  b  c  d  e  f
00:                         -- -- -- -- -- -- -- --
10: -- -- -- -- -- -- -- -- -- -- -- -- -- -- -- --
20: -- -- -- -- -- -- -- -- -- -- -- -- -- -- -- --
30: -- -- -- -- -- -- -- -- -- -- -- -- -- -- -- --
40: -- -- -- -- -- -- -- -- -- -- -- -- -- -- -- --
50: -- -- -- 53 -- -- -- -- -- -- -- -- -- -- -- --
60: -- -- -- -- -- -- -- -- -- -- -- -- -- -- -- --
70: -- -- -- -- -- -- -- --
If nothing appears, make sure the ADXL345 accelerometer is properly connected to the Raspberry Pi and that all solder joints on the sensor pins are clean. If you see errors, try re-enabling I2C again.
3. Writing code
To talk to ADXL345, we will use Adafruit’s ADXL34x Python library, but you need to check your Python version first, because this library does not support Python 2.x.
Type
python, the current version of Python will appear and you can useexit()to exit.pi@raspberrypi:~ $ python Python 3.9.2 (default, Feb 28 2021, 17:03:44) [GCC 10.2.1 20210110] on linux Type "help", "copyright", "credits" or "license" for more information. >>> exit()
If you have Python 2.x, use the following command to install Python 3.
sudo apt-get install python3
Now you can use the following command to install Adafruit’s ADXL34x Python library.
sudo pip3 install adafruit-circuitpython-adxl34x
Now that all the packages we need are installed on the Raspberry Pi, we can start writing Python script to read information from the accelerometer. Use the following command to create a new blank script.
nano adxl345.py
Copy the following sample code into it.
import time
import board
import adafruit_adxl34x

i2c = board.I2C()  # uses board.SCL and board.SDA

# For ADXL345
accelerometer = adafruit_adxl34x.ADXL345(i2c)

while True:
    print("%f %f %f" % accelerometer.acceleration)
    time.sleep(0.2)
When you are sure that all the code is correct, you can press
CTRL+XthenYand thenENTERto save it.With the code now done, let’s go ahead and run the script.
python3 ./adxl345.py
By running this code, you should see the values being read in from the accelerometer.
pi@raspberrypi:~/Documents $ python3 ./adxl345.py
0.000000 0.000000 0.000000
0.000000 -0.196133 9.218251
0.000000 -0.156906 9.061345
0.000000 -0.196133 9.022118
0.000000 -0.156906 9.022118
0.000000 -0.117680 9.022118
0.000000 -0.156906 9.061345
0.000000 -0.117680 9.061345
0.000000 -0.117680 9.061345
0.000000 -0.156906 9.061345
0.000000 -0.117680 9.022118
0.000000 -0.156906 9.061345
0.000000 -0.156906 9.061345
-0.039227 -0.156906 8.982891
Press
Ctrl+Cto stop running the script.
4. More about ADXL345 Accelerometer Library
In addition to reading the acceleration(accelerometer.acceleration), this library can also perform the following detections.
acceleration- The acceleration values on the x, y and z axesenable_motion_detection- Enables motion detection. Allows for setting threshold. Threshold defaults to 18.enable_tap_detection- Enables tap detection. Allows for single or double-tap detection.enable_freefall_detection- Enables freefall detection. Allows for setting threshold and time. Threshold defaults to 10, time defaults to 25.events- Used to read the events when motion detection, tap detection and freefall detection are enables. Requires specifying which event you are trying to read.
For specific usage examples, please refer to: https://github.com/adafruit/Adafruit_CircuitPython_ADXL34x/tree/main/examples.