Note
Hello, welcome to the SunFounder Raspberry Pi & Arduino & ESP32 Enthusiasts Community on Facebook! Dive deeper into Raspberry Pi, Arduino, and ESP32 with fellow enthusiasts.
Why Join?
Expert Support: Solve post-sale issues and technical challenges with help from our community and team.
Learn & Share: Exchange tips and tutorials to enhance your skills.
Exclusive Previews: Get early access to new product announcements and sneak peeks.
Special Discounts: Enjoy exclusive discounts on our newest products.
Festive Promotions and Giveaways: Take part in giveaways and holiday promotions.
👉 Ready to explore and create with us? Click [here] and join today!
2.2.10 MFRC522 RFID Module
Introduction
Radio Frequency Identification (RFID) refers to technologies that use wireless communication between an object (or tag) and interrogating device (or reader) to automatically track and identify such objects.
Some of the most common applications for this technology include retail supply chains, military supply chains, automated payment methods, baggage tracking and management, document tracking and pharmaceutical management, to name a few.
In this project, we will use RFID for reading and writing.
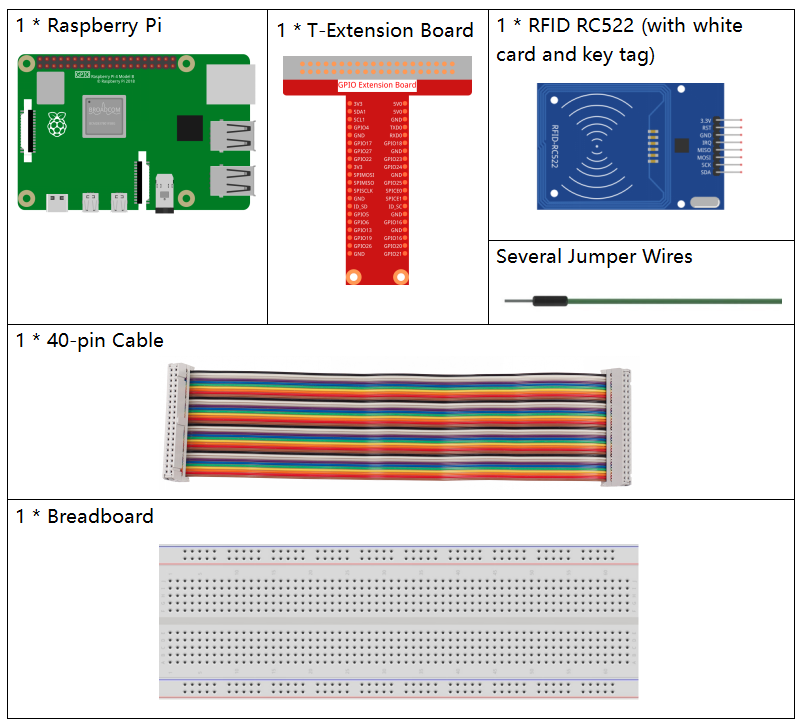
Required Components
In this project, we need the following components.
It’s definitely convenient to buy a whole kit, here’s the link:
Name |
ITEMS IN THIS KIT |
LINK |
|---|---|---|
Raphael Kit |
337 |
You can also buy them separately from the links below.
COMPONENT INTRODUCTION |
PURCHASE LINK |
|---|---|
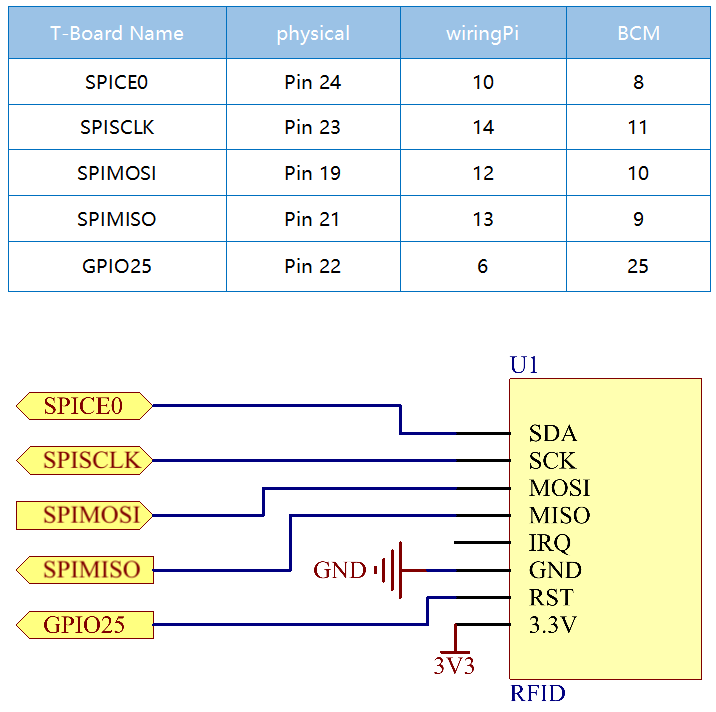
Schematic Diagram
Experimental Procedures
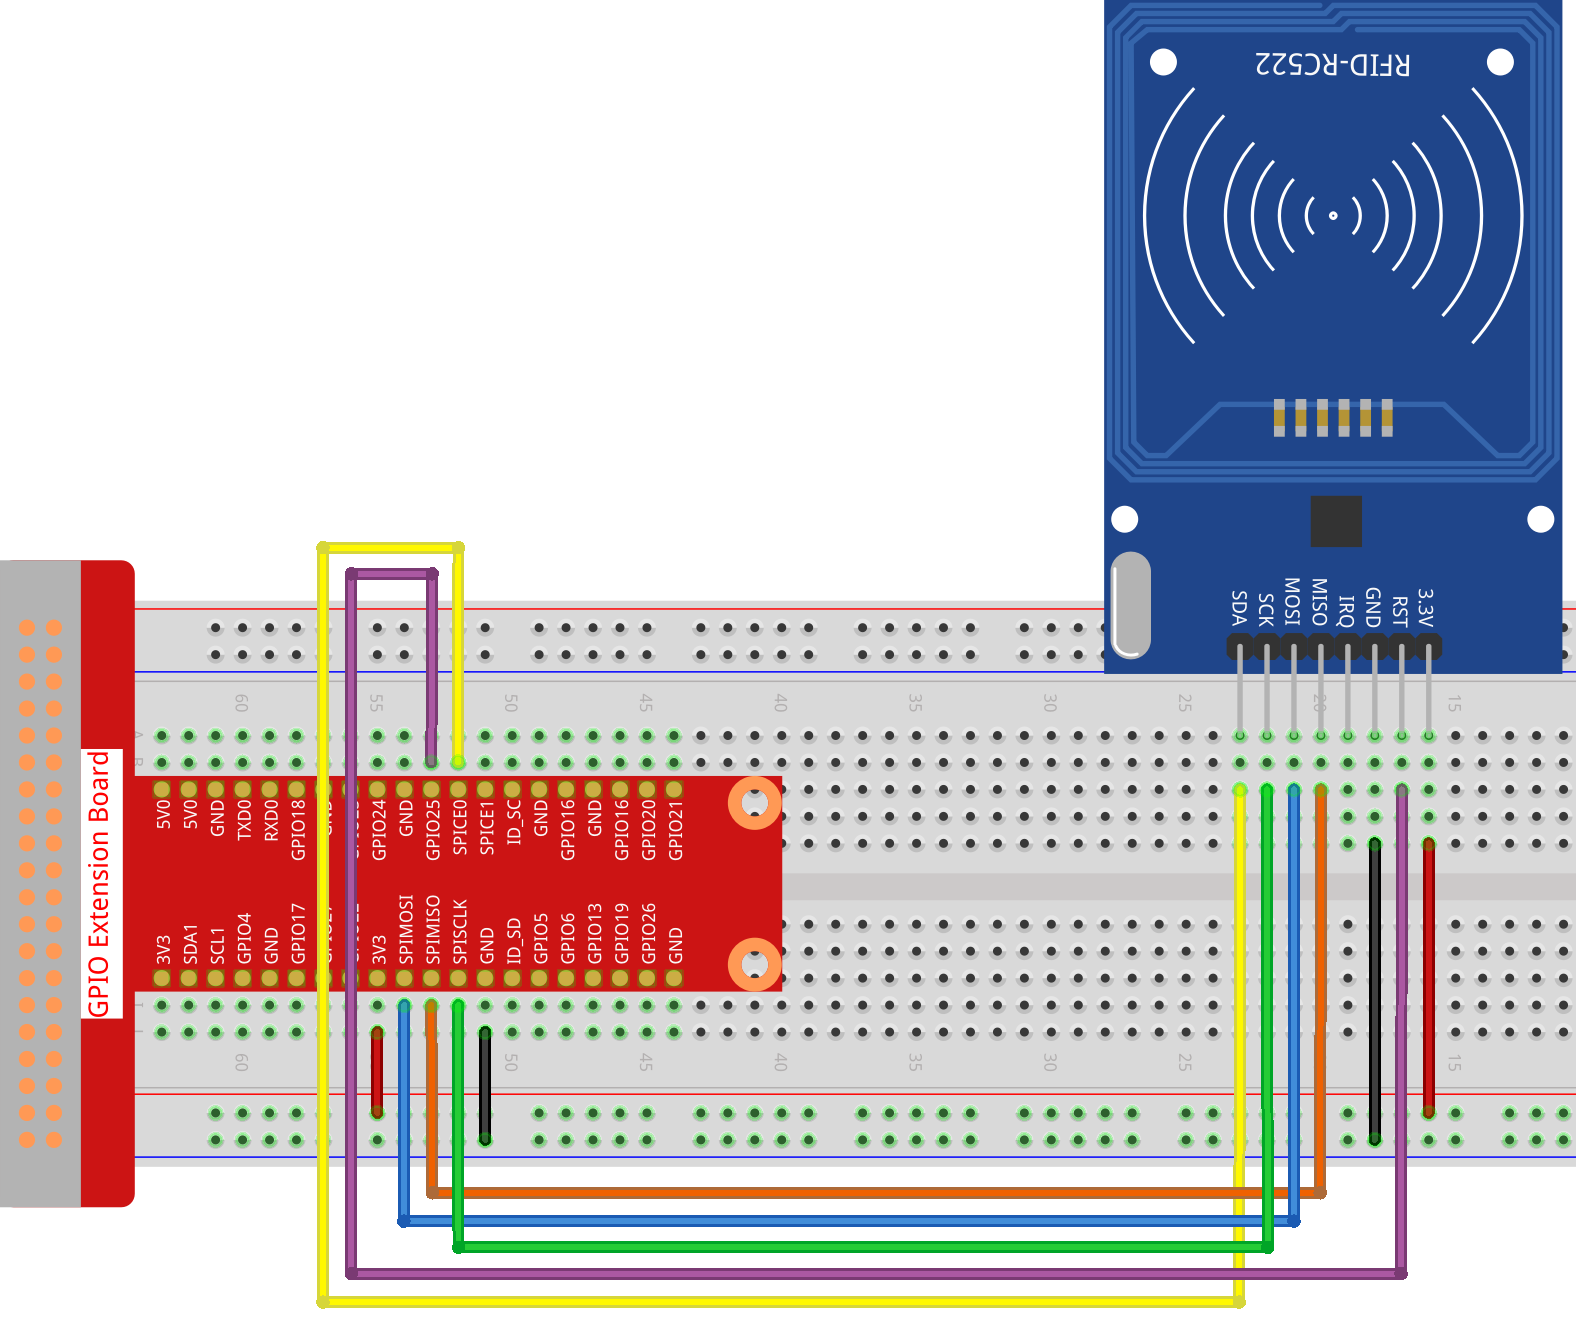
Step 1: Build the circuit.
Step 2: Set up SPI (refer to SPI Configuration for more details. If you have set SPI, skip this step.)
Step 3: Go to the folder of the code.
cd ~/raphael-kit/python
Step 4: Run the 2.2.10_write.py.
sudo python3 2.2.10_write.py
Step 5: After running the program, enter the text you wish to write (up to 16 characters), such as “welcome,” and press Enter to confirm. After that, it will prompt “Data has been written to the card” Finally, press Ctrl+C to stop the code execution.
Please place your RFID card on the reader...
Press Ctrl-C to stop.
RFID card detected!
Card UID: 9BF6210B
Please enter data to write to the card (up to 16 characters): welcome
Block 8 authentication successful
4 backdata &0x0F == 0x0A 10
Data written
Data has been written to the card
Reading data from block 8:
Sector 8 [119, 101, 108, 99, 111, 109, 101, 0, 0, 0, 0, 0, 0, 0, 0, 0]
Step 6: Now run 2.2.10_read.py to read the information of the tag or card you have written.
sudo python3 2.2.10_read.py
Step 7: After running, you will get the following information.
Please place your RFID card on the reader...
Press Ctrl-C to stop.
RFID card detected!
Card UID: 9BF6210B
Block 8 authentication successful
Sector 8 [119, 101, 108, 99, 111, 109, 101, 0, 0, 0, 0, 0, 0, 0, 0, 0]
MFRC522_Read return type: <class 'int'>, Data: [119, 101, 108, 99, 111, 109, 101, 0, 0, 0, 0, 0, 0, 0, 0, 0]
Sector 8 [119, 101, 108, 99, 111, 109, 101, 0, 0, 0, 0, 0, 0, 0, 0, 0]
Read data: welcome
Code Analysis for 2.2.10_write.py
This Python script writes user-provided data to an RFID card using the MFRC522 RFID reader. The script continuously checks for a card, prompts the user to enter data to write, and confirms successful write and read operations.
Import Statements
MFRC522: Imports functions and classes required for RFID reader operations.signalandtime:signalis used to handle graceful termination via SIGINT (Ctrl+C), andtimeis used to add delays in the main loop.
Global Variable
continue_reading: Controls the main loop, allowing the script to terminate gracefully when set toFalse.
continue_reading = True
Signal Handling:
end_readfunction: This function is triggered whenCtrl+C(SIGINT) is detected. It setscontinue_readingtoFalse, allowing the script to exit gracefully.signal.signal(signal.SIGINT, end_read): Binds the SIGINT signal (Ctrl+C) toend_read, so when interrupted, the script will display a message and terminate gracefully.
signal.signal(signal.SIGINT, end_read)
RFID Reader Setup:
rfid_reader: An instance of theMFRC522class, used to control RFID reader operations.default_key: A 6-byte list, typically0xFFfor each byte. This is the default authentication key for most RFID cards.
# Create an instance of the MFRC522 class
rfid_reader = MFRC522.MFRC522()

# Define the default key (6 bytes, default is all 0xFF)
default_key = [0xFF, 0xFF, 0xFF, 0xFF, 0xFF, 0xFF]
User Instructions
The script prints instructions to the console, informing the user to place their RFID card on the reader and use
Ctrl+Cto exit.print("Please place your RFID card on the reader...") print("Press Ctrl-C to stop.")
Main Loop: Detecting, Writing, and Reading Data
Card Detection: The script continuously calls
MFRC522_Requestto detect RFID cards. If a card is detected (status == rfid_reader.MI_OK), it proceeds to the next step.
(status, TagType) = rfid_reader.MFRC522_Request(rfid_reader.PICC_REQIDL)

# If a card is detected
if status == rfid_reader.MI_OK:
    print("RFID card detected!")
    ...
else:
    # Wait for a while before trying again
    time.sleep(0.5)
Retrieving the Card’s UID: Calls
MFRC522_SelectTagSNto retrieve the unique identifier (UID) of the card. If successful, the UID is converted to a hexadecimal string and printed. The UID is necessary for authentication.
(status, uid) = rfid_reader.MFRC522_SelectTagSN()

# If we have the UID, continue
if status == rfid_reader.MI_OK:
    # Print UID
    uid_str = ''.join(['%02X' % i for i in uid])
    print("Card UID: %s" % uid_str)
    ...
else:
    print("Unable to get card UID")
Data Preparation:
Prompting for Input: The user is prompted to enter data to write to the card (up to 16 characters).
Data Truncation: The data is truncated to 16 characters if the user enters more.
String to Byte Conversion: The user’s string input is converted into a byte list padded to 16 bytes, as required by the RFID card’s storage format.
write_data = input("Please enter data to write to the card (up to 16 characters): ")
# Ensure data does not exceed 16 characters
write_data = write_data[:16]
# Convert string to byte list, pad to 16 bytes
data_to_write = [0x00]*16
string_bytes = write_data.encode('utf-8')
for i in range(len(string_bytes)):
    data_to_write[i] = string_bytes[i]
Specifying the Block Number: The script specifies block 8 for writing the data. Note: Block numbers should avoid sector trailer blocks, typically the last block in each sector, as they are used for control information.
block_num = 8 # For example, choose block 8
Card Authentication:
MFRC522_Authauthenticates the specified block using the default key and UID. If authentication is successful, the script proceeds with writing data. If not, an error message is printed, and encryption is stopped.
status = rfid_reader.MFRC522_Auth(rfid_reader.PICC_AUTHENT1A, block_num, default_key, uid)

if status == rfid_reader.MI_OK:
    print("Block %d authentication successful" % block_num)
    ...
else:
    print("Authentication failed")
    rfid_reader.MFRC522_StopCrypto1()
Writing Data to the Card:
MFRC522_Writewrites the prepared data to the specified block on the RFID card. After writing, a message confirms that data has been successfully written to the card.
rfid_reader.MFRC522_Write(block_num, data_to_write)
print("Data has been written to the card")
Reading Back the Data: To verify the write operation, the script reads back the data from the same block using
MFRC522_Read. The retrieved data is printed to allow the user to verify the data.
print("Reading data from block %d:" % block_num)
rfid_reader.MFRC522_Read(block_num)
Stopping Encryption:
MFRC522_StopCrypto1stops the encryption process after operations are complete. This step is necessary to reset the card’s communication state.
# Stop encryption
rfid_reader.MFRC522_StopCrypto1()
Exiting the Loop: After writing and verifying the data,
continue_readingis set toFalseto exit the loop and end the script.continue_reading = False
Key Points
Graceful Termination: The script captures SIGINT (Ctrl+C) to safely terminate and print a message, allowing any ongoing operation to complete before exiting.
User Interaction: Prompts the user for input, enabling data to be customized each time the card is written.
Authentication: Ensures that access to the specified block is securely managed, handling authentication failures gracefully.
Data Formatting: Converts string data to a byte list format compatible with the card’s storage structure, padding as necessary.
Verification: Reads back data from the card to confirm a successful write, enhancing reliability.
Modularity: The script is well-organized with clear functionality for detecting, writing, and reading, making it easier to follow and maintain.
This script is suitable for applications requiring both read and write capabilities with RFID cards, such as access control or user identification.
Code Explanation for 2.2.10_read.py
This Python script uses an RFID reader (MFRC522) to read data from RFID cards. The script is structured to continuously check for cards, retrieve their data, and gracefully handle exit requests using signal handling.
Import Statements:
MFRC522: This module provides methods to interact with the MFRC522 RFID reader.signalandtime: Used to handle script termination (e.g.,Ctrl+C) and control the timing of certain operations.
Global Variables:
continue_reading: A boolean flag that controls the main reading loop, allowing the script to stop gracefully whenCtrl+Cis pressed.
continue_reading = True
Signal Handling:
end_readfunction: This function is triggered whenCtrl+C(SIGINT) is detected. It setscontinue_readingtoFalse, allowing the script to exit gracefully.signal.signal(signal.SIGINT, end_read): Binds the SIGINT signal (Ctrl+C) toend_read, so when interrupted, the script will display a message and terminate gracefully.
signal.signal(signal.SIGINT, end_read)
RFID Reader Setup:
rfid_reader: An instance of theMFRC522class, used to control RFID reader operations.default_key: A 6-byte list, typically0xFFfor each byte. This is the default authentication key for most RFID cards.block_num: Specifies the block number to be read from the RFID card, here set to block8. The block number must match the one used when writing data to the card.
# Create an instance of the MFRC522 class
rfid_reader = MFRC522.MFRC522()

# Define the default key (6 bytes, default is all 0xFF)
default_key = [0xFF, 0xFF, 0xFF, 0xFF, 0xFF, 0xFF]

# Define the block number to read (must match the block used during writing)
block_num = 8  # For example, block 8
User Instructions
The script prints instructions to the console, informing the user to place their RFID card on the reader and use
Ctrl+Cto exit.print("Please place your RFID card on the reader...") print("Press Ctrl-C to stop.")
Main Loop: RFID Card Detection and Data Reading.
Scanning for Cards: The main loop continuously calls
MFRC522_Requestto scan for RFID cards. If a card is detected, it proceeds to the next steps.(status, TagType) = rfid_reader.MFRC522_Request(rfid_reader.PICC_REQIDL) if status == rfid_reader.MI_OK: print("RFID card detected!") ... else: # If no card is detected, wait for a short period before retrying time.sleep(0.5)
Retrieving Card UID: Uses
MFRC522_SelectTagSNto retrieve the card’s unique identifier (UID). If successful, it converts the UID to a hexadecimal string and prints it. This UID is necessary for authenticating the card.(status, uid) = rfid_reader.MFRC522_SelectTagSN() # If UID was successfully retrieved, proceed if status == rfid_reader.MI_OK: # Convert UID list to a hexadecimal string uid_str = ''.join(['%02X' % i for i in uid]) print("Card UID: %s" % uid_str) ... else: print("Unable to get card UID")
Authenticating the Card:
MFRC522_Authauthenticates access to the specified block using the default key and the card’s UID. If authentication succeeds, the script moves to reading data from the block.status = rfid_reader.MFRC522_Auth(rfid_reader.PICC_AUTHENT1A, block_num, default_key, uid) if status == rfid_reader.MI_OK: print("Block %d authentication successful" % block_num) ... else: print("Authentication failed, status code: %s" % status) rfid_reader.MFRC522_StopCrypto1()
Reading Data:
MFRC522_Readreads data from the specified block.data: This variable contains the block’s raw data if the read operation is successful.The script converts each byte in
datato characters and removes any padding null bytes (\x00). The processed data is then printed.
read_status, data = rfid_reader.MFRC522_Read(block_num)
print(f"MFRC522_Read return type: {type(read_status)}, Data: {data}")

if read_status == rfid_reader.MI_OK and data:
    print(f"Sector {block_num} {data}")
    # Convert byte data to string and remove any padding null bytes
    read_data = ''.join([chr(byte) for byte in data]).rstrip('\x00')
    print("Read data: %s" % read_data)
else:
    print("Data read failed, status code: %s" % read_status)
MFRC522_StopCrypto1is called to stop encryption and reset card communication.# Stop encryption on the card rfid_reader.MFRC522_StopCrypto1()
Waiting between Reads: If no card is detected, the loop pauses for 0.5 seconds before retrying.
else:
    # If no card is detected, wait for a short period before retrying
    time.sleep(0.5)
Key Points
Graceful Exit: The script captures the
SIGINTsignal for graceful termination, allowing the RFID reader to complete any ongoing operations.Block and UID Management: Uses block and UID as key components in reading data from an RFID card, with proper handling of authentication and read errors.
Modular Design: The use of dedicated functions from the
MFRC522module makes the script readable and modular, simplifying RFID operations like authentication and data reading.
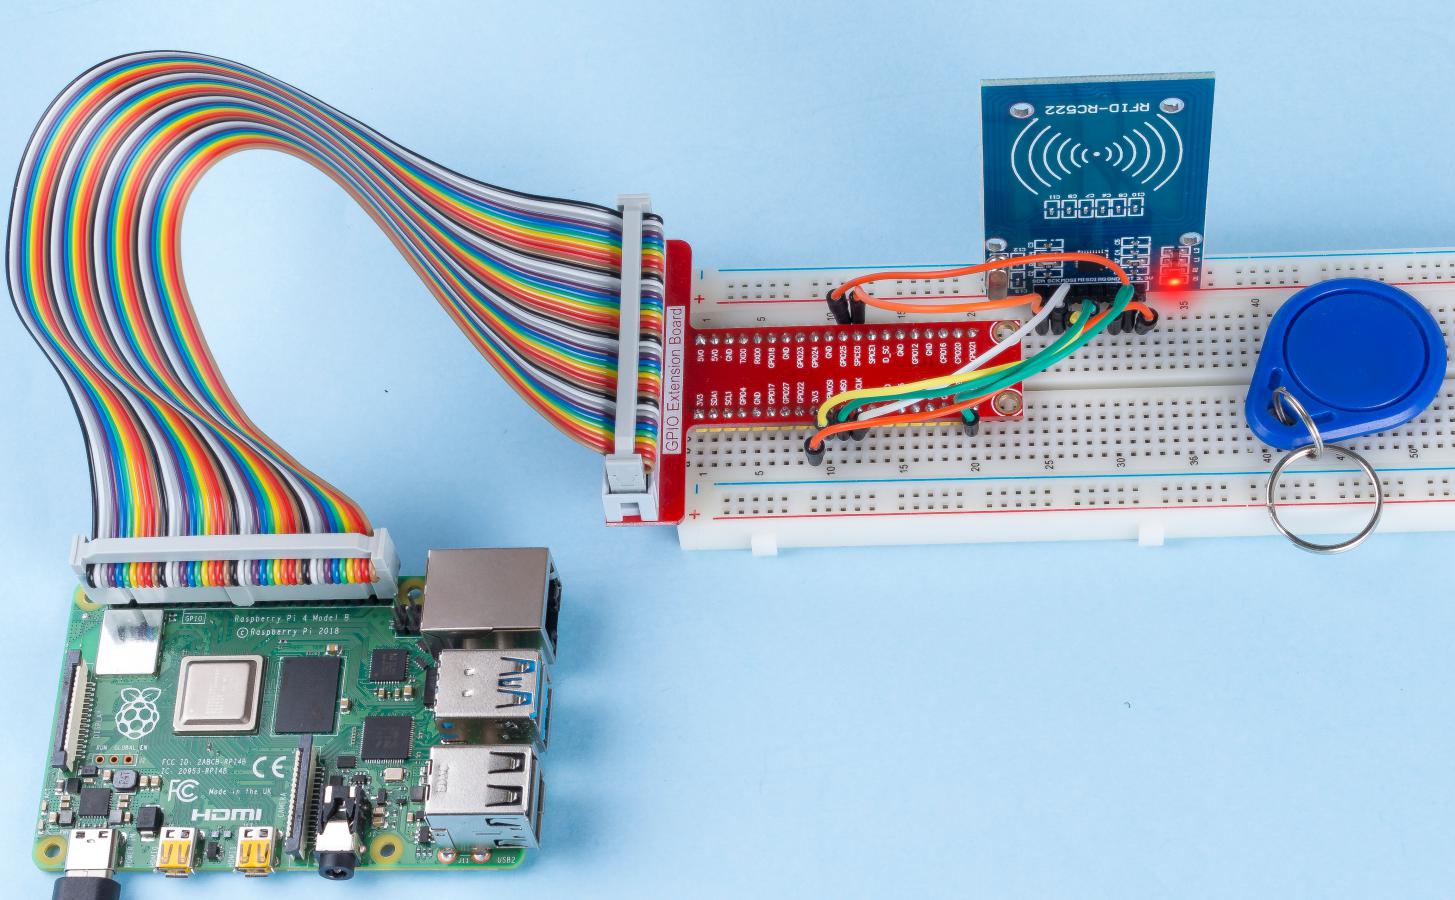
Phenomenon Picture