Note
Hello, welcome to the SunFounder Raspberry Pi & Arduino & ESP32 Enthusiasts Community on Facebook! Dive deeper into Raspberry Pi, Arduino, and ESP32 with fellow enthusiasts.
Why Join?
Expert Support: Solve post-sale issues and technical challenges with help from our community and team.
Learn & Share: Exchange tips and tutorials to enhance your skills.
Exclusive Previews: Get early access to new product announcements and sneak peeks.
Special Discounts: Enjoy exclusive discounts on our newest products.
Festive Promotions and Giveaways: Take part in giveaways and holiday promotions.
👉 Ready to explore and create with us? Click [here] and join today!
2.2.3 DHT-11
Introduction
The digital temperature and humidity sensor DHT11 is a composite sensor that contains a calibrated digital signal output of temperature and humidity. The technology of a dedicated digital modules collection and the technology of the temperature and humidity sensing are applied to ensure that the product has high reliability and excellent stability.
The sensors include a wet element resistive sensor and a NTC temperature sensor and they are connected to a high performance 8-bit microcontroller.
Required Components
In this project, we need the following components.
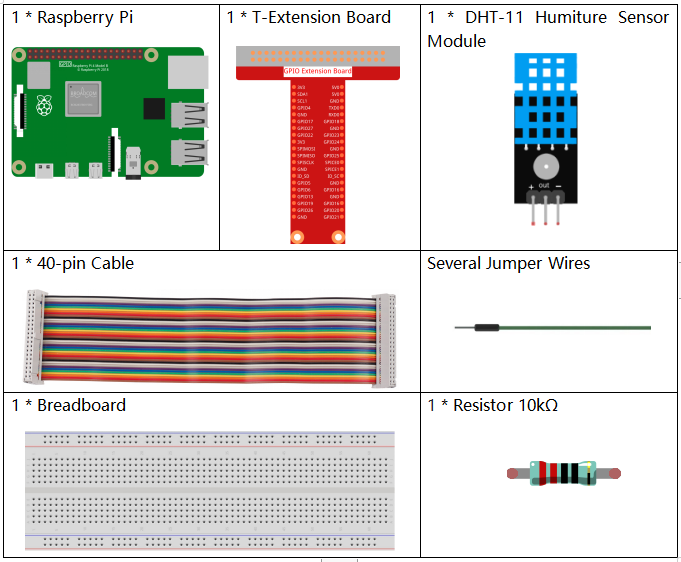
It’s definitely convenient to buy a whole kit, here’s the link:
Name |
ITEMS IN THIS KIT |
LINK |
|---|---|---|
Raphael Kit |
337 |
You can also buy them separately from the links below.
COMPONENT INTRODUCTION |
PURCHASE LINK |
|---|---|
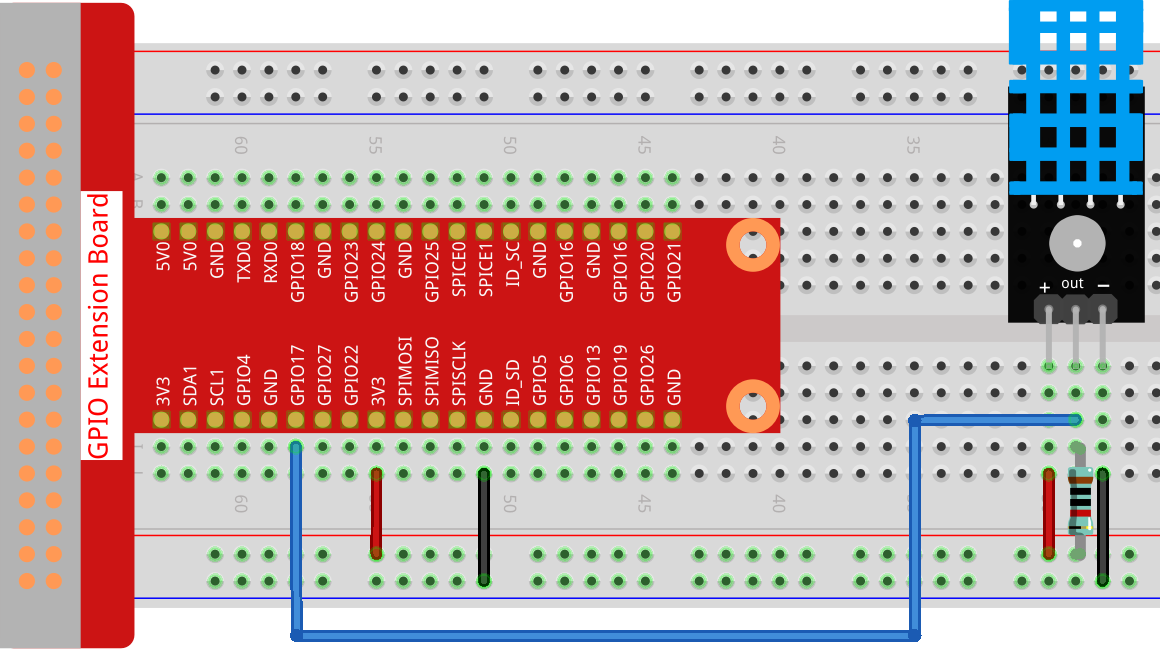
Schematic Diagram

Experimental Procedures
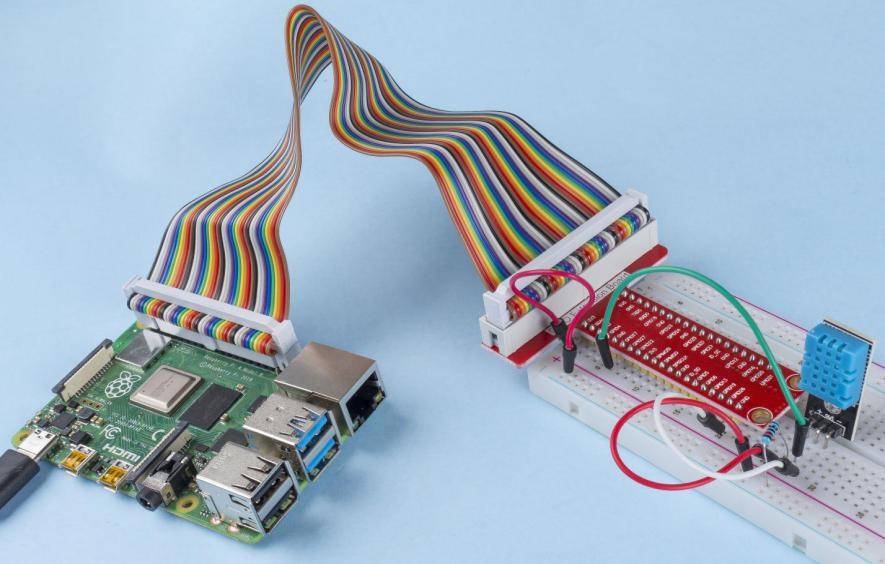
Step 1: Build the circuit.
Step 2: Go to the folder of the code.
cd ~/raphael-kit/c/2.2.3/
Step 3: Compile the code.
gcc 2.2.3_DHT.c -lwiringPi
Step 4: Run the executable file.
sudo ./a.out
After the code runs, the program will print the temperature and humidity detected by DHT11 on the computer screen.
Note
If it does not work after running, or there is an error prompt: "wiringPi.h: No such file or directory", please refer to Install and Check the WiringPi.
Code
#include <wiringPi.h>
#include <stdio.h>
#include <stdlib.h>
#include <stdint.h>

#define MAXTIMINGS 85  // Maximum number of timing transitions

int dht11_dat[5] = {0, 0, 0, 0, 0};  // Data array to hold sensor values

// Function to read data from DHT11 sensor
void read_dht11_dat(int GPIOPIN)
{
    uint8_t currState;
    uint8_t laststate = HIGH;
    uint8_t counter = 0;
    uint8_t j = 0;
    uint8_t i;
    float f; // Temperature in Fahrenheit

    // Reset data array before each read
    dht11_dat[0] = dht11_dat[1] = dht11_dat[2] = dht11_dat[3] = dht11_dat[4] = 0;

    // Pull pin down for 18 milliseconds to initiate communication
    pinMode(GPIOPIN, OUTPUT);
    digitalWrite(GPIOPIN, LOW);
    delay(18);

    // Then pull it up for 40 microseconds
    digitalWrite(GPIOPIN, HIGH);
    delayMicroseconds(40);

    // Prepare to read the pin
    pinMode(GPIOPIN, INPUT);

    // Detect change and read data
    for (i = 0; i < MAXTIMINGS; i++)
    {
        counter = 0;

        // Count how long each state lasts
        while (digitalRead(GPIOPIN) == laststate)
        {
            counter++;
            delayMicroseconds(2);
            if (counter == 255)
            {
                break;
            }
        }

        // Save the current state
        laststate = digitalRead(GPIOPIN);

        if (counter == 255) break;

        // Ignore first 3 transitions (DHT11 response signal)
        if ((i >= 4) && (i % 2 == 0))
        {
            // Shift bits and store data
            dht11_dat[j/8] <<= 1;
            if (counter > 16)
            {
                dht11_dat[j/8] |= 1;
            }

            j++;
        }
    }

    // Check if we received 40 bits (5 bytes) and verify checksum
    if ((j >= 40) && (dht11_dat[4] == ((dht11_dat[0] + dht11_dat[1] + dht11_dat[2] + dht11_dat[3]) & 0xFF)) )
    {
        // Convert temperature to Fahrenheit
        f = dht11_dat[2] * 9.0 / 5.0 + 32;
        printf("Humidity = %d.%d %% Temperature = %d.%d °C (%.1f °F)\n",
               dht11_dat[0], dht11_dat[1], dht11_dat[2], dht11_dat[3], f);
    }
    else
    {
        printf("Data not good, skip\n");
    }
}

int main (void)
{
    printf("Raspberry Pi wiringPi DHT11 Temperature test program\n");

    // Initialize wiringPi using BCM GPIO pin numbering
    if (wiringPiSetupGpio() == -1)
    {
        exit(1);
    }

    while(1)
    {
        // Read data from DHT11 connected to GPIO pin 17
        read_dht11_dat(17);
        delay(1000); // Wait 1 second before next read
    }

    return 0;
}
Code Explanation
Include Headers: The code includes necessary headers for wiringPi functions and standard input/output.
#include <wiringPi.h>
#include <stdio.h>
#include <stdlib.h>
#include <stdint.h>
Define Constants:
MAXTIMINGS: The maximum number of timing transitions expected from the DHT11 sensor (85).
#define MAXTIMINGS 85 // Maximum number of timing transitions
Global Data Array:
dht11_dat[5]: An array to hold the 5 bytes of data received from the DHT11 sensor.
int dht11_dat[5] = {0, 0, 0, 0, 0}; // Data array to hold sensor values
Function
read_dht11_dat(int GPIOPIN): Reads data from the DHT11 sensor connected to the specified GPIO pin.Initialization: Reset the dht11_dat array to zero before each read.
dht11_dat[0] = dht11_dat[1] = dht11_dat[2] = dht11_dat[3] = dht11_dat[4] = 0;
Start Signal: Pull the GPIO pin low for at least 18 milliseconds to signal the DHT11 to start sending data.
pinMode(GPIOPIN, OUTPUT);
digitalWrite(GPIOPIN, LOW);
delay(18);  // 18 milliseconds
Pull the GPIO pin high for 40 microseconds.
digitalWrite(GPIOPIN, HIGH);
delayMicroseconds(40);  // 40 microseconds
Set the GPIO pin to input mode to read data from the sensor.
pinMode(GPIOPIN, INPUT);
Data Reading Loop: The loop runs up to MAXTIMINGS times to read the data bits.
For each transition (from high to low or low to high), it measures how long the pin stays in each state.
for (i = 0; i < MAXTIMINGS; i++)
{
    counter = 0;
    while (digitalRead(GPIOPIN) == laststate)
    {
        counter++;
        delayMicroseconds(2);
        if (counter == 255)
        {
            break;
        }
    }
    laststate = digitalRead(GPIOPIN);
    // ... rest of the loop
}
Data Bit Extraction: The first 3 transitions are ignored as they are part of the DHT11’s initial response.
For each data bit, it determines if the bit is 0 or 1 based on the duration the pin stays high.
if ((i >= 4) && (i % 2 == 0))
{
    dht11_dat[j/8] <<= 1;
    if (counter > 16)
    {
        dht11_dat[j/8] |= 1;
    }
    j++;
}
Checksum Verification: After receiving all bits, the code verifies the checksum to ensure data integrity.
if ((j >= 40) && (dht11_dat[4] == ((dht11_dat[0] + dht11_dat[1] + dht11_dat[2] + dht11_dat[3]) & 0xFF)) )
If the checksum is correct, it prints out the humidity and temperature values.
f = dht11_dat[2] * 9.0 / 5.0 + 32;
printf("Humidity = %d.%d %% Temperature = %d.%d °C (%.1f °F)\n",
       dht11_dat[0], dht11_dat[1], dht11_dat[2], dht11_dat[3], f);
If the checksum fails, it prints an error message.
else
{
    printf("Data not good, skip\n");
}
Main Function:
Prints a starting message.
printf("Raspberry Pi wiringPi DHT11 Temperature test program\n");
Initializes wiringPi using BCM GPIO pin numbering.
if (wiringPiSetupGpio() == -1)
{
    exit(1);
}
Enters an infinite loop to read data from the DHT11 sensor every second.
while(1)
{
    read_dht11_dat(17);
    delay(1000); // wait 1 second
}
Phenomenon Picture