Note
Welcome to the SunFounder Raspberry Pi, Arduino & ESP32 Community on Facebook!
Get technical support and troubleshooting help.
Learn and share projects, tips, and tutorials.
Access early product previews and updates.
Enjoy exclusive discounts and giveaways.
👉 Join us here: [here]
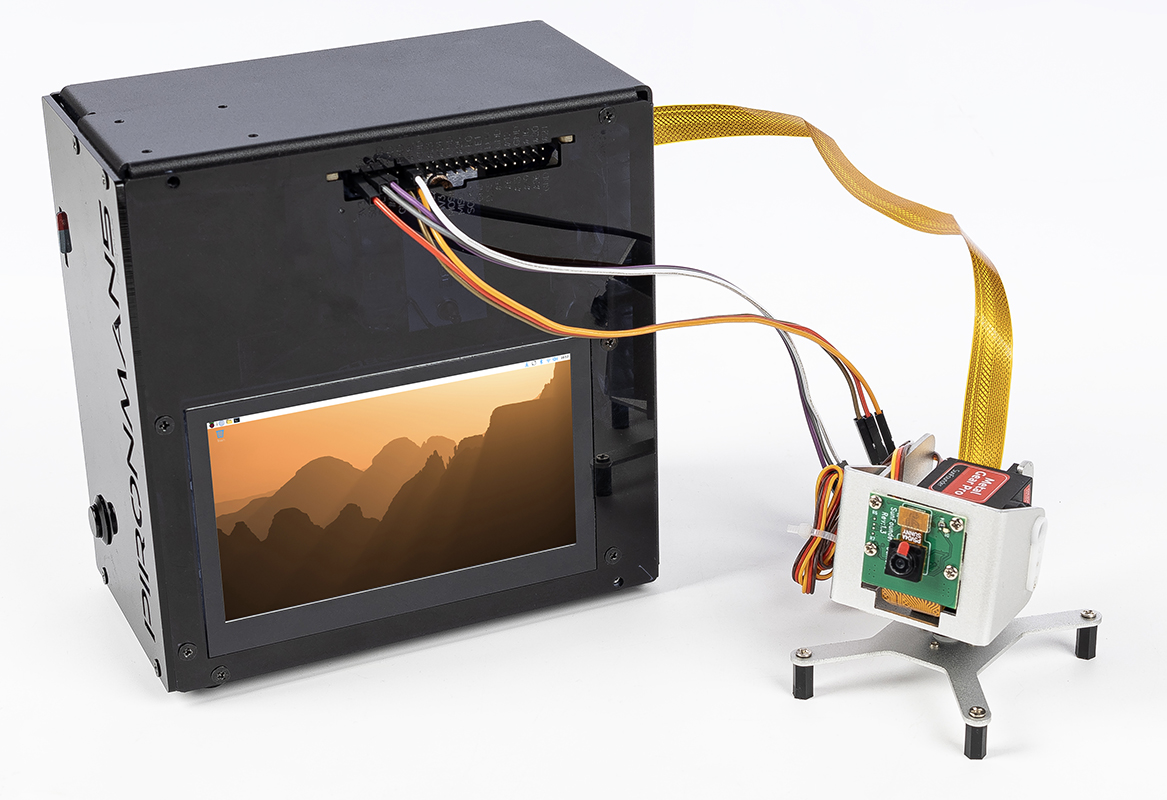
Pan-Tilt Camera Module
Note
The Pironman 5 series does not include a camera module. You need to prepare one yourself or purchase it from our official website:
In this section, you will learn how to set up and control a Pan-Tilt camera module using two SG90 servos connected directly to the GPIO pins. By the end of this section, you will have a fully installed and functional Pan-Tilt module ready for your projects.
Hardware Connection
Before starting, make sure your Raspberry Pi is powered off.
Connection Diagram:
Device |
GPIO Pin |
Physical Pin |
|---|---|---|
Pan Servo (Orange) |
GPIO17 |
Pin 11 |
Tilt Servo (Orange) |
GPIO18 |
Pin 12 |
VCC (Red) |
5V |
Pin 2 or 4 |
GND (Brown) |
GND |
Pin 6, 9, 14, 20, 25, 30, 34, 39 |
Camera Module |
CSI Interface |
Connect to camera port |
Warning
While SG90 servos can draw power directly from the Raspberry Pi’s 5V pin during testing, prolonged use or simultaneous movement of both servos may cause voltage drops and system instability. For long-term projects, consider using an external 5V power supply (ensure common ground with Raspberry Pi).
Step-by-Step Connection:
Connect the servos:
Connect the orange signal wire of the Pan servo to GPIO17 (physical pin 11)
Connect the orange signal wire of the Tilt servo to GPIO18 (physical pin 12)
Connect the red VCC wires of both servos to a 5V pin (physical pin 2 or 4)
Connect the brown GND wires of both servos to any GND pin (e.g., physical pin 6)
Connect the camera:
Gently lift the plastic clip on the CSI camera connector
Insert the camera ribbon cable with the metal contacts facing away from the Ethernet port
Press the plastic clip back down to secure the cable
Test the Servo
Before running the full Pan-Tilt example, let’s test each servo individually to ensure they are working correctly.
1. Enable GPIO and I2C (if needed):
sudo raspi-config
# Navigate to: Interface Options -> I2C -> Enable
# Reboot after enabling
2. Simple servo test script:
Create a test file servo_test.py:
#!/usr/bin/env python3
# servo_test.py - Simple servo test

from gpiozero import Servo
import time

# Test Pan servo on GPIO17
pan = Servo(17, min_pulse_width=0.5/1000, max_pulse_width=2.5/1000)

print("Testing Pan servo (GPIO17)...")
print("Moving to 0° position...")
pan.value = -1  # 0°
time.sleep(2)

print("Moving to 90° position...")
pan.value = 0   # 90°
time.sleep(2)

print("Moving to 180° position...")
pan.value = 1   # 180°
time.sleep(2)

pan.close()
print("Pan servo test complete")
3. Run the test:
python3 servo_test.py
If the servo moves smoothly through all positions, repeat the test for the Tilt servo by changing the pin number to 18.
Test the Camera
1. Enable the camera interface:
sudo raspi-config
# Navigate to: Interface Options -> Camera -> Enable
# Or for newer systems: Interface Options -> Legacy Camera -> Enable
sudo reboot
2. Test camera capture:
For Raspberry Pi OS Bullseye and newer (using libcamera):
# Take a test photo
libcamera-jpeg -o test.jpg -t 2000 --width 640 --height 480

# Preview camera feed
libcamera-hello -t 0
For older systems (using raspistill):
# Take a test photo
raspistill -o test.jpg -t 2000 -w 640 -h 480

# Preview camera feed
raspivid -t 0
3. Verify the photo:
ls -l test.jpg
# Open the image (if you have a GUI)
xdg-open test.jpg
Pan-Tilt Example
Now let’s combine both servo control and camera functionality into a complete Pan-Tilt control program. This example allows you to control the camera direction using WSAD keys and take photos with the T key.
1. Create the Pan-Tilt control script:
nano ptz_wsad_simple.py
Copy the following code:
#!/usr/bin/env python3
# -*- coding: utf-8 -*-
# ptz_wsad_simple.py - Control PTZ with WSAD keys, ultra simple version

from gpiozero import Servo
import os
from datetime import datetime

# Initialize servos
# SG90 parameters: min pulse width 0.5ms (0°), max pulse width 2.5ms (180°)
pan = Servo(17, min_pulse_width=0.5/1000, max_pulse_width=2.5/1000)
tilt = Servo(18, min_pulse_width=0.5/1000, max_pulse_width=2.5/1000)

# Initial position (center)
pan.value = 0
tilt.value = 0

print("\n=== SG90 PTZ Control ===")
print("W: Up")
print("S: Down")
print("A: Left")
print("D: Right")
print("T: Take photo")
print("C: Center")
print("Q: Quit")
print("-" * 30)

def take_photo():
    """Take photo function"""
    # Create photo directory if it doesn't exist
    photo_dir = "/home/pi/Pictures/ptz"
    os.makedirs(photo_dir, exist_ok=True)

    # Generate filename with timestamp
    timestamp = datetime.now().strftime("%Y%m%d_%H%M%S")
    filename = f"{photo_dir}/ptz_{timestamp}.jpg"

    # Take photo using libcamera (for Raspberry Pi Bullseye and above)
    # Alternative for older systems: use raspistill
    os.system(f"libcamera-jpeg -o {filename} -t 1 --width 640 --height 480")

    # Alternative command for older systems:
    # os.system(f"raspistill -o {filename} -t 1 -w 640 -h 480")

    print(f"Photo saved: {filename}")

try:
    while True:
        # Get user input
        cmd = input("Enter command: ").lower().strip()

        if cmd == 'w':
            # Move up (increase tilt angle)
            tilt.value = min(1.0, tilt.value + 0.2)
            print(f"↑ Up ({tilt.value:.1f})")

        elif cmd == 's':
            # Move down (decrease tilt angle)
            tilt.value = max(-1.0, tilt.value - 0.2)
            print(f"↓ Down ({tilt.value:.1f})")

        elif cmd == 'a':
            # Move left (decrease pan angle)
            pan.value = max(-1.0, pan.value - 0.2)
            print(f"← Left ({pan.value:.1f})")

        elif cmd == 'd':
            # Move right (increase pan angle)
            pan.value = min(1.0, pan.value + 0.2)
            print(f"→ Right ({pan.value:.1f})")

        elif cmd == 't':
            # Take photo
            take_photo()

        elif cmd == 'c':
            # Center the PTZ
            pan.value = 0
            tilt.value = 0
            print("PTZ centered")

        elif cmd == 'q':
            # Quit program
            print("Exiting program")
            break

        else:
            print("Invalid command, please use W/S/A/D/T/C/Q")

except KeyboardInterrupt:
    print("\nProgram interrupted by user")

finally:
    # Clean up GPIO resources
    pan.close()
    tilt.close()
    print("GPIO cleaned up")
2. Make the script executable:
chmod +x ptz_wsad_simple.py
3. Run the Pan-Tilt controller:
python3 ptz_wsad_simple.py
4. Control the camera:
Press W/S to tilt up/down
Press A/D to pan left/right
Press T to take a photo (saved to /home/pi/Pictures/ptz/)
Press C to center the camera
Press Q to quit
Camera Capture:
The script uses libcamera-jpeg (for newer Raspberry Pi OS versions) to capture photos. Photos are automatically saved with timestamps to prevent overwriting.