Note
Hello, welcome to the SunFounder Raspberry Pi & Arduino & ESP32 Enthusiasts Community on Facebook! Dive deeper into Raspberry Pi, Arduino, and ESP32 with fellow enthusiasts.
Why Join?
Expert Support: Solve post-sale issues and technical challenges with help from our community and team.
Learn & Share: Exchange tips and tutorials to enhance your skills.
Exclusive Previews: Get early access to new product announcements and sneak peeks.
Special Discounts: Enjoy exclusive discounts on our newest products.
Festive Promotions and Giveaways: Take part in giveaways and holiday promotions.
👉 Ready to explore and create with us? Click [here] and join today!
Dual Joystick Module Control
In this project, we will use the Dual Joystick Module that comes with the kit to control the PiArm.
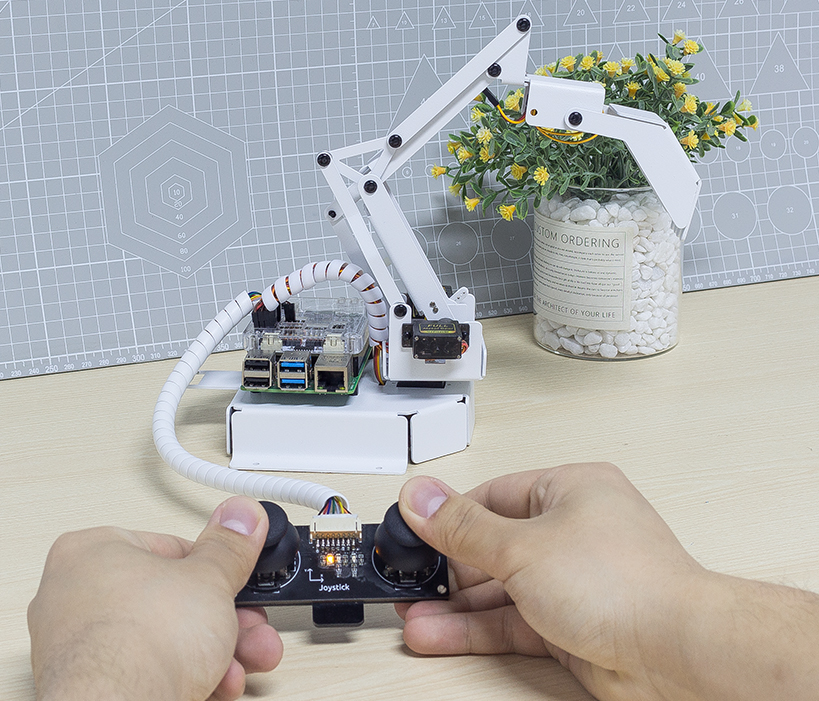
Shovel Bucket - Joystick Control
cd /home/pi/piarm/examples
sudo python3 joystick_module1.py
Once the code is run, you will be able to control the rotation of PiArm’s arm by toggling the left and right joysticks, and controlling the angle of the Shovel Bucket by pressing the left and right joysticks respectively.
But you need to assemble Shovel Bucket to PiArm first.
Code
from robot_hat import Servo,PWM,Joystick,ADC,Pin
from robot_hat.utils import reset_mcu
from time import sleep

from piarm import PiArm

reset_mcu()
sleep(0.01)

leftJoystick = Joystick(ADC('A0'),ADC('A1'),Pin('D0'))
rightJoystick = Joystick(ADC('A2'),ADC('A3'),Pin('D1'))

arm = PiArm([1,2,3])
arm.bucket_init(PWM('P3'))
arm.set_offset([0,0,0])

def _angles_control():
    arm.speed = 100
    flag = False
    alpha,beta,gamma = arm.servo_positions
    bucket = arm.component_staus

    if leftJoystick.read_status() == "up":
        alpha += 1
        flag = True
    elif leftJoystick.read_status() == "down":
        alpha -= 1
        flag = True
    if leftJoystick.read_status() == "left":
        gamma += 1
        flag = True
    elif leftJoystick.read_status() == "right":
        gamma -= 1
        flag = True
    if rightJoystick.read_status() == "up":
        beta += 1
        flag = True
    elif rightJoystick.read_status() == "down":
        beta -= 1
        flag = True
    if leftJoystick.read_status() == "pressed":
        bucket += 2
        flag = True
    elif rightJoystick.read_status() == "pressed":
        bucket -= 2
        flag = True

    if flag == True:
        arm.set_angle([alpha,beta,gamma])
        arm.set_bucket(bucket)
        print('servo angles: %s , bucket angle: %s '%(arm.servo_positions,arm.component_staus))

if __name__ == "__main__":
    while True:
        _angles_control()
        sleep(0.01)
How it works?
leftJoystick = Joystick(ADC('A0'),ADC('A1'),Pin('D0'))
rightJoystick = Joystick(ADC('A2'),ADC('A3'),Pin('D1'))
Define the X,Y and Z pin connections for the left and right joysticks.
def _angles_control():
    arm.speed = 100
    flag = False
    alpha,beta,gamma = arm.servo_positions
    bucket = arm.component_staus

    if leftJoystick.read_status() == "up":
        alpha += 1
        flag = True
    elif leftJoystick.read_status() == "down":
        alpha -= 1
        flag = True
    if leftJoystick.read_status() == "left":
        gamma += 1
        flag = True
    elif leftJoystick.read_status() == "right":
        gamma -= 1
        flag = True
    if rightJoystick.read_status() == "up":
        beta += 1
        flag = True
    elif rightJoystick.read_status() == "down":
        beta -= 1
        flag = True
    if leftJoystick.read_status() == "pressed":
        bucket += 2
        flag = True
    elif rightJoystick.read_status() == "pressed":
        bucket -= 2
        flag = True

    if flag == True:
        arm.set_angle([alpha,beta,gamma])
        arm.set_bucket(bucket)
        print('servo angles: %s , bucket angle: %s '%(arm.servo_positions,arm.component_staus))
In this code, the _angles_control() function is created to control the PiArm.
alpha,betaandgammarefer to the angles of the 3 servos on the Arm respectively, refer to: Angle Mode.If the left joystick is toggled up,
alphaincreases and the Arm will extend forward.If the left joystick is toggled down,
alphadecreases and the Arm will retract backward.If the left joystick is toggled to the left,
gammaincreases and the Arm will turn left.If the left joystick is toggled to the right,
gammadecreases and the Arm will turn right.If the right joystick is toggled up,
betaincreases and the Arm will raise up.If the right joystick is toggled down,
betadecreases and the Arm will lower down.Finally, use the left and right joystick buttons to control the angle of the Shovel Bucket respectively.
Hanging Clip - Joystick Control
Run the code
cd /home/pi/piarm/examples
sudo python3 joystick_module2.py
Once the code is running, you will be able to control the rotation of PiArm’s arm by toggling the left and right joysticks, and control the opening/closing of the Hanging Clip by pressing the left and right joysticks respectively.
But you need to assemble Hanging Clip to PiArm first.
Code
from robot_hat import Servo,PWM,Joystick,ADC,Pin
from robot_hat.utils import reset_mcu
from time import sleep

from piarm import PiArm

reset_mcu()
sleep(0.01)

leftJoystick = Joystick(ADC('A0'),ADC('A1'),Pin('D0'))
rightJoystick = Joystick(ADC('A2'),ADC('A3'),Pin('D1'))

arm = PiArm([1,2,3])
arm.hanging_clip_init(PWM('P3'))
arm.set_offset([0,0,0])

def _angles_control():
    arm.speed = 100
    flag = False
    alpha,beta,gamma = arm.servo_positions
    clip = arm.component_staus

    if leftJoystick.read_status() == "up":
        alpha += 1
        flag = True
    elif leftJoystick.read_status() == "down":
        alpha -= 1
        flag = True
    if leftJoystick.read_status() == "left":
        gamma += 1
        flag = True
    elif leftJoystick.read_status() == "right":
        gamma -= 1
        flag = True
    if rightJoystick.read_status() == "up":
        beta += 1
        flag = True
    elif rightJoystick.read_status() == "down":
        beta -= 1
        flag = True

    if leftJoystick.read_status() == "pressed":
        clip += 2
        flag = True
    elif rightJoystick.read_status() == "pressed":
        clip -= 2
        flag = True

    if flag == True:
        arm.set_angle([alpha,beta,gamma])
        arm.set_hanging_clip(clip)
        print('servo angles: %s , clip angle: %s '%(arm.servo_positions,arm.component_staus))

if __name__ == "__main__":
    while True:
        _angles_control()
        sleep(0.01)
In this code, the _angles_control() function is created to control the PiArm.
alpha,betaandgammarefer to the angles of the 3 servos on the Arm respectively, refer to: Angle Mode.If the left joystick is toggled up,
alphaincreases and the Arm will extend forward.If the left joystick is toggled down,
alphadecreases and the Arm will retract backward.If the left joystick is toggled to the left,
gammaincreases and the Arm will turn left.If the left joystick is toggled to the right,
gammadecreases and the Arm will turn right.If the right joystick is toggled up,
betaincreases and the Arm will raise up.If the right joystick is toggled down,
betadecreases and the Arm will lower down.Finally, use the left and right joystick buttons to control the angles of the Hanging Clip respectively.
Electromagnet - Joystick Control
Run the code
cd /home/pi/piarm/examples
sudo python3 joystick_module3.py
Once the code is run, you will be able to control the rotation of PiArm’s arm by toggling the left and right joysticks, and controlling the on/off of the Electromagnet by pressing the left and right joysticks respectively.
But you need to assemble Electromagnet to PiArm first.
Code
from robot_hat import Servo,PWM,Joystick,ADC,Pin
from robot_hat.utils import reset_mcu
from time import sleep

from piarm import PiArm

reset_mcu()
sleep(0.01)


leftJoystick = Joystick(ADC('A0'),ADC('A1'),Pin('D0'))
rightJoystick = Joystick(ADC('A2'),ADC('A3'),Pin('D1'))

arm = PiArm([1,2,3])
arm.electromagnet_init(PWM('P3'))
arm.set_offset([0,0,0])

def _angles_control():
    arm.speed = 100
    flag = False
    alpha,beta,gamma = arm.servo_positions
    status = ""

    if leftJoystick.read_status() == "up":
        alpha += 1
        flag = True
    elif leftJoystick.read_status() == "down":
        alpha -= 1
        flag = True
    if leftJoystick.read_status() == "left":
        gamma += 1
        flag = True
    elif leftJoystick.read_status() == "right":
        gamma -= 1
        flag = True
    if rightJoystick.read_status() == "up":
        beta += 1
        flag = True
    elif rightJoystick.read_status() == "down":
        beta -= 1
        flag = True
    if leftJoystick.read_status() == "pressed":
        arm.set_electromagnet('on')
        status = "electromagnet is on"
    elif rightJoystick.read_status() == "pressed":
        arm.set_electromagnet('off')
        status = "electromagnet is off"

    if flag == True:
        arm.set_angle([alpha,beta,gamma])
        print('servo angles: %s , electromagnet status: %s '%(arm.servo_positions,status))

if __name__ == "__main__":
    while True:
        _angles_control()
        sleep(0.01)
In this code, the _angles_control() function is created to control the PiArm.
alpha,betaandgammarefer to the angles of the 3 servos on the Arm respectively, refer to: Angle Mode.If the left joystick is toggled up,
alphaincreases and the Arm will extend forward.If the left joystick is toggled down,
alphadecreases and the Arm will retract backward.If the left joystick is toggled to the left,
gammaincreases and the Arm will turn left.If the left joystick is toggled to the right,
gammadecreases and the Arm will turn right.If the right joystick is toggled up,
betaincreases and the Arm will raise up.If the right joystick is toggled down,
betadecreases and the Arm will lower down.Finally, use the left and right joystick buttons to control the on/off of the Electromagnet respectively.