如何扫描和检测I2C地址?
本教程以扫描gy-87模块的I2C地址为例,指导您如何检测I2C地址。
接线
将GY-87模块的SCL连接到UNO R4的SCL,将GY-87模块的SDA连接到UNO R4的SDA。
另一种方法是将GY-87模块的SCL连接到UNO R4的A5,将GY-87模块的SDA连接到UNO R4的A4。

上传代码
将以下代码复制到您的Arduino IDE中,然后上传代码。
#include <Wire.h>

// Set I2C bus to use: Wire, Wire1, etc.
#define WIRE Wire

void setup() {
  WIRE.begin();

  Serial.begin(9600);
  while (!Serial)
    delay(10);
  Serial.println("\nI2C Scanner");

  // Enable bypass Mode for mpu6050
  Wire.beginTransmission(0x68);
  Wire.write(0x37);
  Wire.write(0x02);
  Wire.endTransmission();

  Wire.beginTransmission(0x68);
  Wire.write(0x6A);
  Wire.write(0x00);
  Wire.endTransmission();

  // Disable Sleep Mode
  Wire.beginTransmission(0x68);
  Wire.write(0x6B);
  Wire.write(0x00);
  Wire.endTransmission();
}


void loop() {
  byte error, address;
  int nDevices;

  Serial.println("Scanning...");

  nDevices = 0;
  for (address = 1; address < 127; address++) {
    // The i2c_scanner uses the return value of
    // the Write.endTransmisstion to see if
    // a device did acknowledge to the address.
    WIRE.beginTransmission(address);
    error = WIRE.endTransmission();

    if (error == 0) {
      Serial.print("I2C device found at address 0x");
      if (address < 16)
        Serial.print("0");
      Serial.print(address, HEX);
      Serial.println("  !");

      nDevices++;
    } else if (error == 4) {
      Serial.print("Unknown error at address 0x");
      if (address < 16)
        Serial.print("0");
      Serial.println(address, HEX);
    }
  }
  if (nDevices == 0)
    Serial.println("No I2C devices found\n");
  else
    Serial.println("done\n");

  delay(5000);  // wait 5 seconds for next scan
}
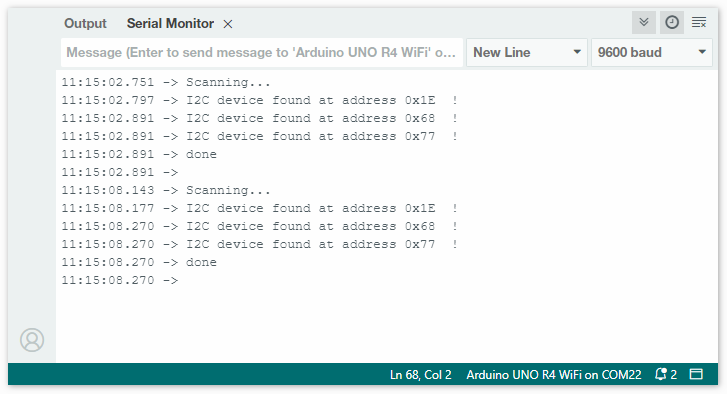
上传代码后,打开串口监视器并将波特率设置为9600。检查串口监视器中的输出。
这些是检测到的I2C地址。您可以参考相关信息来确定哪些芯片对应这些地址。在本例中,0x68``对应MPU6050,``0x77``对应BMP180。地址``0x1E``对应QMC5883L,偶尔(因不同生产批次)QMC5883L的地址也可能是``0x0D。