5. Set up the Pironman
Note
This Pironman is used in the same way as PC and requires the power button to power on/off.
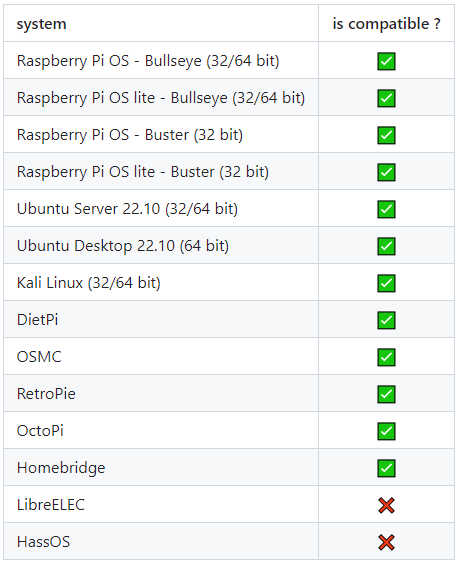
Compatible Systems
Pironman compatible systems are shown below.
If your systems that don’t have git, python3 and pip pre-installed you need to install them first.
sudo apt-get update
sudo apt-get install git -y
sudo apt-get install python3 python3-pip python3-setuptools -y
Install pironman module
Use the following commands to download and install the pironman module.
cd ~
git clone https://github.com/sunfounder/pironman.git -b v2.0
cd ~/pironman
sudo python3 install.py
Warning
The -b v2.0 in the directive is necessary
Rebooting is required after installation to take effect. A reboot reminder will pop up at some point, and you can select y to reboot now or at a later time.
Here are the basic configurations for Pironman.
The OLED screen will display the CPU, RAM and ROM Usage, CPU Temperature and IP Address of the Raspberry Pi.
After 60 seconds, the OLED display goes into sleep mode, and you can wake it up by a short press on the power button.
The fan is turned on at 50 degrees Celsius.
Turn on the WS2812 RGB strip(default connection in IO10) so that it displays in color #0a1aff(blue) and in breath mode (change rate is 50%).
At this point, you can press and hold for 2 seconds to safely shut down or 10 seconds to forcibly shut down.
Modify the Configuration
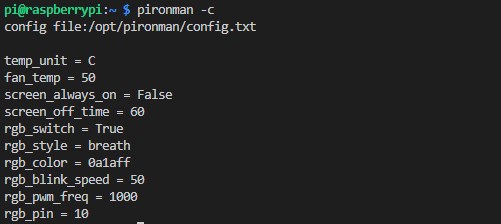
In the pironman module, we have some basic configurations for Pironman, and you can check them with the following command.
pironman -c
The current configurations are shown below.
The fan is turned on at 50 degrees Celsius.
The duration of the OLED display is 60s, after 60s it will start to sleep.
Turn on the WS2812 RGB strip(default 10) so that it displays in color #0a1aff and in breath mode (change rate is 50%).
You can also modify these configurations to suit your needs.
Use pironman or pironman -h or pironman --help to view the instructions, as follows.
Usage:
    pironman <OPTION> <input>

Options:
    start            start pironman service

    stop             stop pironman service

    restart          restart pironman service

    -h,--help        help, show this help

    -c,--check       show all configurations

    -a,--auto        [ on ],enable auto-start at boot
                     [ off ], disable auto-start at boot

    -u,--unit        [ C/F ], set the unit of temperature,
                         C or F (Celsius/Fahrenheit)

    -f,--fan         [ temp ], Temperature at which the fan switches on,
                     in celsius (default 50),in range (30 ~ 80)

    -al,--always_on  [on/off], whether the screen is always on,
                     default False

    -s,--staty_time  [time], screen display duration in second,
                     in second, default 30

    -rw,--rgb_sw     [on/off], rgb strip switch

    -rs,--rgb_style  rgb strip display style, default: breath,
                     in [breath / leap / flow / raise_up / colorful]

    -rc,--rgb_color  [(HEX)color], set the color of rgb strip,
                     default: 0a1aff

    -rb,--rgb_speed  [speed], rgb blink speed (0 ~ 100, default 50)

    -pwm,--rgb_pwm   [frequency], rgb signal frequency (400 ~ 1600, default 1000 kHz)

    -rp,--rgb_pin    [pin], rgb signal pin, could be [10 / spi/ SPI / 12 / pwm/ PWM] or
                     [21 / pcm / PCM], default 10
For example, to turn off the automatic execution of programs at boot.
pironman -a off
Or reset the color of WS2812 RGB strip.
pironman -rc ff8a40
Those configurations are stored in /opt/pironman/config.txt, and you can also make changes directly in this file.
sudo nano /opt/pironman/config.txt
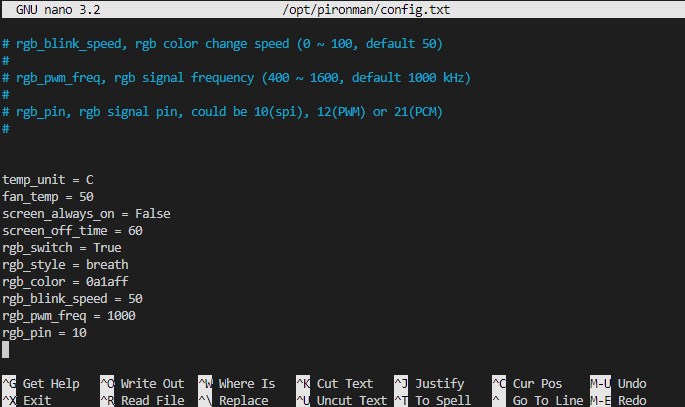
Press Ctrl+X -> Y -> Enter to save and exit editing.
Note
The introduction and configuration of the Pironman components can be found in: 6. About Hardware.