How to Scan and Detect I2C Addresses?
This tutorial takes scanning the I2C address of the gy-87 module as an example, and guides you on how to detect I2C addresses.
Wiring
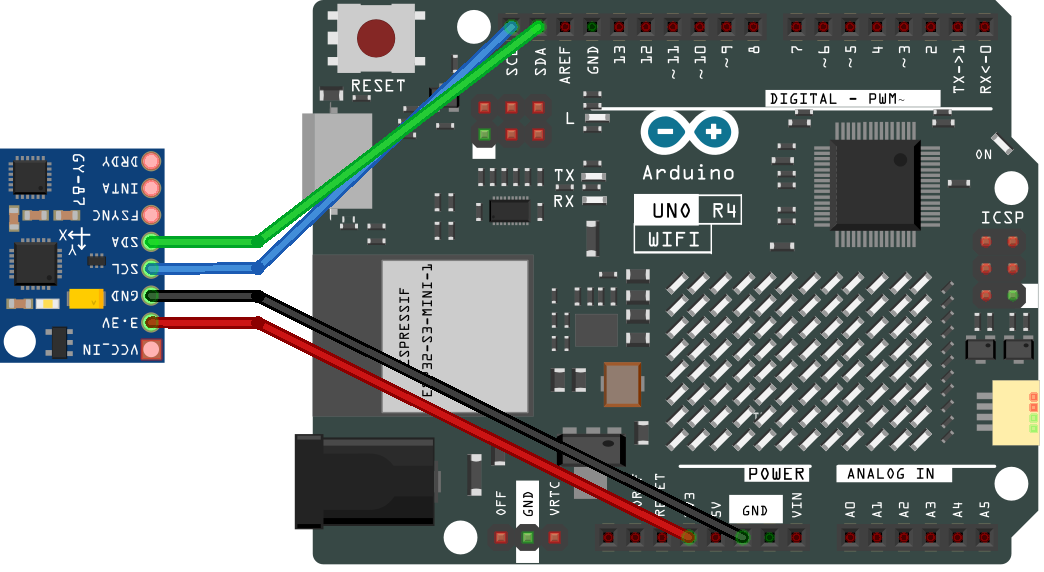
Connect the SCL of GY-87 module to the SCL of UNO R4, and connect the SDA of GY-87 module to the SDA of UNO R4.
Another way is to connect the SCL of GY-87 module to A5 of UNO R4, and connect the SDA of GY-87 module to A4 of UNO R4.

Upload the code
Copy the code below to your Arduino IDE and then upload the code.
#include <Wire.h>

// Set I2C bus to use: Wire, Wire1, etc.
#define WIRE Wire

void setup() {
  WIRE.begin();

  Serial.begin(9600);
  while (!Serial)
    delay(10);
  Serial.println("\nI2C Scanner");

  // Enable bypass Mode for mpu6050
  Wire.beginTransmission(0x68);
  Wire.write(0x37);
  Wire.write(0x02);
  Wire.endTransmission();

  Wire.beginTransmission(0x68);
  Wire.write(0x6A);
  Wire.write(0x00);
  Wire.endTransmission();

  // Disable Sleep Mode
  Wire.beginTransmission(0x68);
  Wire.write(0x6B);
  Wire.write(0x00);
  Wire.endTransmission();
}


void loop() {
  byte error, address;
  int nDevices;

  Serial.println("Scanning...");

  nDevices = 0;
  for (address = 1; address < 127; address++) {
    // The i2c_scanner uses the return value of
    // the Write.endTransmisstion to see if
    // a device did acknowledge to the address.
    WIRE.beginTransmission(address);
    error = WIRE.endTransmission();

    if (error == 0) {
      Serial.print("I2C device found at address 0x");
      if (address < 16)
        Serial.print("0");
      Serial.print(address, HEX);
      Serial.println("  !");

      nDevices++;
    } else if (error == 4) {
      Serial.print("Unknown error at address 0x");
      if (address < 16)
        Serial.print("0");
      Serial.println(address, HEX);
    }
  }
  if (nDevices == 0)
    Serial.println("No I2C devices found\n");
  else
    Serial.println("done\n");

  delay(5000);  // wait 5 seconds for next scan
}
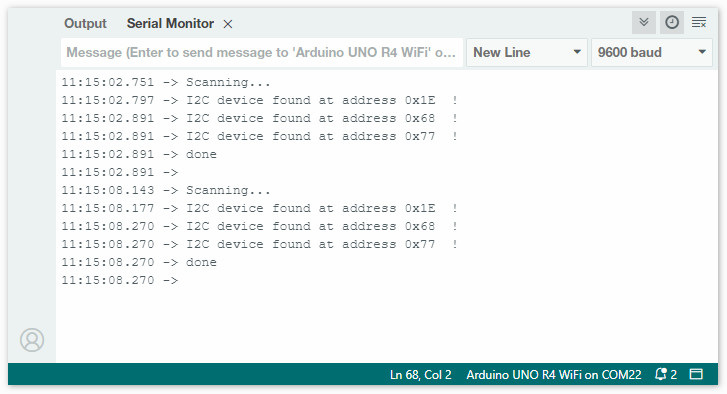
After uploading the code, open the serial monitor and set the baud rate to 9600. Check the output in the serial monitor.
These are the detected I2C addresses. You can refer to relevant information to determine which chips correspond to these addresses. In this case, 0x68 is for MPU6050 and 0x77 is for BMP180. The address 0x1E is for QMC5883L, and occasionally(due to different production batches) the address of QMC5883L may also be 0x0D.
