How to re-burn the firmware for ESP8266 module?
Re-brun the Firmware with R3
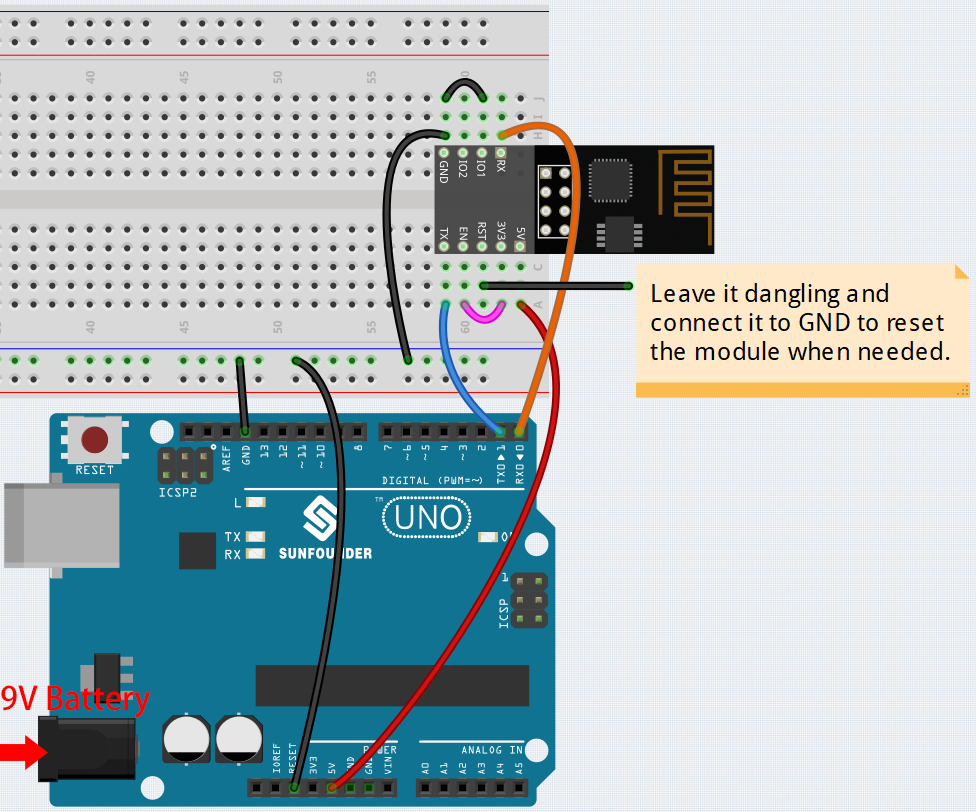
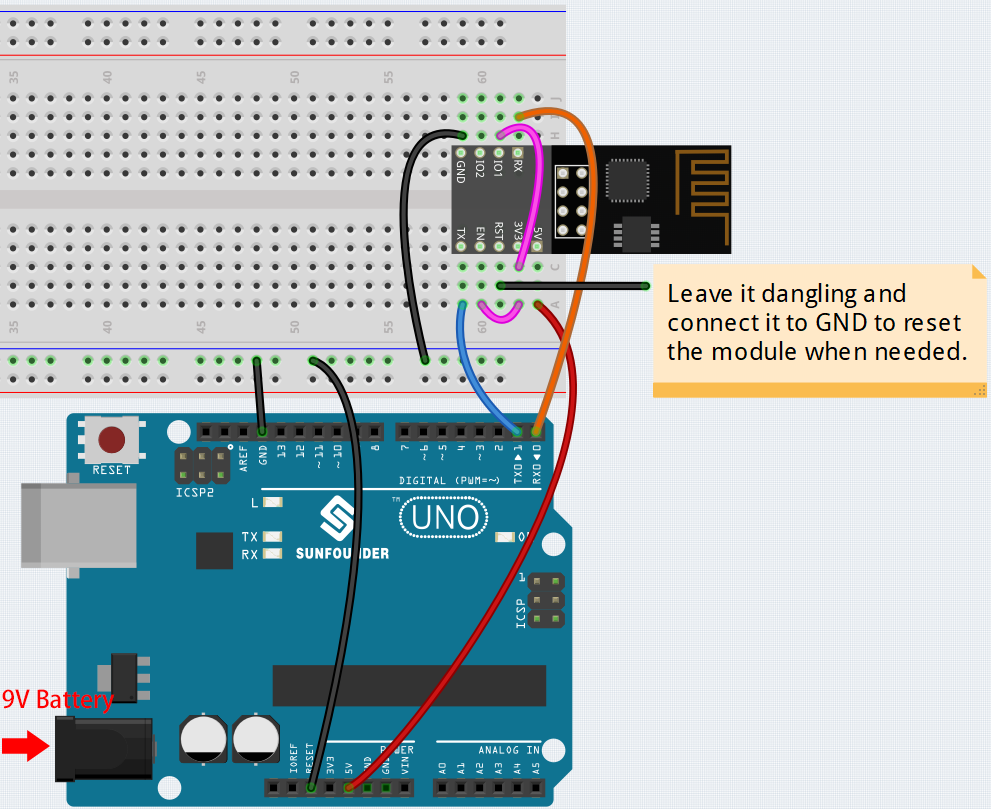
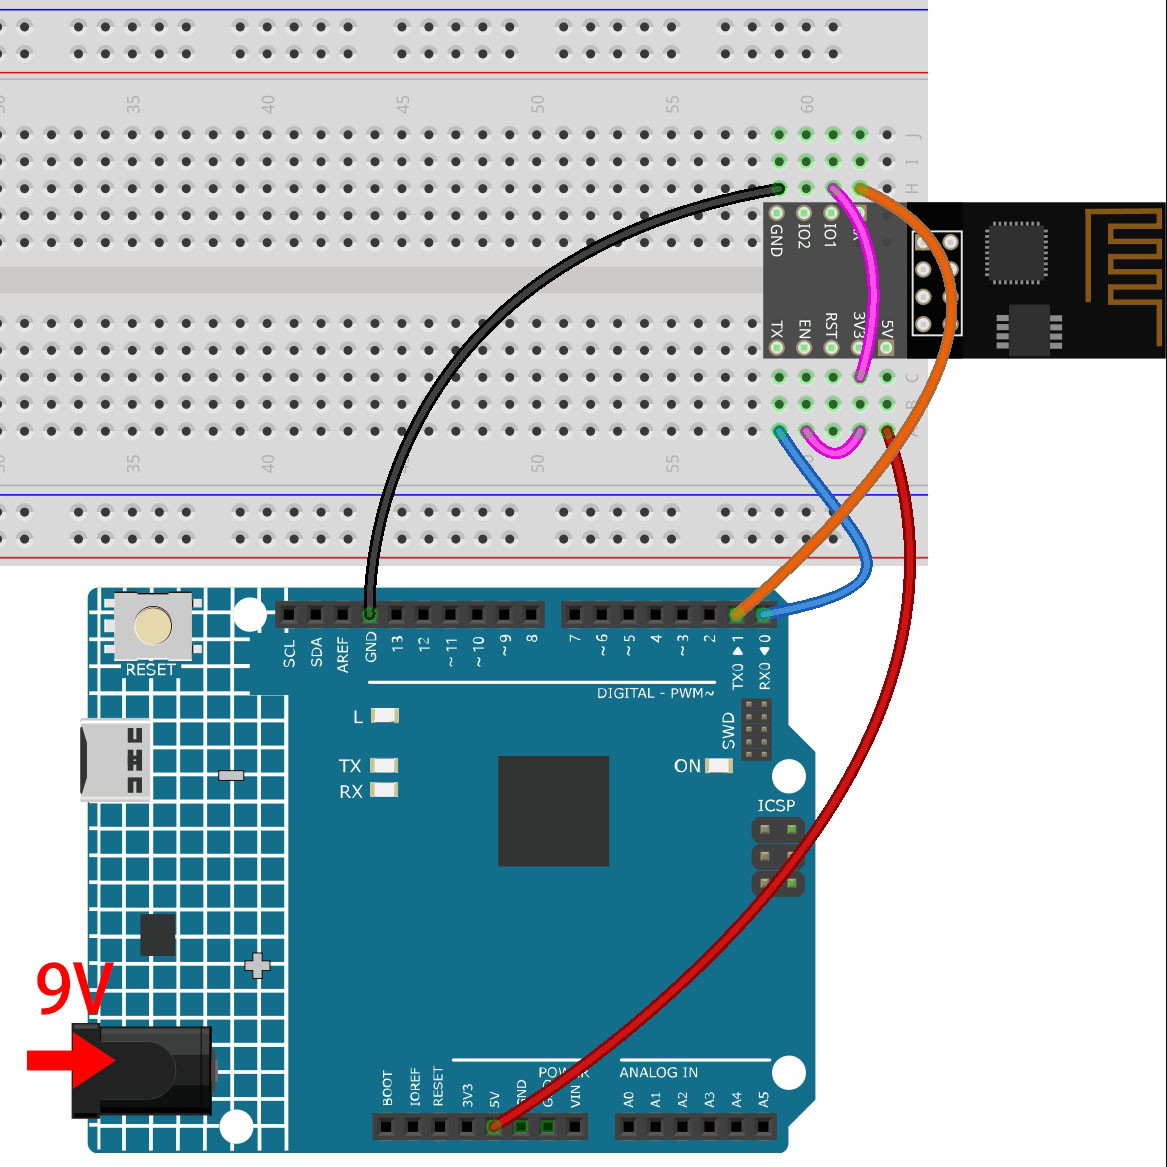
1. Build the circuit
Connect ESP8266 and SunFounder R3 board.
2. Burning the firmware
Follow the steps below to burn the firmware if you are using Windows.
Download firmware and burn-in tool.
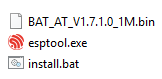
After unzipping, you will see 4 files.
BAT_AT_V1.7.1.0_1M.bin: The firmware to burn to the ESP8266 module.esptool.exe: This is a command-line utility for Windows.install_r3.bat: This is the command package for Windows system, double click this file will run all the commands inside the file.install_r4.bat: Same asinstall_r3.bat, but dedicated to UNO R4 board.
Double click
install_r3.batto start the firmware burning. If you see the following prompt, the firmware has been installed successfully.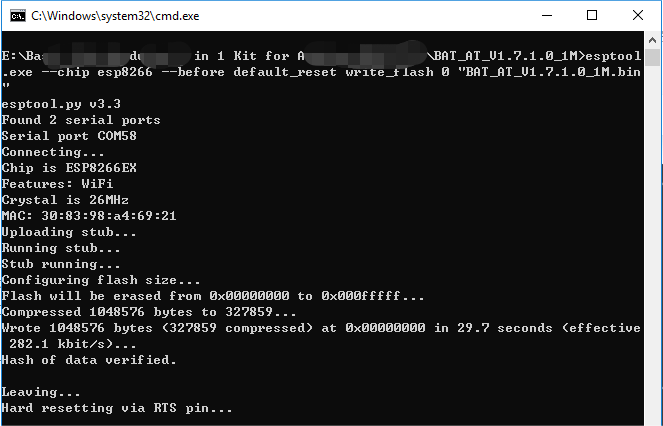
Note
If the burn-in fails, please check the following points.
Reset the ESP8266 module by inserting the RST on the ESP8266 Adapter to GND and then unplugging it.
Check if the wiring is correct.
Whether the computer has recognized your board properly, and make sure the port is not occupied.
Reopen the install.bat file.
To burn the firmware, follow these steps if you are using a Mac OS system.
Use the following commands to install Esptool. Esptool is a Python-based, open-source, platform-independent utility to communicate with the ROM bootloader in Espressif chips.
python3 -m pip install --upgrade pip
python3 -m pip install esptool
If esptool is properly installed, it will output a message such as [usage: esptool] if you run
python3 -m esptool.Download firmware.
After unzipping, you will see 3 files.
BAT_AT_V1.7.1.0_1M.bin: The firmware to burn to the ESP8266 module.esptool.exe: This is a command-line utility for Windows.install_r3.bat: This is the command package for Windows system.install_r4.bat: Same asinstall_r3.bat, but dedicated to UNO R4 board.
Open a terminal and use the
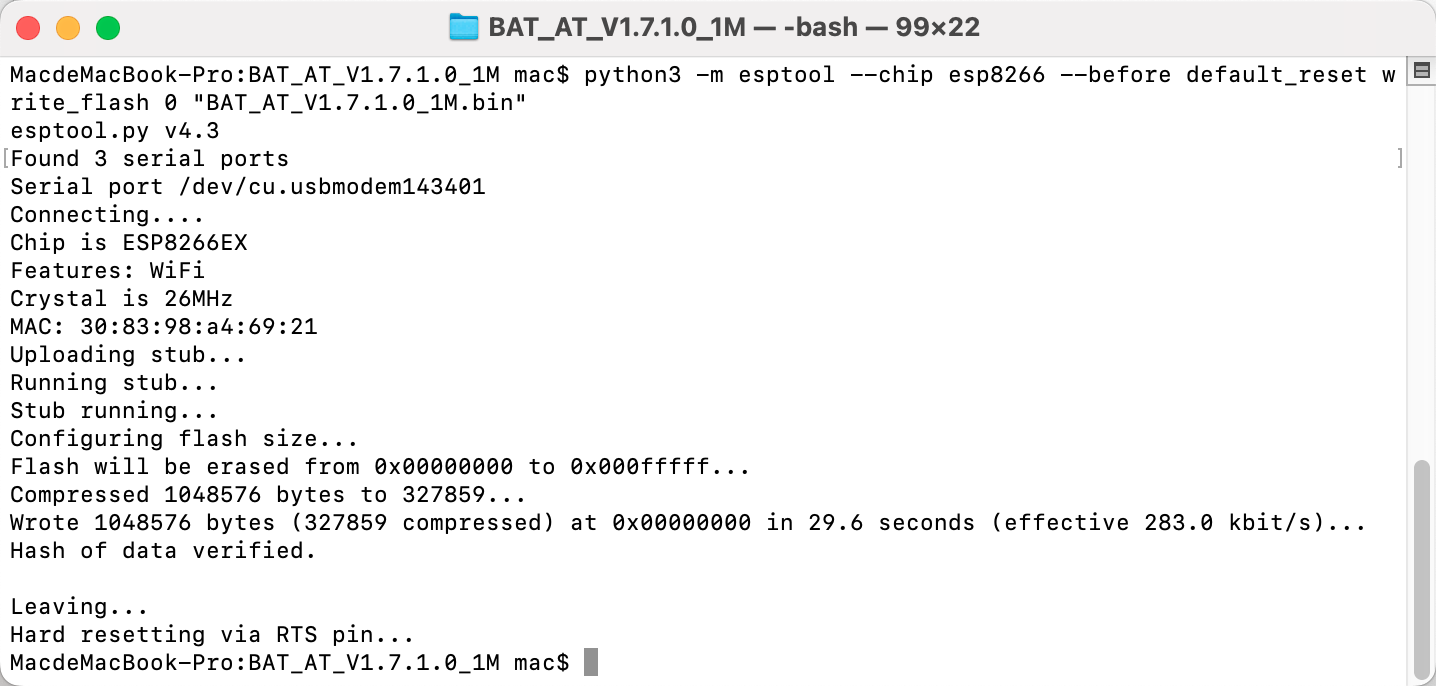
cdcommand to go into the firmware folder you just downloaded, then run the following command to erase the existing firmware and re-burn the new firmware.python3 -m esptool --chip esp8266 --before default_reset erase_flash python3 -m esptool --chip esp8266 --before default_reset write_flash 0 "BAT_AT_V1.7.1.0_1M.bin"
If you see the following prompt, the firmware has been installed successfully.
Note
If the burn-in fails, please check the following points.
Reset the ESP8266 module by inserting the RST on the ESP8266 Adapter to GND and then unplugging it.
Check if the wiring is correct.
Whether the computer has recognized your board properly, and make sure the port is not occupied.
Reopen the install.bat file.
3. Test
On the basis of the original wiring, connect IO1 to 3V3.
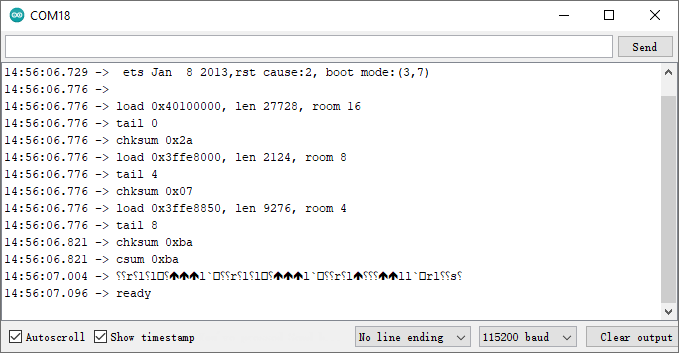
You will be able to see information about the ESP8266 module if you click the magnifying glass icon(Serial Monitor) in the upper right corner and set the baud rate to 115200.
Note
If
readydoesn’t appear, you can try to reset the ESP8266 module(connect RST to GND) and re-open the Serial Monitor.
Click on NEWLINE DROPDOWN BOX, select
both NL & CRin the drop down option, enterAT, if it returns OK, it means ESP8266 has successfully established connection with R3 board.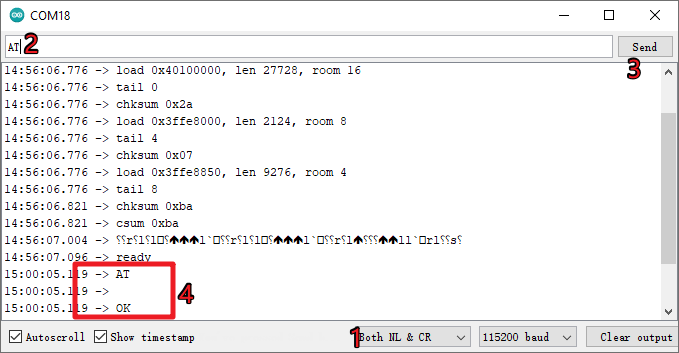
Now you can continue to follow 1.1 Configuring the ESP8266 to set the working mode and baud rate of the ESP8266 module.
Re-brun the Firmware with R4
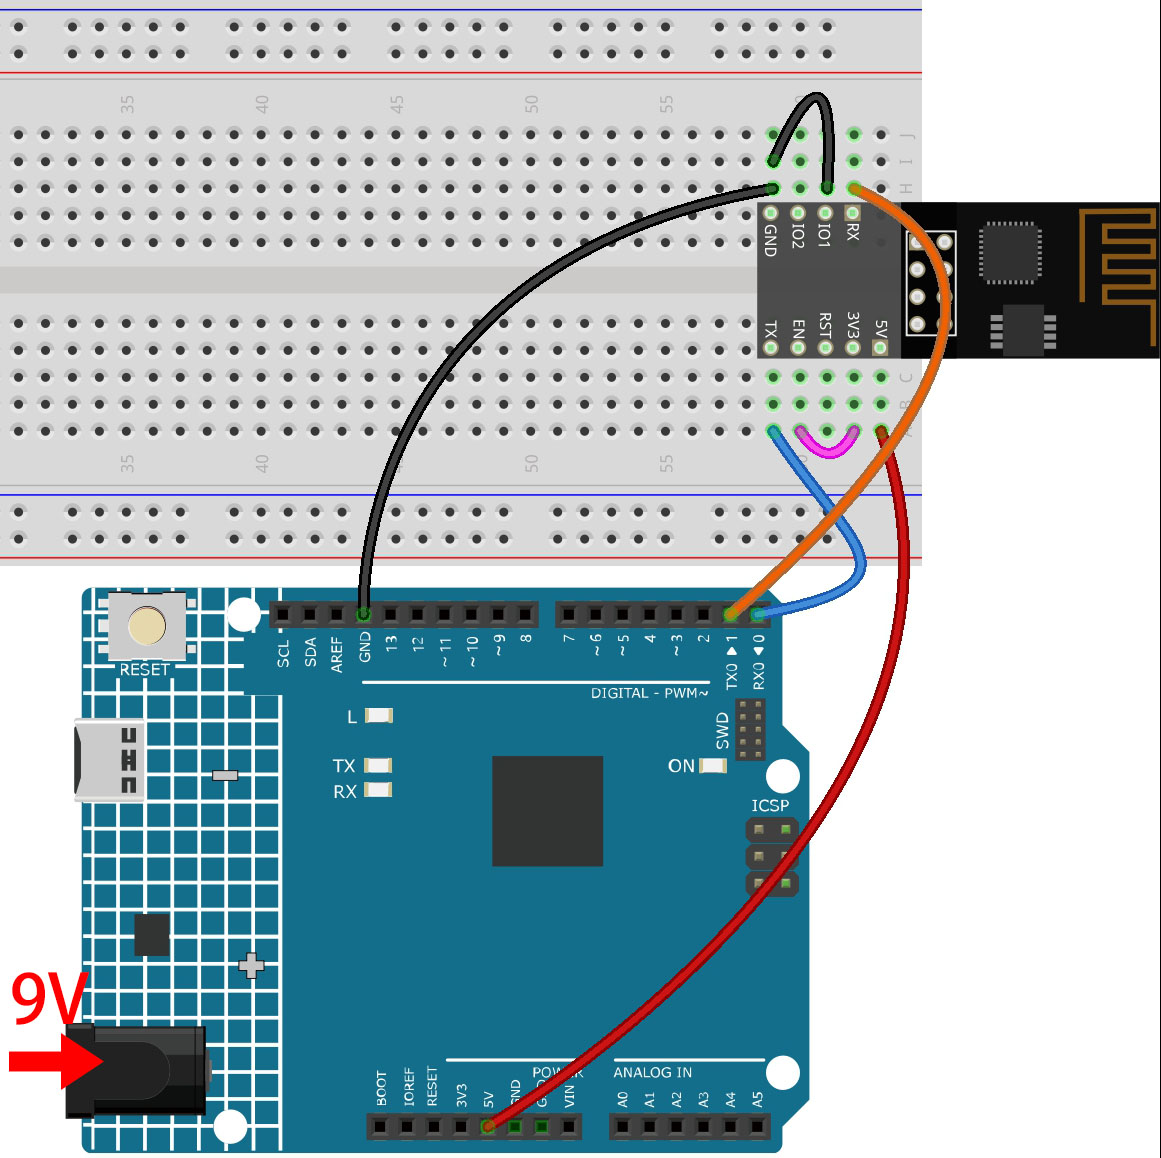
1. Build the circuit
Connect ESP8266 and Arduino UNO R4 board.
2. Upload the Following Code to R4
void setup() {
    Serial.begin(115200);
    Serial1.begin(115200);
}

void loop() {
    if (Serial.available()) {      // If anything comes in Serial (USB),
        Serial1.write(Serial.read());   // read it and send it out Serial1 (pins 0 & 1)
    }
        if (Serial1.available()) {     // If anything comes in Serial1 (pins 0 & 1)
        Serial.write(Serial1.read());   // read it and send it out Serial (USB)
    }
}
3. Burning the firmware
Follow the steps below to burn the firmware if you are using Windows.
Download firmware and burn-in tool.
After unzipping, you will see 4 files.
BAT_AT_V1.7.1.0_1M.bin: The firmware to burn to the ESP8266 module.esptool.exe: This is a command-line utility for Windows.install_r3.bat: This is the command package for Windows system, double click this file will run all the commands inside the file.install_r4.bat: Same asinstall_r3.bat, but dedicated to UNO R4 board.
Double click
install_r4.batto start the firmware burning. If you see the following prompt, the firmware has been installed successfully.
Note
If the burn-in fails, please check the following points.
Reset the ESP8266 module by inserting the RST on the ESP8266 Adapter to GND and then unplugging it.
Check if the wiring is correct.
Whether the computer has recognized your board properly, and make sure the port is not occupied.
Reopen the install.bat file.
To burn the firmware, follow these steps if you are using a Mac OS system.
Use the following commands to install Esptool. Esptool is a Python-based, open-source, platform-independent utility to communicate with the ROM bootloader in Espressif chips.
python3 -m pip install --upgrade pip
python3 -m pip install esptool
If esptool is properly installed, it will output a message such as [usage: esptool] if you run
python3 -m esptool.Download firmware.
After unzipping, you will see 4 files.
BAT_AT_V1.7.1.0_1M.bin: The firmware to burn to the ESP8266 module.esptool.exe: This is a command-line utility for Windows.install_r3.bat: This is the command package for Windows system.install_r4.bat: Same asinstall_r3.bat, but dedicated to UNO R4 board.
Open a terminal and use the
cdcommand to go into the firmware folder you just downloaded, then run the following command to erase the existing firmware and re-burn the new firmware.python3 -m esptool --chip esp8266 --before no_reset_no_sync erase_flash python3 -m esptool --chip esp8266 --before no_reset_no_sync write_flash 0 "BAT_AT_V1.7.1.0_1M.bin"
If you see the following prompt, the firmware has been installed successfully.
Note
If the burn-in fails, please check the following points.
Reset the ESP8266 module by inserting the RST on the ESP8266 Adapter to GND and then unplugging it.
Check if the wiring is correct.
Whether the computer has recognized your board properly, and make sure the port is not occupied.
Reopen the install.bat file.
4. Test
On the basis of the original wiring, connect IO1 to 3V3.
You will be able to see information about the ESP8266 module if you click the magnifying glass icon(Serial Monitor) in the upper right corner and set the baud rate to 115200.
Note
If
readydoesn’t appear, you can try to reset the ESP8266 module(connect RST to GND) and re-open the Serial Monitor.
Click on NEWLINE DROPDOWN BOX, select
both NL & CRin the drop down option, enterAT, if it returns OK, it means ESP8266 has successfully established connection with your board.
Now you can continue to follow 1.1 Configuring the ESP8266 to set the working mode and baud rate of the ESP8266 module.