9. Remote Control
This kit comes with an IR receiver, which allows you to use an IR remote control to control the movement of the car.
Required Components
In this project, we need the following components.
It’s definitely convenient to buy a whole kit, here’s the link:
Name |
ITEMS IN THIS KIT |
LINK |
|---|---|---|
3 in 1 Starter Kit |
380+ |
You can also buy them separately from the links below.
COMPONENT INTRODUCTION |
PURCHASE LINK |
|---|---|
- |
|
- |
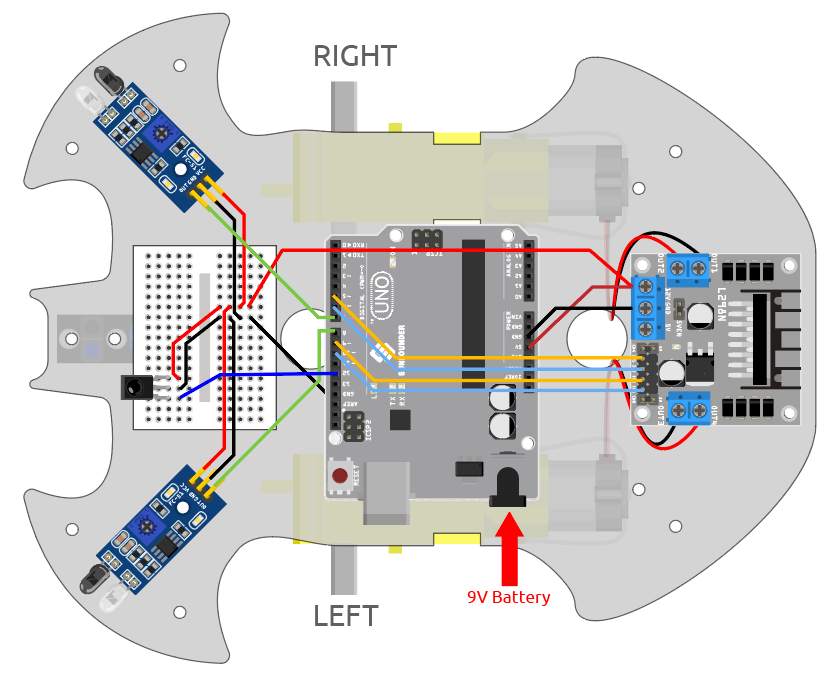
Wiring
Now build the circuit according to the diagram below.
IR Receiver |
R3 Board |
|---|---|
OUT |
12 |
GND |
GND |
VCC |
5V |
LED |
R3 Board |
|---|---|
Anode(The longer pin) |
13 |
Cathode |
GND |
Code
Note
Open the
9.remote_control.inofile under the path of3in1-kit\car_project\9.remote_control.Or copy this code into Arduino IDE.
The
IRremotelibrary is used here, you can install it from the Library Manager.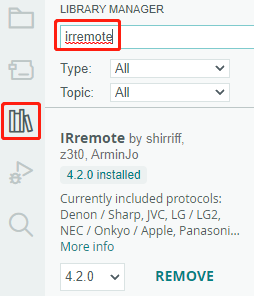
After the code is uploaded successfully, press the button on the remote control, the LED will blink once to represent that the signal has been received, and the car will move according to the button you pressed. You can press the following keys to control the car.
+: Accelerate
-: Decelerate
1: Forward to the left
2: Forward
3: Forward to the right
4: Turn left
6: Turn right
7: Backward to the left
8: Backward
9: Backward to the right
How it works?
The effect of this project is to make the car move by reading the key value of the IR remote control. Additionally, the LED on pin 13 will blink to indicate the successful reception of the IR signal.
Import the
IRremotelibrary, you can install it from the Library Manager.#include <IRremote.h> const int IR_RECEIVE_PIN = 12; // Define the pin number for the IR Sensor
Initializes serial communication at a baud rate of 9600. Initializes the IR receiver on the specified pin (
IR_RECEIVE_PIN) and enables LED feedback (if applicable).... void setup() { ... //IR remote IrReceiver.begin(IR_RECEIVE_PIN, ENABLE_LED_FEEDBACK); // Start the receiver Serial.println("REMOTE CONTROL START"); }
When you press the keys on the remote control, the infrared receiver will know which key is pressed, and then the car will move according to the corresponding key value.
void loop() {

    if (IrReceiver.decode()) {
            //    Serial.println(results.value,HEX);
            String key = decodeKeyValue(IrReceiver.decodedIRData.command);
            if (key != "ERROR") {
                Serial.println(key);

            if (key == "+") {
                speed += 50;
            } else if (key == "-") {
                speed -= 50;
            } else if (key == "2") {
                moveForward(speed);
                delay(1000);
            ...
            }
            IrReceiver.resume();  // Enable receiving of the next value

    }
}
Checks if an IR signal is received and successfully decoded.
Decodes the IR command and stores it in
keyusing a customdecodeKeyValue()function.Checks if the decoded value is not an error.
Prints the decoded IR value to the serial monitor.
Resumes IR signal reception for the next signal.